

Introduction: Changing a Flat Tire

Changing a flat tire is a skill that unfortunately, many people do not possess. Most people never had the privilege of being taught how, while others have simply never run into a situation where they needed to change a flat. No one wants to end up stranded in the middle of nowhere, so here are some simple steps to follow if you are ever in this situation.
Warning!
In the event that you do get a flat tire, try to find a parking lot where you can safely perform the tire change. If this is not possible, pull over as far as possible. The main thing is to be safe!
Step 1: Materials


You will most likely find all of the tools you will need to change the tire in the back of your vehicle. Look for a handle or strap that will allow you to pull up the floorboards. Your tools are often located there. You will need:
• Scissor Jack
• Lug Wrench
• Crank
Step 2: Remove Hub Cap
If you can't see the lug nuts on the outside of the tire, you probably have a hub cap. Simply pull it off and set it off to the side.
Step 3: Loosening the Lug Nuts
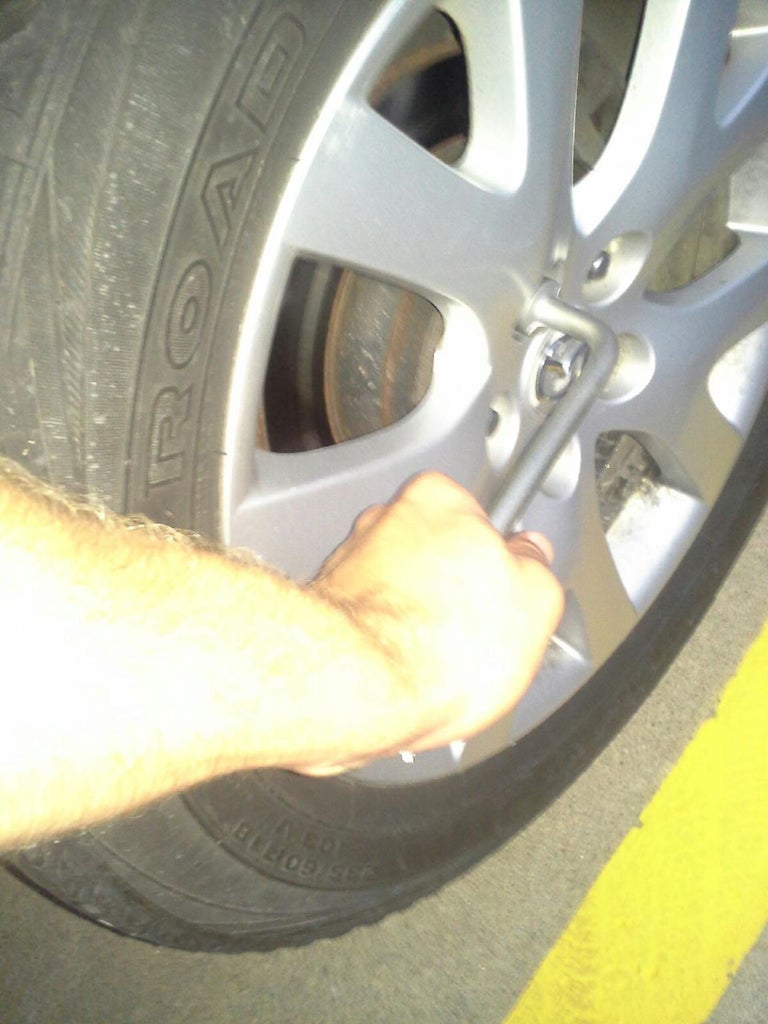

One mistake that is often made is attempting to loosen the lug nuts after lifting the vehicle off the ground. By making this mistake you will soon realize that it is almost impossible to loosen them. The tire will spin as you crank on the lug wrench. The tire being firmly planted on the ground will allow you to get the torque necessary to loosen the lug nuts. When loosening the lug nuts, do so in a star pattern. This will keep the tire from twisting as you take it off. Place the lug wrench on the lug nut and crank in a counterclockwise direction. Do not completely remove the lug nuts. Loosen them to make it easier to spin them off when your vehicle is jacked up.
Step 4: Place Spare Tire Behind Tire

Safety Step!
Placing the spare tire behind one of the good tires is an important safety step. This will keep your vehicle from any unexpected rolling that could occur while jacking it up.
Step 5: Jacking Up Your Vehicle


Make sure that your scissor jack is on a flat surface to keep it from slipping out from under the vehicle. Look under the vehicle and find a sturdy beam that will be able to support its weight. Attach the crank to the scissor jack by putting the hook through the loop on the end. Turn the crank in a clockwise direction. The jack will begin to slowly lift the tire off the ground.
Warning!
At this point the vehicle is a hazard that could potentially crush body parts. Do not position yourself or any body parts under the vehicle. Also, do not lean on the vehicle. This could cause it to fall off the jack, which would result in a much bigger problem.
Step 6: Remove Lug Nuts
You may now remove the lug nuts the rest of the way. Be sure not to lose any of them! If you have a hub cap, set them inside of it. This will keep everything you need to put the tire back on in one place.
Step 7: Remove the Flat Tire

You can now remove the flat tire from the bolts and place it behind one of the other tires, just as you did with the spare.
Tip: Sometimes the tire can be hard to pull off due to rust. Be careful, but in this situation you may need to kick the tire in order to break the rust free. Keep your opposite foot clear of the underside of the vehicle as you do this.
Step 8: Putting the Tire and Lug Nuts Back On
Place the spare tire on the bolts and tighten the lug nuts back on. Use the same star pattern that you used when taking them off. Tighten them as much as possible while the tire is still in the air.
Step 9: Lowering Your Vehicle
Turn the crank in the counterclockwise direction to lower your vehicle. Do this slowly so you don't damage your tire.
Safety Hazard!
Again, keep your body parts out from under the vehicle as you lower it!
Step 10: Tighten Lug Nuts and Put on Hub Cap
Once your vehicle is firmly on the ground, continue tightening the lug nuts in the star pattern. Crank on them as hard as you can to make them as tight as possible. You don't want it coming off while you are driving down the road! You can now replace the hub cap if you had one.


