

Introduction: Child's Quorra (Tron) Costume


More by the author:


About: I'm a .Net Developer - an avid Instructables reader. I'm an beginner, but I've got a lot of patience. Thank goodness there is so much information online! I'd like to get eventually get into robots - and who…
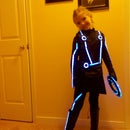
As a follow-up to my Tron Disc instructable, here are some photos of my daughter wearing her Quorra costume.
Unfortunately, I didn't have time to do a step-by-step - I barely finished the costume by Halloween. I've included as much information as possible. If you have any questions - please let me know and I'll try to fill in.
Supplies
- Unitard (with zipper in back)
- 2 x 4AA battery cases with switch (found on eBay)
- 9v battery clips
- Flexible Blue LED Strip (found on eBay)
- White Costume Satin (about 1 yard used)
- Black Costume Satin (at least 3 yards used)
- Iron activated fabric adhesive (like Stitch-witchery)
- Quilt Batting - make sure it's pure white
- Black Wig
- Black knee-high boots
- Elmers Glue
- Hot Glue
- Wire (Make sure you're using a high enough gauge wire to take the current)
- 20 Neo Magnets
- Small Washers (I used about 20)
- Super Glue
- Small piece of cardboard - about the size of the Tron Disc
Tools
- Sewing Machine
- Thread
- Sewing Needles
- Tailor's Chalk
- Grandparent who sews (Optional)
Basically - a white strip of fabric was sewn between two strips of black fabric. Enough white fabric was left to sew in a strip of batting (the kind you put in quilts). The batting diffuses the LED's light so that it's more consistent. Note quite as good as EL wire - but a little more sturdy. Assemble various pieces and sew or fuse together with iron-on adhesive.
Then, sew interconnected LED strips onto the back. Make sure you leave enough wire for movement and pay careful attention to strain relief. I had several issues with wires coming disconnected because of this.
Costume Pieces
Thankfully - my mom sews, so she made a skirt and vest for the costume. Those went on top of the Unitard. 9v snaps were used to provide power between pieces and allow easy disconnection and testing.
Choosing a unitard with a zip-up back was very important - you don't want to be sewing onto something that's going to stretch a lot.
One note - the unitard that we bought melted VERY easy - I managed to melt it in a couple of places while fusing on sections of lights. Be careful, or choose a unitard made of more temperature resistant fabric.
Battery Packs & Power
I connected 2 packs of 4 AA batteries in series to boost the voltage to the 12v required by the LED strips. These were placed in pockets sewn into the back of the Unitard. two 9v Snaps were attached to the battery pack - one to provide power to the Vest and one to the Unitard itself.
Power was provided to the boots by running wires down the leg and adding a 9v snap at the bottom. Snaps were hidden inside the boot when worn.
Disc Holder
The Tron Disc I modified includes a magnetic reed switch. To activate the switch and activate the on/off modes - the holder had to use magnets (I considered Velcro as well - but I didn't like the idea of adding velcro to something I worked so hard on).
I super-glued a ring of Neo magnets to a cardboard circle - be careful. Magnets + glue = glued fingers. I used a screwdriver and pliers to help hold the magnets in place while they dried.
That's it for now folks!

Participated in the
Halloween Photos Challenge

Participated in the
Make It Glow Challenge

Participated in the
Halloween Epic Costumes Challenge


