

Introduction: Circular Blanket Knitted in the Round


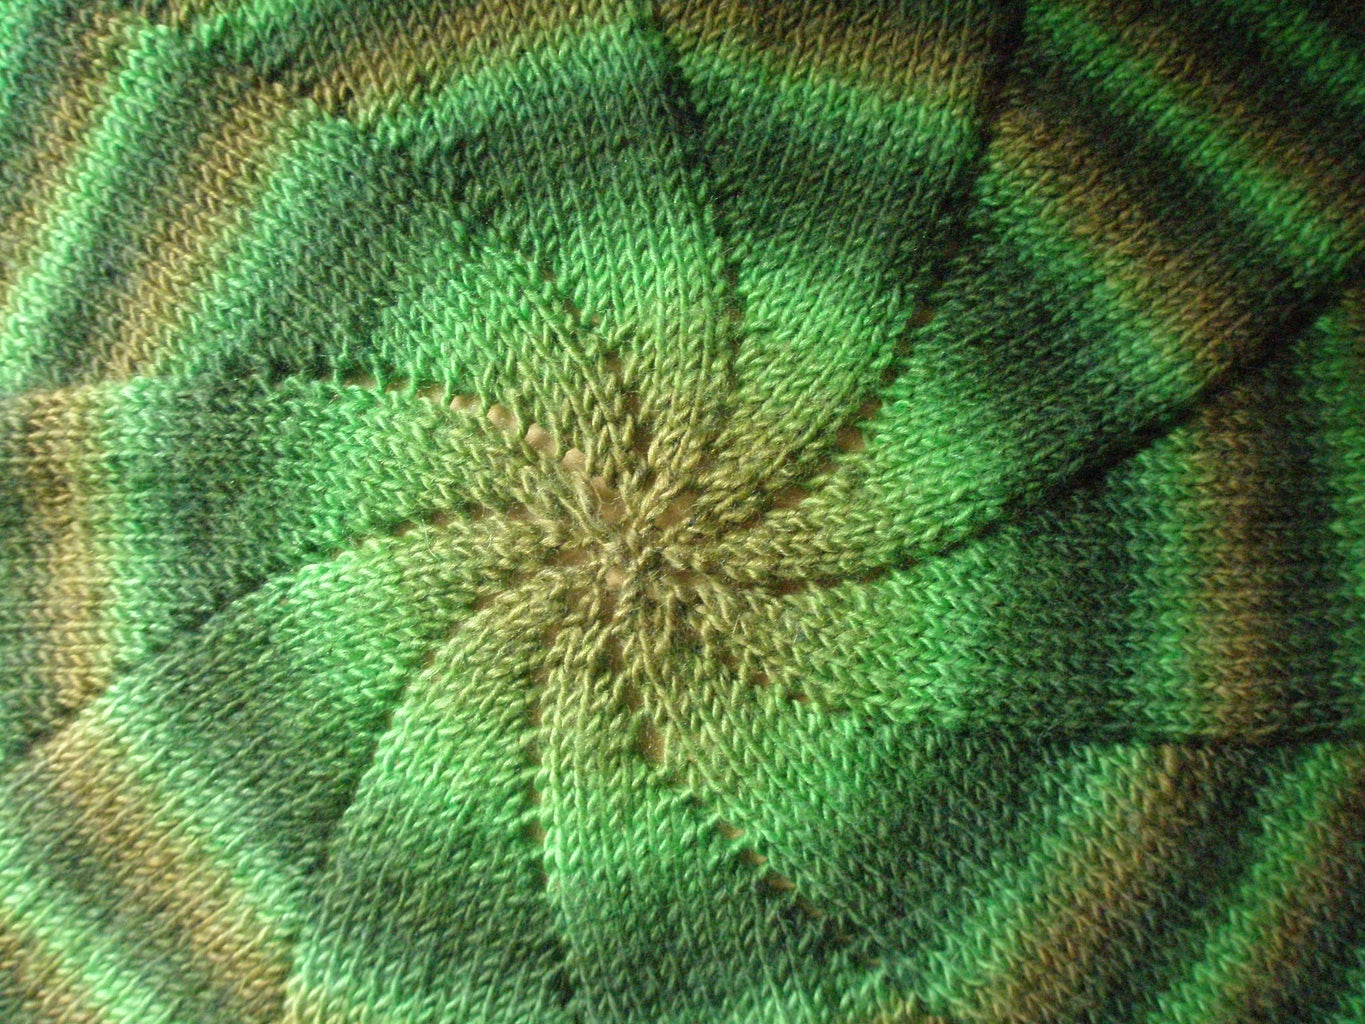
I love this blanket! It is knit in the round using yarn overs to increase every other row which creates the spiral pattern. I love knitting in the round because I don't have to constantly switch my needle back and forth, especially on projects as big as this. I always make these blankets for family friends with new babies since it's so fun and unique but you can make them in any size. It can be done in a solid color but I prefer yarn that makes stripes as you knit because it make a really interesting pattern that changes as your rows get bigger. It's also a great stash-busting project for a random striped blanket.
Step 1: Pattern, Supplies and Casting On


I did not write this pattern. I found it online here
If you just want to look at a knitting pattern, just head on over to that link and have at it! In this guide, I'm going to go over some tips and tricks to make this pattern easier.
I would recommend using worsted weight yarn or thicker, with the appropriately sized needle. Mainly, you want your knitting to really show off the swirly pattern created by the yarn-overs so you don't want your stitches too loose. You also probably don't want to use anything smaller than worsted weight, or you will be knitting this blanket forever.
The blanket I will show you how to start in this tutorial is worsted weight yarn with size 8 needles.
You will need:
at least 1 stitch marker
size 8 (or the appropriately sized needle) dpns (double pointed needles)
size 8 (or the appropriately sized needle) 12 or 16 inch circular needles
size 8 (or the appropriately sized needle) circular needles in increasing lengths. I love needles that have interchangeable cables for projects like this.
Lots of yarn. The blanket I start in this tutorial is kind of going to be a random mishmash of different yarns, but they are all approximately worsted weight.
Skills you will need:
Casting on
knitting in the round
knit stitch
yarn-over
casting off
Begin the pattern by casting on 5 stitches. I like to cast on to one dpn, knit the first row, then distribute the stitches between the other dpns and connect the round. You should place a stitch marker here. I like to position this so it is in the middle of one of my dpns so it doesn't slide off while you're knitting on the other needles.
Step 2: Counting a Lot and Adding a Double Pointed Needle


I like to knit on 3 double pointed needles until I have knitted enough rounds that the basic structure of the blanket is well established. Then I add another dpn by sliding stitches onto the 4th needle so I have about the same number of stitches on each needle. Then continue knitting as usual.
Another tip for making this blanket easier is to put a stitch marker on your needles right after every yarn over, so you have 10 stitch markers around your needles. Make sure the marker for the end of your round is a different color or somehow distinguishable from the others so you know where your rounds start and end. It can be annoying to slide the markers over, but if it's your first time making this pattern and you are somewhat of a beginner it will make your experience much easier. (I didn't use these since I have made this blanket several times before and I am very comfortable with it.)
As you get the hang of it you will probably be able to take the markers out (except for the one that marks the end of a round), but have 10 markers can significantly cut down on the time you spend counting your stitches and makes it easier to tell when to do a yarn-over if you don't know how to recognize the stitch. Don't worry, you will be able to spot on coming a mile away by the end of this blanket!
Step 3: Switching to Circular Needles


When my 4 dpns start to feel like they can't hold any more stitches (usually around 100 stitches or so), I switch to a 12 inch circular needle. To do this, I use the circular needle as if it were the 5th dpn and knit a round so all of the stitches get transferred to the circular needle. You could also slide the stitches, but you might as well get a round knitted while you are transferring the stitches. Just make sure that they don't slide off the other side of the circular needles! If you have needle caps, they might be useful for this step.
Step 4: Switching to Longer Circular Needles


After you have knitted some more rounds, your blanket will probably start to look like a weird hat because it is being gathered along the short circular needles. Eventually the needles will be so crammed with stitched that you will have to switch to a longer set. I used the same method as the last step to switch to a pair of circular needles with a longer cable. This is something you will probably have to do several times during this project as your rounds get bigger and it really comes in handy to have needles with interchangeable cable lengths. Once it is switched to a longer cable, it should look flatter and more like it will be a blanket someday. Again, make sure you don't lose any stitches off the ends of your needles while you are transferring the stitches. Needle caps would be helpful for this.
Step 5: Bind Off and Finish!


There are lots of different ways to cast this blanket off. I like to use an i-cord bind off that gives a nice trim around the edges, but there are a lot of options. You will probably have to do some blocking to keep the edges of the blanket from curling.
And there you have it! A fun and unique circular blanket!

Participated in the
Fiber Arts Contest


