

Introduction: Classy Calendar Frame


Need the ultimate Christmas gift idea? Making and giving this calendar frame to your friends and family will ensure that you always have an idea of what to give from here on out. A Calendar!
Growing up, my family had a calendar frame for those fancy calendars. (The ones we always got were from Lang.) Now that I own a home I figured that I needed one as well. This is my version of the calendar frame my uncle made for my family.
Depending on the desired finish and outcome, this project can take less than one hour or 5-10 times that. This instructable is going to cover the fast and easy way to make a calendar frame. If you want to see the more traditional and advanced method using through tenon joinery, watch the video below.
Tools and Materials
Tools
- Table saw
- Bandsaw or Jig Saw
- Router Table w/Groove Bit
- Nail gun or Brad Nails & Hammer
- Glue
Materials
- Wood
- It'll go pretty fast if you use a 1-by board from the big box store but I've gone as far as using a section of an old 4x4 fence post out of my friends horse pasture. If you want to get fancy then you could always pick up some nice walnut and maple. It's really open for you to decide.
- Calendar
- This is kind of optional but what's the point if you don't have one? Plus it might be nice to double check your measurements in case you didn't get a Lang calendar which my measurements are based on.

*The attached plans are for the calendar frame with the through tenons. If you don't plan on making this version you can simply ignore the mortise and tenons and all other measurements will be good.
Attachments

Step 1: Cut Out the Parts


If you didn't start off with some 1-by stock you'll have to prepare your wood to get it down to about 3/4-inch thickness. Using the plans that you hopefully printed out in the first step, cutting the 7 different pieces that make up this project should only take a few minutes on the table saw.
At this point you might want to lay it out to make sure everything looks right. It helps if you can use the calendar as a reference in case your's doesn't match the standard Lang calendar dimensions. (Even if you have a Lang calendar, you might still want to lay it all out for a piece of mind.)
Step 2: Add the Details


To get the curvy parts, you'll want to grab some paper, card stock or even 1/4" hard board to make a template. Cut it to half the length of the 13 5/8-inch stiles. This way, after your design is drawn and cut out, all you'll have to do is flip it over to get a mirror image. Transfer the design to the two stiles that needs it using a pencil. (Or whatever writing utensil you want.)
Cut out the designs using your bandsaw, jigsaw, pocket knife or extreme amounts of beating it with a rock and then give it a nice sanding with 220 grit sandpaper. To get a pencil groove you'll want to get out your router table and install a groove bit. If you don't want the pencil groove to go the entire length, mark the start and stop point on your router table's fence. Now you can slowly drop the piece down on the groove bit starting mark and lift it up at the stop mark. (You'll probably want to turn your router off and push the bit back just a bit off of the stop mark to keep from going any further on accident.)
Step 3: Apply a Finish


If you aren't going to be spraying your finish, right now is a good time to finish that up. Make sure you tape the ends off so when it comes time for assembly, your glue will stick better. If you are going to be spraying or just applying a clear coat, doing it after final assembly would probably be much easier.
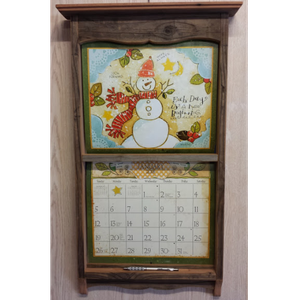
This is a good place to get creative, the two finishes I show in the above pictures are slightly different. The teal one started off being painted brown and then I applied a watered down teal paint. The pictures don't do it justice but the brown seeping through the teal gives it a really neat effect. The other picture shows some old barn wood where the fresh cut pieces had some watered down teal painted on and then quickly wiped off.
Step 4: Assembly


Before you get out your glue, you'll want to pull out that calendar you hopefully have and make sure everything lines up. If you have a different style than a Lang, your center divider might need to move a little bit so you're not covering up the month name. Same goes for the bottom stile or pencil holder. You'll want to make sure it is high enough that the calendar will tuck behind and stay there.
To hang the calendar in the frame, I choose to drill a small hole and stick a brad nail in it. I did have to clip off a bit so it wasn't too long but that depends on what you have on hand.
For a fast assembly, just some wood glue and a brad nail gun will finish it off in a matter of minutes. If you decide to use a hard wood you'll probably need to take some additional measures on top of glue and brad nails.
Step 5: Enjoy


This is a great project to give away as a Christmas present. You can make a TON of them real fast or you take your time and put some great details in. As an added bonus, it gives you something to give your in-laws for every Christmas from here on out.. A Calendar!

Participated in the
First Time Author Contest


