

Introduction: Complete Bathroom Renovation


This is a small bathroom but it needed a complete overhaul to save it from 'just plain ugly' - a designer's nightmare. From the floors to the walls to the lighting, everything had to be done. I wanted to do it myself to save money on labor. This did not help me save time by any means.
I have tiled a few floors in the past and done some plumbing and electrical but had never tiled a shower stall or gutted a room entirely. This was a challenging first but I learned a lot to share along the way.
Warning - Try not to drop over in disgust at the before pictures in the next step.
This is my first instructable so my pictures were vertical and horizontal. I didn't realize they needed to be all the same so some of them don't show well with the formatting.
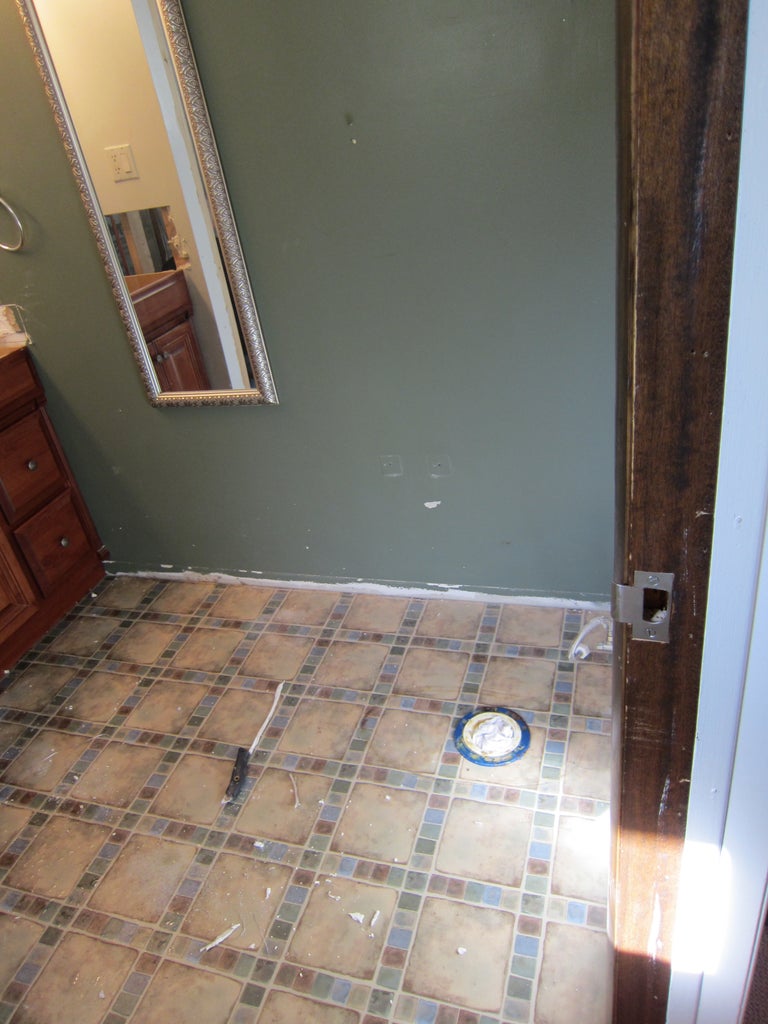
Step 1: Before Pictures


This bathroom was the ugliest one I had ever entered. Every time I walked in there I cringed so I knew no matter how much stress and time it would take it would be worth it in the end.
The poor taste in decoration was from the previous owners. Most of the pictures were taken when we did the walk through to finalize the purchase of our house. After we moved in the ugly bones remained and we lived with it for almost two years.
Step 2: Demo


Get a dumpster and wear gloves. The smallest dumpster our waste company offered was all we needed.
Demo is the best part. Be careful not to destroy wiring and plumbing while taking out your stress.
After I ripped out the shower we found the original 1966 mint green tile. I liked it much better than the mildew infested shower surround.
This was done so long ago the tile and plaster walls were held on with heavy metal mesh. I had to purchase a reciprocating saw to get through it. If you have dealt with plaster walls you might know what I'm referring to. Be sure to make only the necessary cuts to avoid having to redo too much drywall.
When removing the toilet I would recommend using some sort of pump to remove all the water first. I didn't have a pump and was in a hurry so toilet water splashed all over the floor. Yeah, it was gross.
Remove all baseboards with a flat crowbar making sure not to mar them. If you have a large enough space I recommend numbering the pieces or making some sort of map so you can easily reinstall them if you aren't replacing them. I did not replace mine, just painted them white.
Since the sink/counter top was built into the walls (because it was too wide) I had to cut the walls which didn't end up mattering because the new sink I purchased was also too wide for the opening and unfortunately I had to do the same thing the previous people did and build it into the walls. I guess it is that much more secured in place. The vanity cabinet slid out without problem.
I tore up the linoleum floor in one piece just by ripping it off. You may have to use a scraper if your floor is really stuck down.
Remove any other items from the walls. Accessories, mirrors, lighting, etc.
Demo complete.
Step 3: Frame and Install Shower Pan


Get a buddy to help. I managed to recruit my dad to help with some of this.
In anticipation of my 200 pound shower door I put 4 studs in the left side of the shower wall. Definitely not overkill in this application in my opinion.
After the space was framed out with 2x4's I used 1 1/2 inch styrofoam insulation to insulate the walls. When you need to make cuts in the styrofoam it's easy. Just score with a utility blade and snap the score along a 2x4 (or large work bench) to fit between studs. Next staple 4mm vapor barrier onto the studs covering the entire area using a staple gun.
The best part is hanging the concrete board. Use 2 1/2 inch concrete screws for this. I was concerned about the weight of the tile that was going up so I used long screws.
Once the concrete board is up mix morter according to package directions and apply to cracks of concrete board using a flat trowel to smooth and seal. Use silicone caulk for the corners and where you aren't able to use morter. Knock down any raised areas of morter.
You will need to install the shower drain before putting in the shower pan. I chose a no-caulk drain and thought it would be easier but quickly found out it HAD to be caulked. Luckily my basement is exposed so I was able to get right under the shower and tie in the new pipes to the water line. If you don't have the know how to do this - hire a plumber.
Ready to install the shower pan. There are many options out there of kinds of pan materials. Acrylic vs fiberglass vs cast iron - what to use? I chose an acrylic pan after much research leading me to believe acrylic was stronger and more durable than fiberglass and less expensive than cast iron. Do research of your own to determine what is best for your space. In short, however, you want something that won't bend, flex and/or squeak when standing in the finished shower. If you have a standard sized space shower pans some are readily available at your local home improvement store. Ordering may be necessary so make sure to fit that into your time frame for renovating or this project will drag out for months.
Lay tar paper cutting an appropriate sized hole for the drain and lay on the subfloor. Mix a 40 lb bag of concrete according to package directions and pour evenly on the tar paper where shower pan will be. Place shower pan and press to level. I purchased a 4 foot level to make sure this was exact. This is the last thing you want to be off.
Let the concrete dry for 24 hours. Put in strainer plate.
Step 4: Tile the Floor and Paint Walls


While the concrete is drying under the shower pan tile the floor.
Screw concrete board to the subfloor covering the entire area to prepare for tiling.
I chose an italian porcelain rectangular light gray canvas tile. It looks like shiny canvas. It's rad. I purchased it from www.ppltile.com along with the mosaic tile for the shower. The mosaic tile was 3 weeks late but other than that the pricing seemed good and the customer service was fine.
Mix thin set according to package directions.
Using a 1/4 inch square trowel spread a layer of thin set (I used Mapei) on the back of one tile and press into place. I used 1/8 inch spacers to space my tile and put them in a brick pattern.
I chose to purchase a tile saw to make my cuts but check with your local home improvement or hardware stores to see if you can rent them. If I rented one for three hours it would cost more than buying one so I chose the cheapest option and now have a tile saw on hand for my next project.
Let thin set dry for 24 hours before grouting.
Remove spacers and mix grout according to package directions.
Since I had such a thin grout line I used (Kera Color S (sanded) Charcoal) and a grout trowel. Have a 5 gallon bucket of water, a sponge and an old dry towel handy. Grout off approximately nine square feet at a time pressing into the grooves leaving no space or air pockets and remove as much excess grout as possible with a damp sponge. Make sure to get off all the grout. You can use a dry towel to remove the film you see on the tile before it is completely dry.
We're not close to done people. Now paint the walls and ceiling. Need I explain? If you are attempting a bathroom renovation you have painted walls and ceilings before.
Step 5: Tile the Shower


I chose thin set as opposed to mastic and used Mapei Ultra Flex 1. Do research to see what will work for you but I was impressed with the thin set. It set up quick which was key for hanging wall tile. I highly recommend it.
I again chose an Italian porcelain gray mosaic tile for the shower walls. It came in 12x12 inch sheets held together with a wax like substance that could be easily cut to size.
Apply thin set to the shower walls using a 1/8 inch trowel starting at the bottom and press a sheet of tile onto the thin set with your hands or other method to make sure it is flat. Repeat and repeat again until you get to the ceiling.
I was concerned about cutting these mosaic tile sheets on the tile saw since they are connected with that waxy stuff but it worked great and didn't tear apart when applying pressure to push the tile through the saw.
Let thin set dry for 24 hours before grouting
I chose Kera Color U (unsanded) White grout. Mix according to package directions and scoop grout onto the grout trowel and press grout in all the spaces. Take time with this as to not miss any areas.
Once grout is completely dry caulk, with paintable caulk, around the ceiling, shower pan and where the tile ends on the walls.
Wait 24 hours to apply grout sealant. Sealant is necessary to prevent moisture penetration. You will also want to apply this to the floor.
Step 6: Install New Light Fixture


If you have never done any electrical wiring I would recommend either hiring someone or following exact instructions that come with any new light fixture. This can be dangerous if not done correctly. Don't zap yourself.
Unfortunately, I don't have pictures of this process. Just the finished install. This is a Hinkley light fixture.
Step 7: Install Vanity and Toilet Topper


I ordered a vanity cabinet after seeing a floor display at the local home improvement store. It doesn't show so much in this picture but it was orange and ugly. We sent it back for a new one. Don't be afraid to do this if you get something you don't like. People are willing to work with you to correct a problem. They agreed with us that the cabinet was on the orange side and not natural wood.
Put the cabinet in place and shim if necessary to level it. Screw the back wood panel into the studs in two places to secure.
Using screws (not provided with the toilet topper) screw into studs to secure. Add decorative knobs if desired using provided template.
Step 8: Install Sink, Faucet, Shower Head and Toilet


Run a line of caulk adhesive along the top edges of the vanity cabinet and place sink on the top pressing into place. This is a rectangle sink with a flat bottom. If you get something similar make sure the sink is leveled correctly to avoid improper draining and pooling in the sink. Read reviews when purchasing new items. It is very helpful to avoid problems people have had.
Reinstall the toilet using a new wax seal.
If you had to cut any part of the wall to make the sink fit now is the time to fix that with new drywall where it was damaged.
If you don't have experience with any plumbing you could hire a plumber in install shower and sink fixtures. I did it myself. Follow instructions to avoid any leaks. Again, not something you want in a reno project.
Tip - Take a picture of the pvc pipe before you remove it. That way you can reconstruct it after and avoid purchasing new. You will need to clean it very well. It will be massively gunked.
Step 9: Tile the Backsplash

I used mastic and a 1/16 inch v notched trowel to adhere the tile backsplash. Cut any necessary pieces with tile saw.
Mastic should dry faster than thin set and you can begin grouting after about 12 hours but follow any package directions to be safe.
Grout the same way as the shower stall making sure to wipe off any excess to avoid getting a permanent film on the tile.
I chose to cut the tile to make a stair step look instead of just having it straight around. It's more designerly.
Caulk the top edge and around the bottom edge where tile meets the sink. Use paintable caulk.
Step 10: Paint Window Trim and Wall

To match all the rest of the trim in the house I chose to paint the window trim white. I also painted the wall a bright blue. A nice contrast to all the gray and white in the rest of the space.
You will need a window treatment of some kind for privacy. Ready to cut cellular shades are available at most home improvement stores. This one was a Bali custom shade since the window is so small and it matched the rest of the house.
Step 11: Install Accessories


Install bathroom accessories as necessary. Towel bar, toilet paper holder, towel ring, door hook, etc. Easy enough to install with screws and mini screws.
Step 12: Have Shower Door Installed


It weighed more than I do and I had no one to help. Need I say more?
Since I chose to not have an inset for a soap/shampoo shelf so we installed a floor to ceiling wire rack. They are available at Target and Bed Bath and Beyond.
The project finally wraps up into a fully functional bathroom. I am very pleased.
Based on our initial budget of $3500 we came in at the low low price of $5750 - OUCH!

Third Prize in the
Fix & Improve It Contest


