

Introduction: Create Space and Get Rid of Wires With This Shelfie


This is how you can create space with a design look and get rid of those horrible wires, modem and sockets. This inscrutable involves woodwork. Some experience with laser cut parts or CNC milling of wood and drilling holes is advised.
You need:
1x lasercut plywood shelf. (Size 70 x 70 cm. You can use my PDF and order it at a company that can laser cut or CNC-mill wood.
4x screws and rings from the hardware-store
Glue for wood
Drill for concrete of type of wall you have at home
Wrench
Level
Tape or clamps
Pencil
Wet cloth

Step 1: Mounting and Drilling


First of all you need the shelf. You can use my PDF and order it at a company that can laser-cut or CNC-mill wood. Use 6 mm thick plywood, MDF, bamboo or acrylic for this design. The drawing is meant for a 1200 x 600 mm board. Note that you need 2 of the same boards to create this shelf. Every part needs to be cut twice! On the drawing there is a large and a tiny one.
Place the first part on the proper height. I fixed it as low as possible to hide as much of the wires. Hold it leveled and use a pencil to draw a line.
Drill the first holes.
Most handy for now is to fix the part with two or more screws. Or you'll need more hands to help you later on.
Then place the second part on the other side of the wall and make sure it's leveled.
Step 2: Assembling the Shelf


Now it is time to assemble the shelf. It consists of a lot of parts so you need some puzzling and patience.
Take the two parts you fixed on the wall in step 2 and assemble the whole shelf with a proper amount of glue. Apply enough glue to the slots. It doesn't matter if it pores out when you put the parts together.But don't forget you must remove the glue drops with a wet cloth, otherwise it will stain on the wood when it dries.
Use tape or clamps to secure some parts from moving during this process.
Let the glue dry
Step 3: Mounting the Shelf


This is the last step. After you've assembled the shelf, fit it to the wall.
This requires the 4 or more screws/rings and a wrench and some patience. The space in this design to move the wrench is limited, but you'll manage.
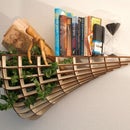
After this you can start decorating and enjoying your new created space.

Participated in the
CNC Challenge

Participated in the
Small Spaces Contest


