

Introduction: Creating 3D Clothes From Marvelous Designer Patterns Tutorial


In this free Marvelous Designer patterns for clothes tutorial you'll learn how to recreate dynamic 3D clothing from Marvelous clothing patterns.
I'll show you how to import a Marvelous Designer pattern, how to scale the Marvelous Designer pattern to the correct size and how to accurately trace the pattern. Next you'll learn how to sew the Marvelous clothing pattern pieces together. Lastly you'll see how to apply textures and custom Fabric Presets (Physical Property Presets) to complete the dynamic 3D Marvelous Designer clothing item.
Here below you'll find the how to use Marvelous Designer patterns video tutorial.
After the Marvelous video tutorial, you'll find a step-by-step written Marvelous Designer howto tutorial that you can download as a PDF for fast reference later.
To follow along this tutorial, download the free Marvelous Designer clothing pattern for this tube skirt including the physical property presets.
Step 1: Marvelous Designer Video Tutorial on How to Use Marvelous Clothing Patterns
Here is the Marvelous Designer video tutorial how to create clothing from Marvelous Designer patterns for clothes.
Step 2: Get a Marvelous Designer Clothes Pattern to Use

To create 3D clothing in Marvelous Designer, you need a Marvelous Designer pattern.
Marvelous Designer patterns are different than real world sewing patterns which can often be confusing with various other lengths and calculations for seam allowances etc., which are not necessary for creating digital 3D clothes. Also, most sewing patterns are made for printing out on paper and do not have a clear overview of the pattern, but are spread out over many pages for use in the real world.
Asides from that, it can be very time consuming to try to use real world sewing patterns in Marvelous Designer software since creating 3D clothes is often different than real world sewing and you have to figure out how to make different effects in Marvelous Designer which are not covered in real world sewing patterns.
Step 3: Adding Fabrics for the Different Pattern Pieces

The first step, is to add as many Fabrics in Marvelous Designer as you need for all the different parts of the clothing item. Click the +Add icon and give your Fabrics the appropriate name for the correct clothing part.
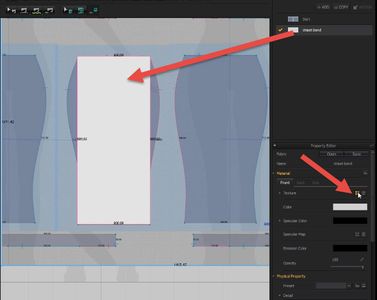
Step 4: Importing the Marvellous Designer Pattern for Clothes Creation


The next step once you have your Fabrics created, is to click on the icon as shown in the screenshot above and load in your Marvelous Designer pattern as a Fabric texture.
Step 5: Applying the Marvelous Designer Clothes Pattern

Using the rectangle pattern tool, draw out a large rectangle and apply the Fabric with the pattern texture on to it.
Step 6: Correct Scale of Marvelous Designer Clothing Patterns


Now we need to get the Marvelous Designer pattern to the right scale so we can trace it in the next steps.
In order to scale the pattern to the correct size, we need a reference point. Find a segment line that has an easy length like for instance a round number of 300 mm.
Once you've decided on the length you'll use as a reference point, take your rectangle pattern tool, right click on the 2D pattern window canvas and type in the same length like the segment line you are referencing.
(If it is not a round number such as 300 but 245 that is fine too).
The height you make this reference pattern piece is not important, but I recommend it is around 100 so it doesn't catch up too much space.
Step 7: Scale Reference for the MD Patterns


Apply a different fabric onto the reference pattern piece and position it over your rectangle that has the Marvelous Designer clothing pattern texture.
Step 8: Scaling the Marvelous Designer Clothes Pattern


Using your texture transform tool scale the Marvelous Designer pattern on the X transforms until the segment line you were referencing matches up with the reference pattern of the same length.
Do NOT scale the texture horizontally or vertically as that will distort the Marvelous Designer pattern!
Once the two segment lines are aligned to the same length as close as possible, you are ready to trace your pattern.
Step 9: Tracing the Marvelous Clothing Patterns


To trace the Marvelous Designer clothing pattern, we will once again take the rectangle tool and draw out a rectangle the width and length of the pattern piece we want to create.
Step 10: Recreating the Marvelous Designer Patterns


To extend the rectangle down to the bottom of your pattern, use your Edit Pattern tool and pull the segment line down.
Step 11: Making the Marvelous Designer Pattern Transparent


By default your last used fabric will be applied to this new pattern piece, which will likely be the fabric with your Marvelous Designer clothing pattern on it. This will be very confusing and make it hard for you to trace your pattern, so apply a different fabric preset onto the rectangle. If you don't have any color or texture on this fabric it will be white. We want the fabric to be transparent so we can see through it to the Marvelous Designer pattern cheat below so we can accurately trace the pattern.
To make the pattern transparent, click on the load texture icon and load in a PNG image that is completely transparent. (You can create this in Photoshop, Fireworks, Gimp or any other image editing software, by simply making a small sized document with a transparent background without any layers or color and saving it out as a PNG).
Once you've loaded in your transparent texture, you will no longer see your white rectangle, instead you'll just see the outline of it.
Step 12: Tracing the Marvelous Designer Clothing Pattern


Now that our pattern is transparent, we can easily see through it to the Marvelous Designer clothing pattern reference image beneath and using our Edit Pattern tool move the segment lines and points to match up. To make the pattern curved, use the Edit Curve Point tool and manipulate the points until the curves match that of your Marvelous Designer clothing pattern image.
Step 13: Creating Waistband Patterns

To create square or rectangle shaped patterns for waistbands etc, simply right click with your pattern tool on the 2D pattern window canvas and type in your desired width and height using the underlying Marvelous Designer pattern as a reference.
Step 14: Making the Transparent MD Pattern Visible Again

Once you're done tracing out all your pattern pieces, delete your big rectangle with the reference texture of the Marvelous Designer patterns.
You'll be left with your transparent pattern pieces. Delete the transparent PNG texture in order to see them so you can better work with them.
Step 15: Creating Symmetric Marvelous Designer Patterns


Many Marvelous Designer clothes are made with symmetric patterns (you can tell if two patterns are symmetric to one another by the blue bounding box and blue line that connects them).
Instead of retracing the other symmetric pattern piece, simply right click on the pattern you made, Copy and then right click on the canvas and select 'Symmetric Paste'.
Step 16: Sewing the Marvelous Designer Pattern Pieces Together

Now its time to sew together our Marvelous Designer patterns!
Take a look at the colorful sewing lines on Marvelous Designer clothing pattern you are recreating your clothes from. You can easily see what segment lines get sewn together since the matching seamlines have the same color to them. Asides from that, most of the Marvelous Designer patterns by CG Elves also come with several other screenshots including very clear connecting seamlines.
Step 17: Arranging the Marvelous Designer Patterns Around the Avatar


Now it's time to arrange the clothing patterns around your avatar. Click on the Avatar Arrangement Points icon or use the hotkey SHIFT F to bring up your avatar's Arrangement Points.
Next click on a pattern piece and then click on a suitable Arrangement Point to wrap the pattern piece around your avatar's body.
Step 18: Importing a Marvelous Designer Physical Property Fabric Preset

Most of the Marvelous Designer clothing patterns also come with custom physical property presets, so before you simulate, make sure to load in the corresponding physical property preset.
Different physical property settings can greatly change the way your clothes hang, drape and animate.
The same clothing item can look SO different with a different setting.
It is very important to have the appropriate settings and by using a preset you can save yourself hours of work and frustration!
Sometimes it can take longer to get the perfect physical property settings just right, than to make the clothing item itself.
Step 19:

After sewing everything together and simulating, load in any textures you want to complete your Marvelous Designer garment.
I hope this Marvelous Designer patterns tutorial helps you!
If you need Marvelous Designer patterns for clothes, check out CG Elves mega bundle of 124 Marvelous clothing patterns and 300+ Physical Property Presets.


