

Introduction: DIY High-Speed Book Scanner From Trash and Cheap Cameras


I love books. There is some truly fantastic knowledge and information hidden out there in hard to find, rare, and not commercially viable books. I find that I want my books with me everywhere. But that's where the problems begin. Buying, moving, storing, and preserving books means environmental costs... and when I loan a book to a friend, I no longer have access to it. Digital books change the landscape . After suffering through scanning many of my old, rare, and government issue books, I decided to create a book scanner that anybody could make, for around $300. And that's what this instructable is all about. A greener future with more books rather than fewer books. More access to information, rather than less access to information. And maybe, years from now, a reformed publishing/distribution model (but I'm not holding my breath...).UPDATE: We've outgrown the Instructables commenting system. There's a new place to discuss book scanner building -- please join us at DIYBOOKSCANNER.ORG -- and BTW, you don't need to register to get a PDF of these instructions. UPDATE:9/16/2011 - Instructables has kindly made the PDF download public for everyone. Thanks, Eric. UPDATE: If you're actually planning to build one of these things, you really should visit DIYBookScanner.org. I have a new set of plans there that is much simpler than these ones. I've built two of these things now, and this instructable covers the best parts of both of them. You can build a book scanner using only hand tools plus a drill. I realized that not everyone is comfortable with using all the different hand tools you might need to make it. So I scanned a book on using hand tools that should answer all your questions. ;)Download a sample here.Download the entire book (115mb) here. I may have to remove this if there are too many downloads. Please note that these were taken before the scanner and software were complete. Scans from the final system are much nicer. We have written some open-source, free software to convert the images from your scanner into PDFs. It's currently in a rough alpha stage, and needs a pretty fast computer to get things done. It works on Macs and PCs. Help us improve it! This software is covered on step(78-79). EDIT: Many people have commented that an automatic page flipper would be faster. I think this system is pretty fast. I made a comparison video if you'd like to see how this compares to an automatic scanning system. And you can watch a movie while you work on my system. Let's get to it! UPDATE, 2009-04-28. Step 1 now contains a beta-quality printable PDF materials list.
Step 1: Material Acquisition: Dumpster Dive in the Day With Your Camera


Let's start with getting the things you need.This book scanner employs recycled, found, and salvaged materials at every step. I think it's important to note that this is not only because it is the right thing to do, environmentally speaking, when prototyping and building things, but also because the major thrust of this project is to make it affordable for almost anyone. Affordability often means getting creative with what you have and what you can find. UPDATE-2009-04-28 -I've made a PDF materials checklist. It's currently in beta. Please help me perfect it!UPDATE-2009-4-29: Here's the parts list by Autophile, who's almost completed his own scanner.One of the problems of building this way is that there is a strong stigma against recovering things from the trash. I'll admit that this affects even me on occasion. With that in mind, I want to show you a little dumpster diving trick that's socially acceptable. It's terribly simple. Take your camera, and hold it over the edge of any dumpster you find interesting. When you get home, see if there's anything that will help you. Later, return under cover of darkness and recover whatever it is you needed. I spent almost a month thinking about this second book scanner and where to find stuff. During this month, I was vigilant about noting the locations of various construction dumpsters, and I also kept an eye on trashcans whenever I passed them. Whenever I saw something interesting, I made a simple decision. Should I grab it now, or simply photograph it? If it was a dumpster, I photographed it. If it was something useful, I grabbed it right away. It's good to keep a fabric shopping bag or backpack on you to transport all the stuff you will inevitably find.
Step 2: Material Acquisition: Tools and Why You (Might) Need Them


Often construction dumpsters have objects that are awkward to grab or even too large to fit in a car. For this reason it is good practice to bring some tools. I have a drill and a "sawzall" that come with me when I'm dumpster diving. With these tools, I can remove interesting parts of things, salvage screws and hardware, etc, as well as cut boards in half if they are too big to fit in my car. You should also have a flashlight and heavy gloves to protect your hands. In terms of this project, I would argue that using recycled materials is actually only a secondary benefit because the environmental benefits of using digital books really add up over time. Using recycled junk isn't just a challenge, it makes walks and watching purposeful, lightens the load on landfills and trucks, and makes up for other areas where you may not be as conscious as you'd like to be. It also sets the precedent that while finding everything at the Home Depot or hardware store is fine, finding the stuff out of the ether is far better.
Step 3: Material Acquisition: Buying Recycled Stuff.


Finally, dumpsters are far from the only place to find things. This project requires some things that you will never find in dumpsters -- like working light bulbs. For this, look to places which explicitly work in recycling. In my community, Habitat for Humanity ReStore is a fantastic resource. They had the paint I wanted, the halogen light bulbs I needed, and even a light fixture that worked to hold my lightbulbs, all for profoundly reduced prices. You can find the HDPE you need in the form of cutting boards at thrift stores. And you can also ask friends and family if they have extras. Chances are, they do or they know someone who does. Another great spot are hazardous waste recycling facilities. Mine has a "materials exchange" where you can get paint and glue for free.
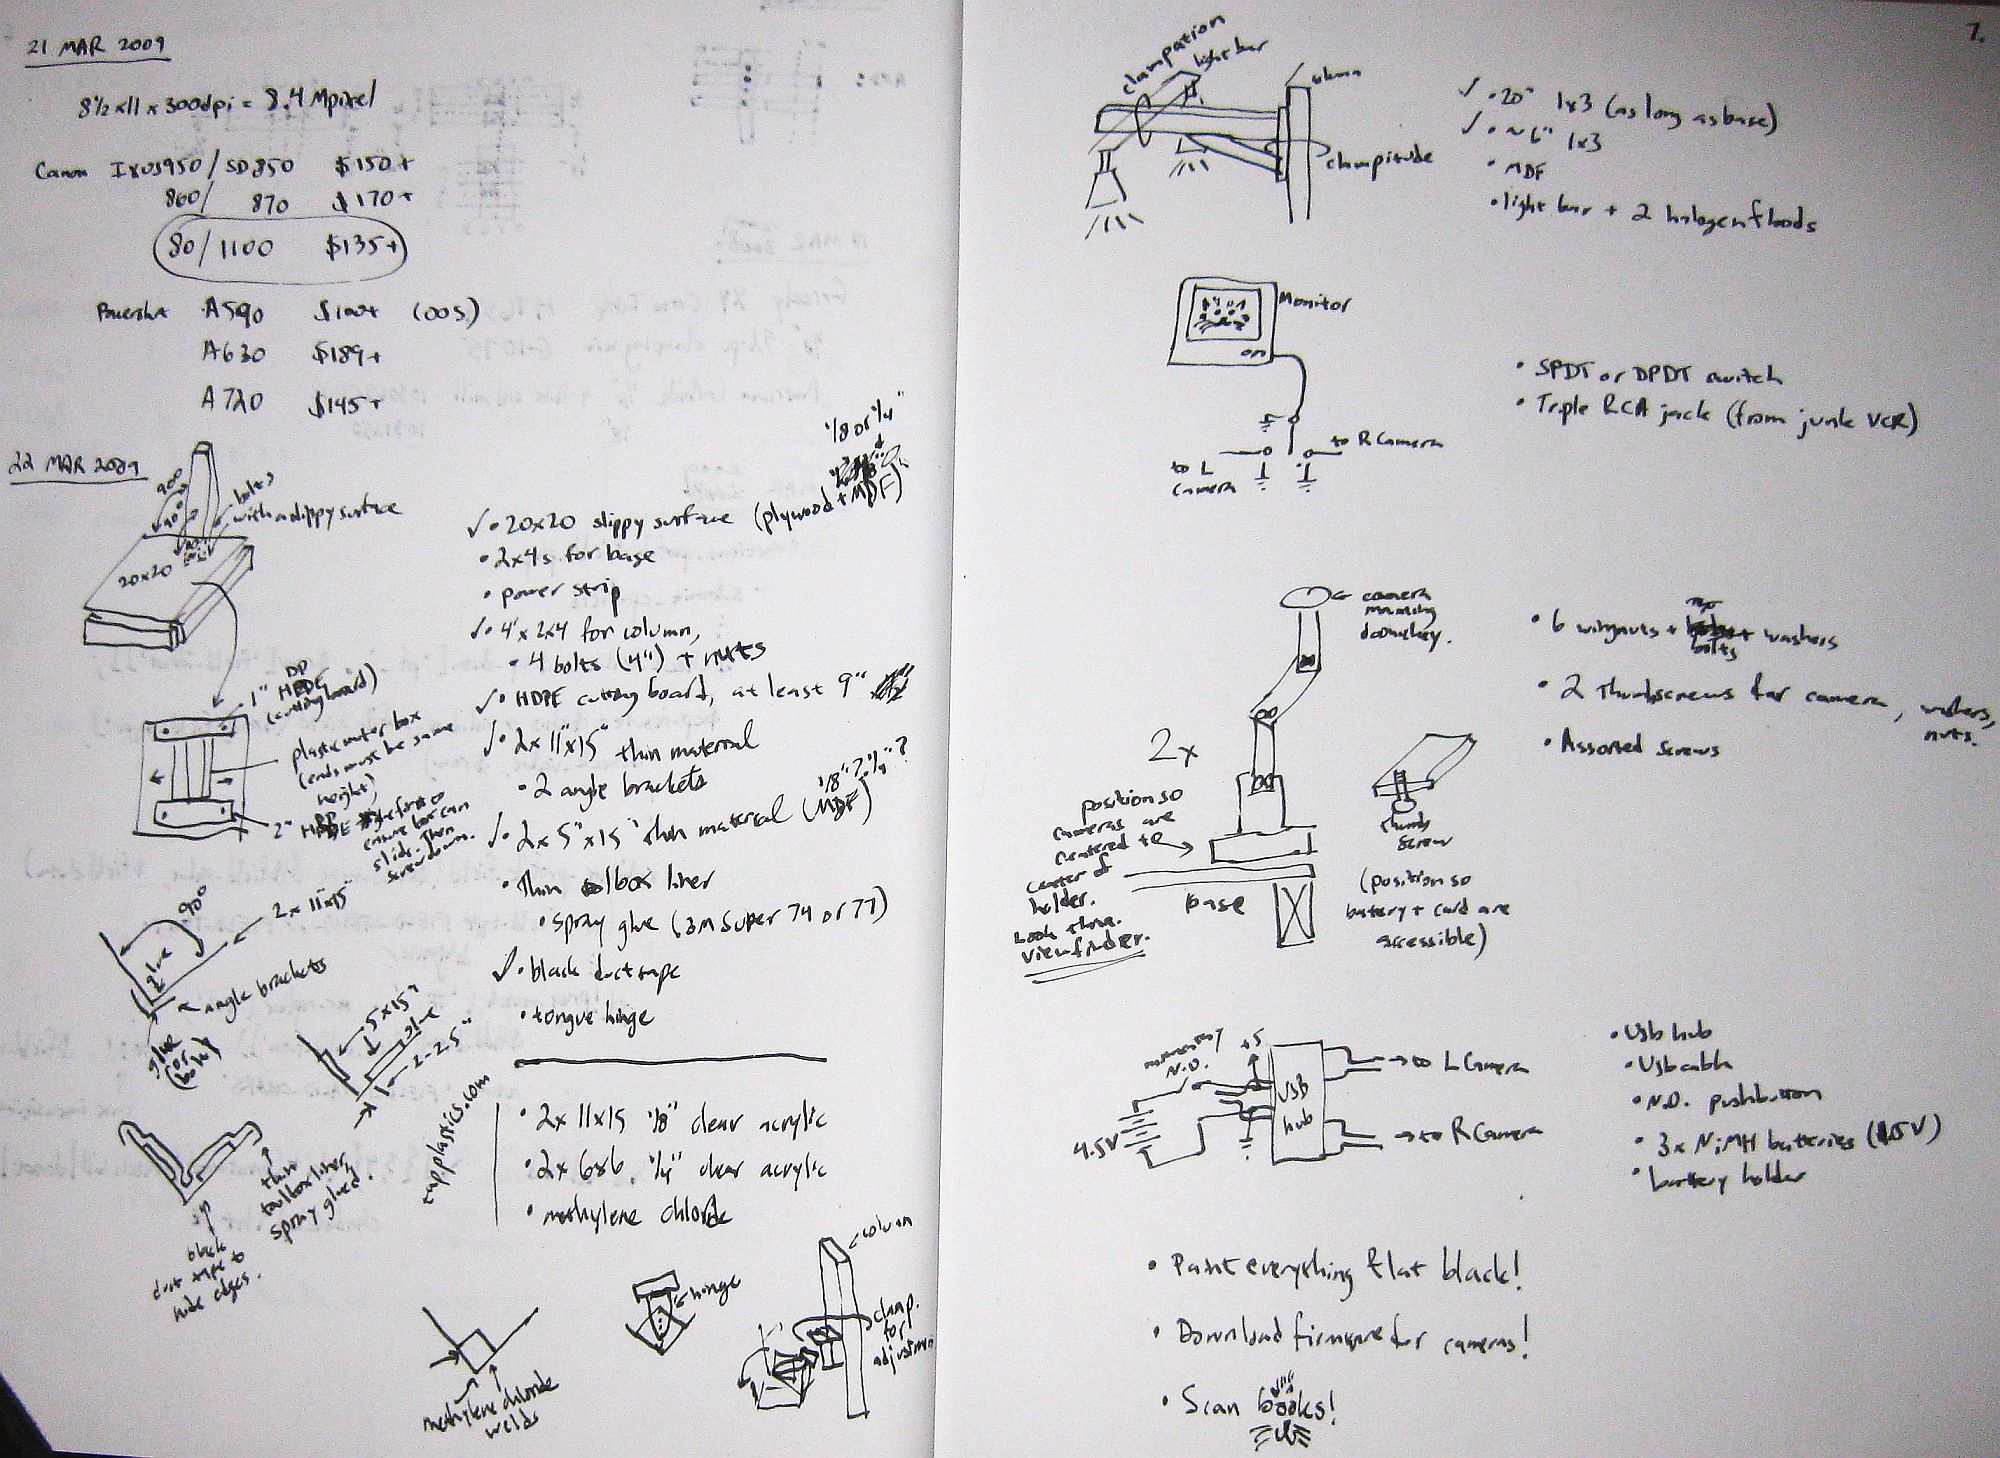
Step 4: Base: Materials


To make the frame, you will need to acquire some materials. I was able to get almost everything from the trash.*. You need an 8' 2x4 or the equivalent in smaller pieces. You need at least one piece that is about 4' long. You can make almost the entire base from this single board. I was able to find one 8' piece in the dumpster of a construction site near my house (See: Material Acquisition Recommendations). Later, I found a few more short scraps of much nicer stuff.*. You need 4 bolts (at least 4 inches long), 4 nuts and a handful of woodscrews. I was able to find bolts in the trash (during Fargo's famous Spring Cleaning Week), but all the screws I found were too short. My friend Wolfgang loaned me some deck screws because he had a lot of them left over from building his workshop. *. You need large-ish piece (20x22 or larger) of either countertop material, coated MDF, melamine, or plastic. I chose countertop material because I was able to find it in a local dumpster. Often you can get such cutoff pieces at no cost simply by asking. Additionally, if you wait until the end of the month when people are moving from apartment to apartment, there will be pieces of furniture like desks, coffeetables, and bookshelves that have the right finish. The important thing is that the surface be a little slippery. *. You need a power strip. This will be the control center for your lighting. You can get away without it if they are hard to come by or expensive. I found mine in the trash on moving day.
Step 5: Base: Preparing and Cutting the Wood


Cut your board into appropriately sized pieces. Because it is easier to cut 2x4's than countertop material, I simply measured my piece of countertop and sized the boards to it. I was not particularly careful about this and you do not need to be careful about it, either. Just get things close. NOTE: If you got your board out of the dumpster, as I did, you will want to be sure to get all the nails out of it, ESPECIALLY if you are using power tools to cut it. Pulling nails takes all of a couple minutes and means you get to save money on new materials. It prevents you from unnecessarily dulling or ruining tools. It is worth it.
Step 6: Base: a Drilling Template for Speed


Make a little template to drill pilot holes for your woodscrews. I used this piece of plastic angle, but you can use anything, even a folded piece of cardboard. Simply measure and mark the distance to halfway across the short side of a 2x4 (.75"). I marked two holes. Using this template, all my pilot holes lined up neatly and it saved time and headscratching. If you're paranoid, like I am, check the fit of your materials. I did this simply by setting the countertop on my boards to make sure everything lined up.
Step 7: Base: Screw It.


Screw it together! Here is the assembled base. For fun and to check the fit of my work, I rested the countertop on it again.
Step 8: Base: Cut the Column Piece.
If you haven't already, cut your column piece. It is nothing more than a 4' piece of 2x4.
Step 9: Base: Drilling the Column


Now we need to attach the column. In this design, the base is attached to the column with four bolts so that the scanner can be torn down and moved easily. I simply measured 4 holes and drilled them. It was necessary to countersink the holes for my bolts because my bolts were too short. If I had purchased the bolts new instead of pulling them from the trash, this would have been unnecessary. Since I have already collected tons of bolts, it was worth the small amout of effort to countersink, and it saved me ANOTHER trip to the hardware store. I used the Harbor Freight Tools clamps to hold the column on the base and used the holes in the base as a template for drilling. This assures that everything lines up neatly and that the column is straight.
Step 10: Base: Bolt the Column in Place.


Bolt the column in place.
Step 11: Base: Attaching the Countertop Material.

Place your countertop material and screw it to the frame. This is not very critical.
Step 12: Base: Attaching the Outlet Strip.


Measure the distance between the two mounting holes and drill two screws into the side of the base. Stick it on the screws. Done. Gorgeous.
Step 13: Bookholder: Introduction and Design Issues


Congratulations on making the base for your book scanner.One of the nastier problems in scanning books is that the "center" of the book shifts as you flip through the pages. I have a couple pictures with a very thick book that demonstrate this problem. Essentially, with books that have any thickness, the center "V" shape of the book moves left to right as you flip pages. However, the platen of our book scanner does not move. That means that we need whatever is holding the book to slide freely, to center it below the platen.This is the main reason why the base of the book scanner must have a smooth surface, like melamine, plastic, or counter top. Things have to slide.
Step 14: Bookholder: Introduction and Design Issues (Continued)


There are many ways you can make the book holder. In fact, my first book holder was made entirely of cardboard, and it worked well enough to digitize my first book. After thinking about this, I chose to use a pre-made miter box as the start, because it is very cheap ($6) at Harbor Freight, and because it can also be used to produce the scanner. (I used this same principle in buying clamps. You use the clamps to assemble the device and to operate it. In other words, the tools become the machine).
Step 15: Bookholder: Materials and Prep.


A hot glue gun is a good tool to have. The hotter, the better. Miter box, 14" Harbor Freight Part Number 99932.HDPE.Beg, borrow, find or steal some HDPE (Cutting board plastic). You don't have to use HDPE (on my first machine I used aluminum angle) but I've found that it works really well. I also found it in the dumpster of a plastics shop. HDPE is used to make custom cutting boards, so there are often surplus cutoffs available for very little money. You can also simply buy a cutting board -- thrift stores are full of them. Cut it into two strips. I chose to cut mine into two strips, which are 1x16" and 2x16". These just happened to be convenient sizes. The shortest you can make them is 9", and the thinnest would be roughly 1/2".
Step 16: Bookholder: First Strip.

Screw one strip at the back of the base. Be sure it is parallel with the back of the base.
Step 17: Bookholder: Second Strip.


Set your miter box in place. This miter box is 13.5x7". Set the next strip of plastic in front of it and push it against the miter box so that it becomes a kind of guide rail for miter box motion left and right. Give it a dab of hot glue to hold it in place while you adjust it. While the glue is still hot, gently push the plastic against the miter box while moving the miter box back and forth. The idea is to get the miter box to move freely, but not to have much "play" if you try to rotate it. The smoothness of this mechanism can really make scanning more or less fun, so spend a little time on placing it right.
Step 18: Bookholder: Screw It.

Screw the second strip.
Step 19: Bookholder 2: the Reckoning
The next part of the book holder assembly is where the book actually rests. As with the other parts of this instructable, you can (and should) substitute other materials. In this case, I used Coroplast (CORrugated PLASTic) because I was able to scrap it from an election sign last fall. You could probably make it more easily from wood, MDF, or perhaps even heavy cardboard. Materials (pictures will be in the next steps if you need them):Coroplast, wood or MDF. Two angle brackets.Hot glue gun or other kind of glue.Tool box liner material. Spray glue or stapler.
Step 20: Bookholder 2: Cut the Coroplast


Cut two pieces of coroplast (wood, MDF, etc) at 11x15". 11x15"... This is one of the few hard recommendations in this instructable. I have found that this size holds almost every book I've been interested in scanning. Cut two more pieces of coroplast (or whatever) at 5x15". I got my Coroplast from outdated election signage.
Step 21: Bookholder 2: Glue And/or Screw


Glue the two 11x15" pieces together at a perfect 90 degree angle. I glued them together with industrial hot glue. This stuff is pure magic. Highly recommended. I had to buy some iron angle brackets to reinforce the assembly -- unfortunately I couldn't find them elsewhere. You will be putting a lot of pressure on this assembly so take the time to make it sturdy. From now on we will refer to this as the "VST (V-Shaped Thingy).
Step 22: Bookholder 2: Relief for Book Spines

Glue your two 5x15" pieces on the inside of your VST. Glue them 2 to 2.5" from the centerpoint of the "V". The idea here is to allow the spine of the book to expand while keeping the pages flat.
Step 23: Bookholder 2: Sticking Books Down With Toolbox Liner


Attach the toolbox liner material to the VST. This keeps the book from sliding when you scan it, which is critical to the operation of the device. This step is more time consuming than difficult, but I've included some pictures to help guide you. It also really helps to have a friend to help manipulate the material. The basic idea is to use spray glue (please use good spray glue like 3M Super 74 or 77) to adhere the toolbox liner to the VST. I simply spray glue the entire back of the piece and drape it gently over the VST. Then, working quickly before the glue dries, I conform it to the surface of the plastic. We used black duct tape to hide the uncovered edges of the VST.
Step 24: Bookholder 2: Thirst.

Step 25: Platen: Overview

The plastics in this part are something you should buy new. Unfortunately, I have found no good way to make a platen from recycled materials. I have made 4 platens in total, and the first two used recycled scrap plastics (there is a surplus shop in town that sells acrylic cutoffs and scrap). The first platen could not be glued because the plastics were slightly warped, and the second one, the paper covering that protects the acrylic had become hardened and almost impossible to remove. A tip: near-boiling water will remove such paper, but it is not fun.Save yourself the pain and go buy new, clean plastic. You won't regret it. Materials:2 11x15" cuts of 1/8" clear acrylic. 2 6x6" squares of 1/4" clear acrylic.Some methylene chloride. A syringe or applicator. Something square.A tongue hinge. A chunk of scrap wood (or two).
Step 26: Platen: More on Plastics
Have your pieces cut at a local plastics place. Ask them, if possible, to route the edges smooth. It will make gluing the pieces much easier. If you don't want to glue your platen or handle dangerous chemicals yourself, your local plastics shop can do it for you, but it will be expensive.Watch this video from TAP plastics, and/or or this video from me. I apologize for the low production quality of my video. If you haven't welded acrylic before, these are a' must watch. I have found that I vastly prefer using a syringe over the usual applicator, but syringes can be hard to find, and you don't want to pull them from the trash. ;)UPDATE: From Caitifty, how to find syringes: Pharmacies in California and many other states in the US now legally sell insulin needles (and Canada, most of Europe, Australia etc have done so for decades) - get the smallest gauge they carry (smaller gauge = larger diameter, go figure) and you'll usually find the needle part can be popped off by sliding a knife blade into the gap at the head of the needle, leaving you a very convenient syringe with a 15mm applicator tip. If you're really lucky your pharmacy (or needle exchange - google to see if there's one near you) will carry actual luer lock syringes which don't have needles 'built in'.
Step 27: Platen: Assembly, Loosely Put


Assemble your platen as shown. Leave the plastic/paper covering on as long as possible. If you make even a small scratch on the imaging surface, that will be in every scan you make, forever.
Step 28: Platen: Hinge

Take a 4-6" chunk of wood and screw the hinge to it as shown.
Step 29: Platen: Putting the Pieces Together.


Mark the centerline of your rear platen gusset and place the hinge on it to mark out the holes. Drill them, and attach the hinge with some screws and nuts.
Step 30: Platen: CLAMP


Test Clamp it to the column with one of your clamps. You don't want to permanently screw it to the column because using a clamp lets you adjust the platen height for thinner and thicker books.
Step 31: Column Extension: All in One "Step"


You need a column to put your lights on. This column should be as long as the base -- in my case, a little over 22". Materials:Some wood (I had a scrap of maple from the same dumpster where I found the countertop). You can use anything. I made mine with an angled support, but it isn't totally necessary. Some plastic or MDF. MiniStep 1. Cut the wood. I cut the wood to 22" long, and then using my miter box, I cut an angled support about 6" long. I screwed them together. They weren't perfectly straight -- the original wood was warped. However, it didn't matter because this design is resistant to error.MiniStep 2. Mount your plastic or MDF to the back. Measure, mark, and drill pilot holes. Countersink screws, and screw it together. MiniStep 3. Clamp to the base! Any problems with straightness or alignment are easily adjusted using the Harbor Freight clamps.
Step 32: Lighting: Why You Should Use Halogen Bulbs

Let's talk for a minute about lighting. Now, one thing that made me laugh is that in the very description of the Epilog Laser contest, they mention using LEDs instead of incandescent bulbs. I feel that I need to spend a moment addressing my choice of illumination for this device.
Step 33: Lighting: How to Light for Cheap, Crappy Cameras
Let me start by saying that this whole system is designed to work under non-ideal conditions and to be manufactured from just about anything -- this is less an instructable, I hope, than it is a general template to build and innovate with similar devices. However, one truth, photographically speaking, is "Garbage in, Garbage out". To get the best book scans, we need to pay attention to how a camera works. This is especially important because we are using cheap cameras. While I could go on about the cameras for weeks on end, I will keep this very simple.In a perfect world, we would use our cameras on their lowest ISO setting to reduce noise. In a perfect world, we would use a very small aperture (from f6 to f11) to keep things very sharp. In a perfect world, we would use a very fast shutter speed (faster than 1/60th of a second) so our movement doesn't blur the images.http://diybookscanner.org/forum/viewtopic.php?f=1&t=75EDIT: for an up-to-date discussion of camera aperture settings, please see this thread at DIYBOOKSCANNER.ORG]The cool thing is, we don't need a perfect world to do all that stuff. All we need is some high-intensity lighting. Like halogens.
Step 34: Lighting: But Why Not the Alternatives?

Step 35: Lighting: the Solution, I Said It Already

So perhaps surprisingly, the most sensible choice was halogen lighting. On my first scanner, I bought new halogens and found that their lack of flicker, super-high output and reasonable price was perfect for this application. The bumpy hexagonal lens system they put on outdoor bulbs diffuses the light very nicely. And then, just in time for building the second scanner, I found a source of recycled halogen bulbs -- the Habitat for Humanity ReStore. At our ReStore, they have salvaged bulbs for 1.50 each, a tenth of the new price. FINALLY, the white balance of your camera can (and should) be set to Tungsten, which perfectly corrects for the warm color cast of these lights. In other words, your cameras come preset to use these things. It saves you time and effort and a whole step of color-correcting later.
Step 36: Lighting: Enough Talk, Let's Mount 'Em

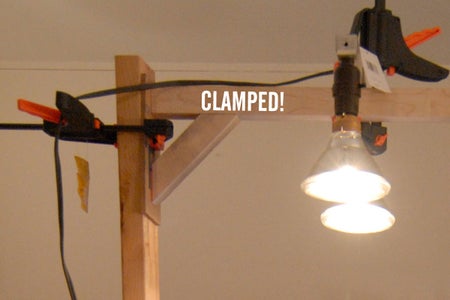
All that said, mounting your lights will depend on what you can find. I found this very neat light bar at Habitat for Humanity ReStore. It cost 1$. Similar light fixtures are often used in bathrooms above mirrors and should be easy to find. You could also light and wire some standard light sockets onto a board, or you could mount two gooseneck lamps. In any case, simply copy this basic idea and you'll be set. If you use this bar configuration, your lights will be easily positionable/adjustable which is exactly what you want them to be. Clamp 'em in place to check your work.
Step 37: Firmware/Camera Setup

You'll need at least one working camera to move this project along. Firmware installation is step 1. Because it is so complicated, I made a video for you to follow along with rather than typing out ten thousand confused words. The full version is here if that copy is illegible:http://fakeproject.blip.tv/file/2009463/Please note the mistake I made in this video. Apologies again for the low-ish production quality.
Step 38: Video Switch:


You have two cameras but only one display. You need a video switch! You can buy one, but I made my own from recycled materials. Step 1. Find an old VCR, tape deck, or anything with RCA jacks in the trash. I managed to get my RCA jacks from the same machine as my camera columns. I could have used this soggy camcorder that I found on the way to Wolfgang's place. Flooding makes for a lot of interesting scrap.
Step 39: Video Switch: Jacks

Extract the RCA jacks. The kind that have left and right audio plus a video (red, white, and yellow) are the most convenient to work with. I got these from an "Elmo Classroom Presenter". I used other parts from it later in the project.Find or purchase a 'single pole double throw' (SPDT), or 'double pole double throw' (DPDT) switch. This one is DPDT, identifiable by the six posts on the bottom. SPDT would have three. Both are OK.
Step 40: Video Switch: Solder All Grounds Together.


Connect all grounds/shields together. The two input grounds and the output ground should be soldered together. I found the grounds by touching my multimeter to the shield of each jack and to pins on the board until I found a connection. After soldering all the ground wires together, I applied heat shrink tubing for durability.
Step 41: Video Switch: Output

Decide which of the three jacks you want to be an output. I chose the middle one. Connect the center pin of the video output to the center pin of the switch. Connect the other two pins of the switch to the center pins of the other two jacks.
Step 42: Video Switch: Completion.


Glue the switch and jacks together to make it easy to operate the switch.Put a little velcro on the bottom and stick it to your book scanner.
Step 43: Display Systems: Overview

The two scanners I've built so far feature two different display systems. You should strongly consider using some display system on your scanner, because plugging the cameras in to a display not only DOUBLES your battery life, it also saves you from craning your neck around at the camera to check the see if it has properly focused on each shot. I discuss this a little bit in the "technical overview" video.Both display systems are recycled. The first display I built is from a modified portable DVD player. My dad bought it for my late grandpa Stanley Reetz to watch movies on, but it didn't work for very long. The DVD player portion of it stopped working, though the display would still light up. I had it in my closet for several years, hoping to re-use the LCD. As it turns out, it was possible to modify it for video input, but it had some power management smarts and would turn itself off after ten minutes. So ironically, I had to disable power management on this device to reuse it in a green way. ;)
Step 44: Display Systems: Locating the Video Signal Wire.

To modify the device for video input, open the bezel of the unit. Look for "signal wire" -- gray wire with a shield and a white center conductor. Cut the center conductor while the device is on and displaying the "APEX" start screen. If the screen goes black but doesn't turn off, you found the video wire. This simplistic approach has worked for me with many devices -- simply look for a shielded incoming wire that looks plausible and snip it to see if the onscreen image disappears. Crude, but effective.
Step 45: Display Systems: Solder It In.

Solder an RCA jack to the cable you just cut. Typically the center conductor is the video signal and the woven wire shield is the ground.
Step 46: Display Systems: IT LIVES!!

Test with a video input signal. IT WORKS!
Step 47: Display Systems: Pesky Power Management.

Ordinarily this DVD player would shut itself off if there was not a DVD in it for say, 10 minutes. There will never be a DVD in it again , so we need to keep the screen from turning itself off. Open the base of the unit. Unplug the flat ribbon cable that connects the laser mechanism to the base. In my unit, I never reconnected these parts.Look at the area where the display connects to the mainboard. In every one of these devices that I've seen, there is a section of the board that looks like a secondary power supply. Note here the small voltage regulator, transformer, and capacitors.
Step 48: Display Systems: Hack Time.

Get the datasheet for the voltage regulator (and other chips if you suspect them). I used Octopart.com to look up the datasheet by entering the numbers as they appear on the chip. This particular voltage regulator is a "BA055" made by Micrel. According to the datasheet, pin 1 (the leftmost pin) is the "Enable" pin. That means that it turns the regulator on and off. The datasheet also says that it can be connected directly to Vin(the positive power input) to turn the device on permanently. Heat pin 1 with a soldering iron and gently lift it from the circuit board. Solder it to the voltage input.I really wish Instructables didn't resize images. If you find this hard to read, let me know and I'll upload another, larger version.
Step 49: Display Systems: Put It Back Together.

Reassemble the device! You now have a free, recycled LCD screen for any project. I also made a little visor for mine from a scrap of black foamcore material.
Step 50: Display Systems: Easier Options.

The easiest display is just an old analog TV. Try to find one with composite (RCA) inputs. Since the digital switchover here in the US, I have seen dozens of analog TVs in the trash. I grabbed this little one and the milk crate it rests on from the same dumpster.
Step 51: Camera Support: Overview.

It's important to have a good support system for your cameras. In both of my book scanners, I've had a good way to support them, but both my methods don't generalize well. So I'll show you how I did mine and then propose a method that anybody could do with more basic materials. My first book scanner was built from a Polaroid MP-4 camera stand. It has arms extending out, and I attached the cameras to them. Basically, I just drilled a large hole in a scrap slab of HDPE and then added an angle bracket to mount the camera. These aren't the best because they only work for my particular scanner. Regardless, I am including them here for posterity.
Step 52: Camera Support: the New Deal.

For the new scanner, I happened to have the remains of two Elmo Classroom Presenters. They're usually used in classrooms to project the handwriting of the professor. I found two of these things partially disassembled in a dumpster at my university. The arms from these units are nearly perfect for cameras -- they can be extended, they lock easily, and they have a rotating bit at the top.
Step 53: Camera Support: Angle Brackets

Left to find was an appropriate camera bracket. For the Canon Powershot A590, I discovered that 2" angle brackets are the perfect thing. They provide good support across the base of the camera, but they do not prevent you from opening the battery door. This is important because you want access to the batteries and memory cards, but you do not want to disturb the alignment of the cameras every time you replace batteries or unload pictures.
Step 54: Camera Support: Screws to Hold Your Babies in Place


Mounting the cameras is simple. I make little DIY camera finger bolts by taking a 1/4 20 bolt with a flattened head (unfortunately, I can't find the name for this type of bolt -- let me know if you know it), and in this case, I use a nut and a washer to shorten it so that it is the right length to hold the camera securely. I have made other versions of this using a wingnut and a hex-head bolt, visible in step 51.Update: My dad, who taught me how to use tools and build things, writes: "I think the flat head bolts are commonly called thumb screws just like their knurled cousins. ". I'll take his word for it. These are thumb screws.
Step 55: Camera Support: a More General Proposal


The nice thing is that you can make almost anything into a camera arm. One idea I had is a very simple DIY "gorillapod" which is mounted to the top of a 2x4 cut at an angle like these arms. You could also make a camera arm with a bracket much like these existing arms. I have made a little mockup in Maya. With nothing more than a board, some brackets, and a few wingnuts, you can have your own articulating arm. Actually, this system would work even better than the one I've made, and I will probably make something like it for a future book scanner.
Step 56: Camera Support: Final Notes.


Mounting the camera arms is a little tricky because the lens of the camera is not in the center of the camera or perfectly on-axis with the arm. What this means is that you need to mount the arm on the left and right side offset by a small amount. We simply eyeballed the cameras so that the extended lens assembly looked about in the center of the V-shaped thingy. Then we screwed them onto the countertop base. In the future, I hope to flesh out this step of the book scanner instructable a bit more, and I'm looking forward to your input and ideas on more general camera arms, too. I'd have spent more time on them if I didn't have such great solutions at hand.
Step 57: Handle/Electronics: Overview.

The firmware we installed earlier allows the cameras to be triggered electronically using their USB connectors. To get them to fire at the same time, you need to provide a less-than 5V pulse to them. The two purposes of this handle system are to A.) provide the 5V pulse to the cameras and to B.) make the book scanner simple to use. I have now constructed three different trigger buttons/handles for the book scanner. All three have their strengths and weaknesses. The third solution is definitely the most flexible and the least work. I'd like to show you how to make that one in detail and show the other two largely to show you what *not* to do. Materials:USB hub. Cheap LED flashlight, the kind that uses 3AAA batteries. 3 NiMH rechargeable AAA batteries. Some kind of insulated, two conductor wire; mine came from a discarded cell phone charger. (Better if it's a coil cord.) A momentary switch. The best kind are the "Reset" switches from old computers, though almost any will do. A loooong 1/4 20 bolt or threaded rod (or whatever thread you like). A wingnut, threaded to match the bolt. A couple nuts, threaded to match the bolt. A hunk of plastic or wood about 2" long and 1" thick.Some washers that will fit inside the flashlight body (about 3/4").Misc junk; industrial hot glue gun.
Step 58: Handle/Electronics: Hub

Locate your USB hub. I found this one in the trash bin at work -- it was some kind of medication promo. Since USB1 is outdated, you should be able to easily find this kind of hub for free. Recycling it gives it new life.*
Step 59: Handle/Electronics: Hub 2.

Open it up. We are going to cut off the USB connector, but we need to determine which pin is positive and which is ground. The easiest way to do this is to plug it into your computer and use a multimeter to see which pin has +5V on it. In this case, +5V turned out to be the leftmost wire -- the red wire -- and ground was the brown, rightmost wire. This is probably pretty consistent between hubs, but you should test yours anyway.
Step 60: Handle/Electronics: Trimmin'


Cut the original USB connector from the end of the wire. Leave a little wire on it in case you need it in a project later. Isolate the brown (ground) and red(+5V) wires and strip them.
Step 61: Handle/Electronics: Battery Case


Disassemble your flashlight. Take out the battery case. Sand the ends of it to prepare it to accept solder. Remove the batteries and solder a red wire to the positive side and a brown wire to the negative side (if you can find them, color is not really important). Pour hot glue over these connections to insulate them and protect them from breaking off. You now have a power source for your hub. Plug your camera into the USB hub and connect the battery case red and brown (+V and Ground) to the USB hub +V and Ground (red and brown) using alligator clips. The camera shutter should fire, and if the hub has an LED, it should light up. This will only work if you installed the custom firmware I discussed earlier.
Step 62: Handle/Electronics: Momentary Switch Installation 1
Now we need to take a break from the hub and work on a switch. You need to get the rest of your flashlight disassembled. This flashlight is just press-fit together. You can pop the LEDs out of the front with pressure from a screwdriver. You can pop the switch from the tailcap by carefully applying lots of pressure to the switch. We will not be using the switch(because it is a "push-on, push off" type), so don't be too worried about destroying it if you have to. Remove the switch from the black plastic tailcap piece. Leave the rubber cover in place.
Step 63: Handle/Electronics: Momentary Switch Installation 2


Take your momentary switch (mine is from an old computer that was trashed) and put the leads through the hole in the center of the cap. You may have to clear out some space for the switch to get a good fit. I also had to trim the unused leads on the bottom of the switch. Apply some hot glue around the switch to fix it in place. Press it back into the threaded tailcap.
Step 64: Handle/Electronics: Momentary Switch Wiring


Drill a hole in the flashlight body to accommodate the coil cord. Insert the coil cord into the body.
Step 65: Handle/Electronics: Momentary Switch Wiring 2


Solder the wires from the switch to the coil cord wires. The order is not important. I used heat shrink tubing to keep things nice and clean. Heat the heatshrink to shrink it. Apply liberal amounts of hot glue to the incoming coil cord to fix it in place.
Step 66: Handle/Electronics: Mechanicals 1.


Returning to the other side of the flashlight, assemble the threaded rod, washer, and junk as shown. The idea here is glue the rod into the center of the flashlight, so it comes out the left side. It does not need to spin- quite the opposite. Once you have your assembly ready, push it into the flashlight and fix it in place with a lot of hot glue. Don't be shy with it. I happened to have some nice black plastic that sealed the end, but you could use another washer or nothing at all.
Step 67: Handle/Electronics: Mechanicals 2.

Add another nut on the outside of the last nut you put on. Drill a 1/4" hole through a scrap of wood or HDPE. Put another nut on the other side of the polyethylene. You can put washers on both sides of it for added stability. Conclude this hardware stack with a wingnut. Using the wingnut and a crescent wrench, you can now adjust the tension on the plastic block (which adjusts how freely the handle rotates). The purpose of the wingnut is to lock the inner nut from rotating on the shaft. Thread in the tailcap with the new switch. Admire how cool this thing looks.
Step 68: Handle/Electronics: Mechanicals 3.

If you chose to use threaded rod and it is too long, cut it to length.
Step 69: Handle/Electronics: Soldering It All Together.

Solder the switch in-line between the battery case +V and the +V of the USB hub. Solder the grounds of the battery case and USB hub together. Your electronics are largely complete and should work now. Give 'em a test to be sure!
Step 70: Handle/Electronics: Mounting It Up.


Mark your platen, drill mounting holes and mount the handle assembly to the platen. I put velcro on all this stuff and velcro'd it to the base. That keeps things neat and tidy, but lets me remove the battery case to replace batteries. It also leaves things open for moving them later.
Step 71: Handle/Electronics: Looking Back

The previous switch designs were electronically similar, but had some shortcomings. For that reason, I'm just going to show you some pictures and discuss them a little bit so you can benefit from my experience. The first switch I made was entirely recycled. I had a switch and LED board from an old printer, two motherboard memory backup batteries (scavenged from bad motherboards) in series, and the guts of a broken USB hub. This design was bad for two reasons. One, it was mounted on the same arm as one of the cameras, so every time I took a picture I disturbed the camera position a bit. Second, those motherboard batteries are not cheap or easy to find if they need to be replaced. Finally, this circuit was a bummer because the LED rarely lit up. Still don't know why.
Step 72: Handle/Electronics: Posterity


The second switch, built with the help of my friend Lyle, is a much cooler thing, but it is rather difficult to build. It consists of the same scavenged USB hub (but with all the electronics desoldered and the grounds and +V of every USB plug wired by hand), a 9V battery, a screwdriver handle, and some old telephone parts. The basic idea was to make a handle with a light-up switch so it would be obvious that all systems were working properly. The downside of this switch, though it is very effective, is that it is a lot of work to build. You must hollow out a screwdriver handle, mount bearings inside it, find a light-up switch that doesn't suck, etc etc. In spite of all this, I've tried to include enough photo documentation that you could reproduce it if you like.
Step 73: Final Steps: Painting It All Together.


You got this far, the final steps are pretty easy. Paint your device. To get good output from our cameras we need to eliminate sources of glare, and the unpainted wood is one of those sources, particularly the column and column extension.
Step 74: Final Steps: Which Cameras??

At the time of this writing, the best camera for this task is the Canon Powershot A590 IS. It has enough resolution, enough manual control, works with CHDK/Stereodata Maker, and often goes on sale online for $100. The price made this scanner possible.You may use other cameras, but be sure they are on the supported list of StereoData Maker. Any camera that can run SDM will probably work, but again, these are the best. Keep in mind that ONLY CANON POWERSHOT CAMERAS WORK WITH CHDK/STEREODATA MAKER.If you need more help with StereoData Maker, please post in the comments, or better still, sign up forthe official Yahoo Group.Many knowledgeable users -- and the developers of SDM -- hang out there.Now I know many of the people reading this are probably college students. You can substantially reduce the cost of your book scanner by agreeing with your roommate or pals to buy the same cameras. You don't need a book scanner every day, so you can just borrow each other the cameras for a few days at a time.
Step 75: Final Steps: Plugging It All Together and Powering It UP
Hopefully your cameras have arrived by now. Plug your main outlet strip into the wall. Plug your TV into the outlet strip. Plug your lights into the outlet strip. Put fresh rechargeable AAs into your cameras. I recommend Sanyo Eneloop NiMH batteries. Put fresh rechargeable AAAs into the battery holder for the hub.Plug the cameras into the hub using the USB cables that came with the cameras. Plug the video cables (that come with the cameras) into your video switch. Turn everything on.Center your lights over the platen.Revel in the glory that is your machine.
Step 76: SETUP AND OPERATION BABY


You need to put the cameras in Manual Mode by switching the Mode Dial to "'M'".Set the aperture to F8. Set the shutter to 1/50 of a second or faster. Set the White Balance to "Tungsten". Set the Quality to Superfine and the Resolution to Large. Your cameras are ready. If you keep them in "M" mode they will retain these settings.
Step 77: Load a Book and Capture It.


Put a book under your platen, and adjust platen height where the platen attaches to the column. You want the platen to rest at the base of the binding, so that it is not pressing harder at the top of the book than the bottom. Unless all your books are the same size, you will need to adjust this for each book.Start at the beginning of your book and work to the end. HINT: Sometimes, I run into occasional focus issues -- you can see some of them in the tool book I scanned at the intro. One simple way to deal with these is to keep a "Focus sheet" around. It's just a piece of paper with printed words on it. If you encounter a page that has nothing in the middle for the camera to focus on, before capturing that page, stick the focus sheet over top of it and focus the camera. Remove it, and then release. You'll have a perfectly focused page.
Step 78: Download Page Builder

Aaron Clarke wrote the software to process the output of this book scanning system. It reads in all the images, allows you to set a crop, corrects for irregular lighting, and outputs PDF. Currently, this is alpha software. It makes a number of assumptions. It requires a powerful machine to work. You will be best off with at least 2 gigabytes of ram and up to ten gigabytes of free hard disk space. At some point, this will change, but likely not very soon.While it is very easy to tell the software what to do, it takes a while to process so much image data. Page Builder may take more than 3 hours to process a 300 page book. Currently, we have to make a book into a couple smaller PDFs -- the reason being the way we make PDFs from Matlab. If anyone has Matlab code for good PDF printing, please contact us.Download Page Builder for XP here.Download Page Builder for Vista here.Mac users will need a copy of Matlab, as we can't get a standalone version to work. The XP and Vista copies both include the source script, which was developed on a Mac and works fine..UPDATE 2009/04/20: If you are having page order issues, please try this version, which also includes some imaging enhancements.Only the XP version has been extensively tested.Page Builder is Free Software. The sources are available. We are graduate students and have extremely limited time to support this software. So little time that we actually have no time. It is our hope that other people will help shoulder some of the development costs of this software.
Step 79: Run Page Builder.

Run Page Builder by clicking on "PgBldr.exe". Watch this tutorial video to understand the interface conventions. Page Builder is highly effective software, but the efficiency is largely due to the special user interface. Watch this video before coming to us with problems about the software.Just one more quick note: We're currently deciding how best to handle covers and stuff. If you run into a page order issue, just put your front cover image in the right folder. Credit where credit is due: Though this is "my" project, it could not have been completed without Aaron (software), Noah (editing, camerawork, and more), and Lyle (electronics). It also saw benefit from advice from people like Nate H. Developing not only the book scanner, but the instructable really pushed the level of documentation I'm used to producing. At this point in time, I have as many hours into making this instructable clean and complete than I have in making the second book scanner. Seeing the 79th step come together, I can say it was worth it. And the book scanners are some of the most complex and enjoyable things I've built in a while.That's it. I hope you build yourself a book scanner, and I hope that you enjoy more books because of it. If you appreciate the effort that went into this, please give us your vote. All four of us have some great ideas for the laser cutter, and you can bet if we win, they'll show up here. Thanks.
Grand Prize in the
Epilog Challenge


