

Introduction: DYI Lithium Battery for Handheld Radio Yaesu FT-60


I have a very nice handheld radio, Yaesu FT-60, bought in 2005. I don't want to replace the device, it works excellent, but the battery is pretty old and it is NiMH. It is a 7.2V and 1400mAh. Newer handheld radios have Lithium batteries which weight less, are smaller, resist better to lower temperatures, give extended operation times and so on.
This tutorial will describe how to add Lithium batteries to Yaesu FT-60 handheld radio.
PS: you can buy ready made Lithium batteries for Yaesu FT-60 (like the one in the image), this tutorial is about adapting and using existing stuff.
Tools needed:
- pliers, cutter, file, knife blade (or Dremel), a flame to heat the knife blade, hot melt gun, soldering iron
Parts needed:
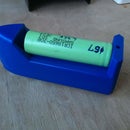
- Yaesu FT-60 handheld radio, battery case FBA-25A, 2 pieces of Lithium protected batteries type 18650 (3,6V and 2000-2400mAh)
Step 1: Concept and Thoughts Before First Cut


The goal is to fit 2 pieces of 18650 Lithium protected batteries inside the Yaesu FT-60. Original battery is 7.2V and 1400mAh, I will connect in series 2 Lithium protected batteries, each one is 3.6V and 2400mAh, so in the end will be 7.2V and 2400mAh, which is better than 1400mAh (extended operation time).
As the images describe, 18650 batteries are bigger than the available space on the back of Yaesu FT-60. Using these batteries type is good for me because I am using them in some LED lamps, so I don't have to buy special ones for this application.
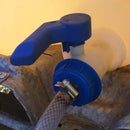
In order to fit the batteries, I will modify a battery case FBA-25A, this one also I had it around. The battery case is shown attached to the radio in the above images.
Basically I will cut 2 rectangular holes in the battery case, in this way the Lithium batteries can "overflow" outside the battery case and will be also correctly attached to the radio.
Step 2: Measuring What to Cut


As name tells, Lithium batteries 18650 are 18mm in diameter and 65mm in length.
On the other hand the NiMH battery pack (FNB-83) from Yaesu FT-60 is only 16mm tick, so somehow the 18650 battery must "get out" through the back of Yaesu FT-60.
Therefore I will cut the battery case as indicated in the draft, first a straight line and then 2 other lines on the left and on the right of the first straight line.
Step 3: Cutting the Battery Case


Cutting the battery case can be done using a Dremel or using other methods. I used "other methods" since I have no Dremel.
I took a knife and I heat its blade (heat it until metal is red) and then I cut the plastic. Initially I cut 2 straight lines, then on the sides of each line I cut another 2 lines.
I used pliers to remove the cut plastic, then a file to straighten the rectangular holes. Also a cutter was used in order to adjust the holes until the 18650 batteries fitted with the radio.
All these operations must be done in a patient way, cut little by little each time, if not you may end up by cutting too much. Insert one battery, check if fits, if not cut a little more until fits.
The end is when the batteries can be easy rotated when battery case is attached to the radio.
Step 4: Making Electrical Contacts


The battery case came equipped with springs as electrical contacts, so I will use them for my modification.
It is needed to have a contact to main battery positive part (+), another contact is needed between + and - of the 2 Lithium batteries 18650 and the last contact is to main battery negative part (-).
I will solder the springs to the main battery contacts, for this I need to find the correct position for the contact guided by one 18650 battery.
Then I will solder 2 springs in order to make contact between + and - of the 2 Lithium 18650 batteries.
Pay attention to + and - contact of the main battery pack as indicated in the image.
Also for 18650 battery, + contact (small part of the battery) must touch a flat spring contact, - contact (big flat part of the battery) must touch a cone spring contact.
Step 5: Attaching Electrical Contacts


Now comes the tricky part: use hotmelt in order to fill the gap between 18650 battery and the battery case, also to keep in position the springs for electrical contacts.
I used some paper to protect and to give a shape to the hotlmelt.
If operation is not successful from the first time, use the knife heated blade to cut the hotmelt and adjust spring position. Pay attention not to smear hotmelt on the spring part where electrical contact is made.
Step 6: Final Thoughts
So now Yaesu FT-60 should work on Lithium batteries, see below a short clip:
In order to charge the 18650 batteries, batteries will be taken out of the battery case and placed in the Lithium charger.
+Original NiMH battery pack FNB-83 weights 180 grams, the new Lithium 18650 battery pack weights 110 grams.
+Original NiMH battery pack FNB-83 was 1400mAh, the new Lithium 18650 battery is 2400 mAh (at least labeled).
-Original NiMH battery pack FNB-83 was able to seal from moisture, the new Lithium 18650 battery is not.
-Original NiMH battery pack FNB-83 had contacts for desktop charger, the new Lithium 18650 battery pack has no such contacts.
Future improvements:
- add charging contacts outside the battery case
- add some protective material over the exterior of the battery pack (maybe Sugru? maybe some hotmelt?), in this moment moisture can get inside the handheld radio.


