

Introduction: Designing a Spandex Supersuit


Spandex and superheroes go together like bad puns and Batman! While these days not every superhero walks around in a primary colored onesie, in the 1940s, Superman and his ilk were so identified by their skin tight uniforms that they were sometimes referred to as "long underwear heroes"! How very intimidating!
Even if you aren't using stretch fabric as part of a superhero costume, there is no doubt that learning to design and sew spandex is a great skill to have under your belt... (or at least under the underwear you wear over your tights.)
Using an existing commercial pattern or garment as our base, I'll show you how to design a supersuit fitted to your unique body shape and styled to match whatever character you've designed. I'll help you understand and alter a pattern, sew a mock up, fit your suit, and turn this basic template into a pattern for the supersuit style you've imagined.
In this tutorial I'll just cover the initial patternmaking side of the equation. To learn how to sew your final spandex supersuit on a home machine, check out my Constructing a Spandex Supersuit instructable. This tutorial is also part of my How to Become a Superhero collection which is a series of tutorials that walk you through designing and creating your own superhero costume. To learn how I constructed each part of the costume using different materials check out the other instructables in this series.
Designing a Spandex Supersuit (*you are here)
Constructing a Spandex Supersuit
Step 1: Tools and Materials
- Paper pattern or fitting spandex garment to use as a pattern
- Sewing machine or serger
- Stretch sewing machine needles
- Needle point and serrated tracing wheel
- Transfer Paper
- Fabric and paper scissors
- Thread snippers
- Seam ripper
- Pins
- Tailor’s chalk or disappearing marker
- Clear ruler
- Flexible measuring tape
- Hip curve
- Pattern paper
- Cutting table or other cutting surface
- Pencil and eraser
Step 2: Choosing Spandex

There's a few things you should consider when you're picking out spandex for your suit.
One very important factor is the direction of the stretch. Spandex fabrics can be either 2 way stretch or 4 way stretch.
2 way stretch fabrics stretch in one direction only (or much more in one direction than the other). 2 way stretch is most often stretchy along the cross-grain (from selvage to selvage) but sometimes along the grain instead. If you are using a 2 way stretch, you will want want the stretchiest direction of the fabric to be wrapping around your body horizontally, but I highly recommend using 4 way stretch for any very tight fitting garment, especially one that goes both over the shoulders and through the crotch like most bodysuits.


4 way stretch fabrics stretch in both the grain and cross-grain direction. 4 way stretch spandex is the best kind of fabric to use for any very tight fitting garments like leggings, costumes and bodysuits. When your fabric can stretch in all 4 directions, it makes it comfortable, very easy to fit, and relatively easy to pattern for. I highly recommend that you use 4 way stretch spandex for this class.

For supersuits, I really recommend getting a slightly heavier weight spandex with a good percentage of stretch in all 4 directions. I would also highly discourage you from using stretch velvet if this is your first time sewing spandex, as the fuzzy texture of velvet makes it a nightmare to sew.
My go-to test for choosing spandex in the fabric store, is what happens when you stretch it? If the metallic foil applique starts to crack, or the printed pattern fades as it's stretched, it's not great quality. For this reason I highly recommend shopping for spandex in person if you can.
Step 3: Technical Sketching

So, you've drawn your superhero costume as a whole, now you need to get a bit more detailed about the design your supersuit. To do this I like to draw what we in the fashion design world call a flat sketch or technical sketch. This is a very clear simple illustration of the design from the front, back and side that includes the placement of seams, hems, closures and details. For this kind of sketch it's good to use a croquis that is positioned in a very simple, un-stylized pose, with normal proportions close to your own. You don't have to use croquis, but I do find it helpful to make sure you are sticking to realistic human proportions. I'm providing some simple male and female croquis here with front, side and back views, and you can also find a lot more versions by just searching for them online.

Place your croquis under a sheet of marker or tracing paper and draw your supersuit design referring back to your sketch or inspiration.
The basic design of my suit is going to have a side seam running up each side of the body, inseams on the inside of the legs, and a center back seam. When you get more comfortable with spandex sewing and patternmaking, you will be able to move and eliminate some of these seams, but for now we are going to work with them. One of the alternate patterns I list in the next section is a side-seamless pattern, but I personally feel like this is not a great idea for beginners because it makes fitting so much harder.

As you draw your design, think about where lines from the front will meet the back at the side seam and how paneling and color blocking will compliment your body. If you are creating an area of color-blocking or a style line on the front of the suit you might want the to continue the same line in the back, or create a complementary shape. This is why drawing a side view of the suit can be helpful, as sometimes a shape that looks good from the front view will look a little odd from the side. In the words of my favorite designer, the late great Alexander McQueen: “I design from the side; that way I get the worst angle of the body. You’ve got all the lumps and bumps, the S-bend of the back, the bum. That way I get a cut and proportion and silhouette that works all the way round the body.”
As you draw your technical design, you also have to be mindful of practical considerations. As I mentioned before, try to make your style lines relatively simple, and avoid compound curves and points that aren't on seams. If you do want to create a point, like I have where the legs of my suit meet the torso, you can avoid the tricky triangle inset problem by placing this pointed panel along a seam so it can be sewn in more easily. Try not to make too many small panels, or design places where seams will all come together in a point.
You also need to think about how you are going to get in and out of your suit, which will affect where you put closures, openings or elastic. Adding zippers and closures to spandex can be a bit tricky, creates points of weakness, and tends to make suits less comfortable. If you can avoid the need for a zipper to get into your suit by creating a larger neckline or a cut-out neckline with just a small closure at the top all the better. To use a neckline opening to get into your suit, you will need a neckline that measures at least 90% of your shoulder measurement (un-stretched).
Step 4: Choosing a Pattern
Now that you know exactly what the style of your suit is going to look like you can make an informed decision about the best option for getting a good base pattern.
Possibly the easiest option here is to find a bodysuit that fits your body shape well already and copy this pattern. If you already have something like this to use as a base, or you feel like going out and finding one, this can be an easy way to immediately get a fit you like. You can find great instructions for how to extract a pattern from an existing piece of clothing in this great Instructable on how to Copy Your Clothes by Natalina. The only thing you'll need to do differently is to transfer your pattern onto paper, not directly onto fabric.

If you use this method, you can basically skip ahead in this lesson to the section on fitting and marking style lines, but the rest of this information will still be useful.
Another option, and the one I'm going to be covering in depth in this lesson, is to use a commercial pattern and alter it to match your design. If you go this route it's a good idea to look for a pattern that already has style lines similar to your design, or to start with the simplest pattern possible, to draw your own design lines on top of. This will let you get the best fit from your initial shape before you dive into adding complicated details.
I tried sewing a few commercial bodysuit patterns, to see which ones I thought were good basic designs and I ended up being happiest with this simple Ballet Unitard pattern from Jalie.
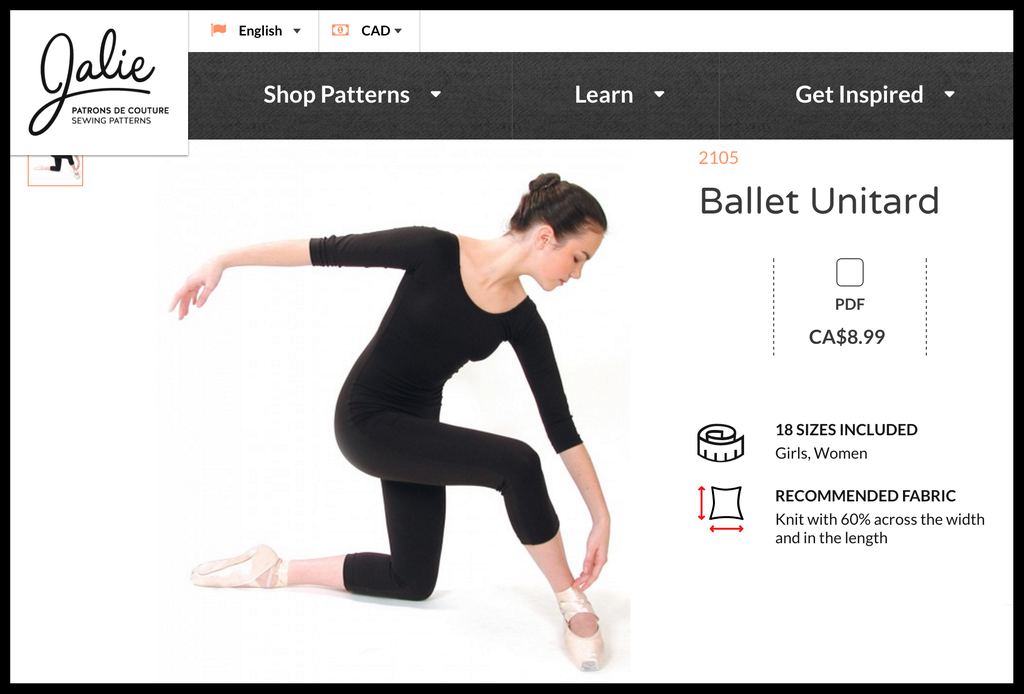
Jalie is a smaller pattern company that specializes in activewear, dance and gymnastics patterns, and I've found their patterns to be simple well-proportioned. This downloadable pattern has 18 sizes from girls to women and can be easily altered. It has 3/4 raglan sleeves, 3/4 length and legs and a scoop neck, so it may not be the right pattern for the base of everyone's design, but most of these elements are easily altered.
If you are making something that definitely wants a zipper down the front or back or no side seams, a lot of cosplayers love Kwik Sew K3052. For men and boys I'd recommend starting with Jalie's Men's and Boys Leotard which can be altered to have longer legs, smaller armholes, and a higher neckline. Another option with more full body coverage is YaYa Han's M7340 Men's Zippered Bodysuit from McCall's.
Of course your spandex design doesn't have to be a full body onesie, it can be leggings and a stretch top, a leotard without legs, etc. Find the pattern or pre-existing garment that fits best with your design and go from there.
Step 5: Understanding a Pattern

Depending on whether you're using a commercial pattern that came in an envelope or a downloadable PDF pattern you bought online, the instructions and sizing on the pattern may be laid out slightly differently, but the information presented will be basically the same.
On the front of most commercial patterns, or the online page that describes a downloadable pattern, you'll find a few important bits of information (and sometimes a ridiculous photo, but try not to judge a pattern by its cover models, you can actually find some good designs hiding behind the bad marketing).


- Pictures of the Design Options: most patterns, especially those from the big pattern companies, come with a few variations of the basic design which are usually shown on the front cover or additional online photos.
- Size: the overview of the pattern will always have the size range listed. Be sure to look at the measurements that correspond to different sizes to be sure your size falls within this range (we'll talk more about this in a minute).
- Difficulty: some patterns will also list the pattern company's idea of how difficult this particular pattern is. This is, of course, dependent on your skill level, but an "easy" pattern is usually a pretty safe bet for a beginner.
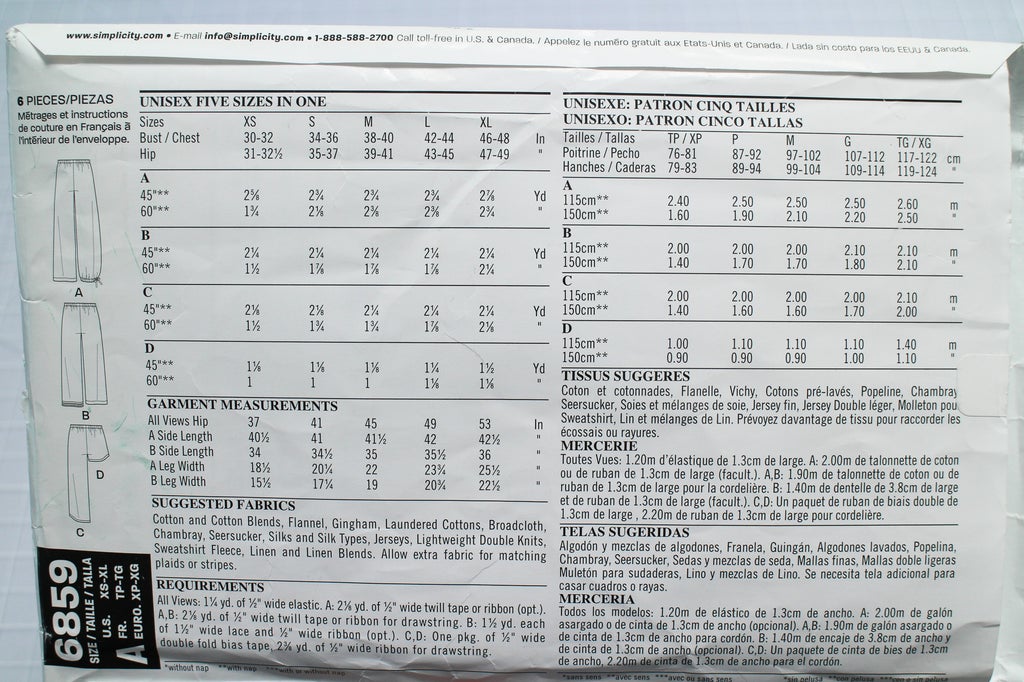
Sizing Charts: The back of a commercial pattern or the corresponding page in the instructions of a PDF pattern, has a lot of information on them that can be a bit overwhelming, but once you know what to look for, there's no need to panic.
- Pieces (Styles): if your pattern contains more than one style, drawn versions of these variations will usually be included here. The letters next to each drawing correspond to the number of that style which will be labeled elsewhere on the pattern as well.
- Sizes and Measurements: When you are picking out a pattern you can use these to make sure that your size falls somewhere within the range of the pattern. The sizes on commercial patterns usually do not correspond to ready to wear clothing sizes, so if you usually wear a medium, don't assume that you will be a size medium in a sewing pattern. To help you avoid this tendency, Jalie uses sizes labeled from O-W instead of numbered sizes or S, M, L.
- Yardage: Here you'll find the required yardage for each size and style. There will be different requirements if your fabric is 60" or 45" wide, so make sure you check how wide the fabric is when you're buying it. You can sometimes squeeze a pattern into a smaller amount of fabric than the pattern suggests, but I always try to get a bit more fabric than what is required in case of mishaps.
- Garment Measurements: On some pattern you will also find a section that lists that actual measurements of the finished garments. For some reason, a lot of commercial patterns usually include an excessive amount of extra room (or ease), so their suggested sizes based on body measurement are often too big. The "Garment Measurements" section can sometimes give you a more accurate estimate of how big the designs will actually be. This does not apply so much to spandex garments though, because these garments are usually designed with negative ease, meaning the garment measurements will be smaller than the body.
- Fabric Suggestions: this is where you'll find what kinds of fabric will work best for this particular design.
- Requirements/Notions: this section lists the other things you'll need to make this design like zippers, elastic, etc.

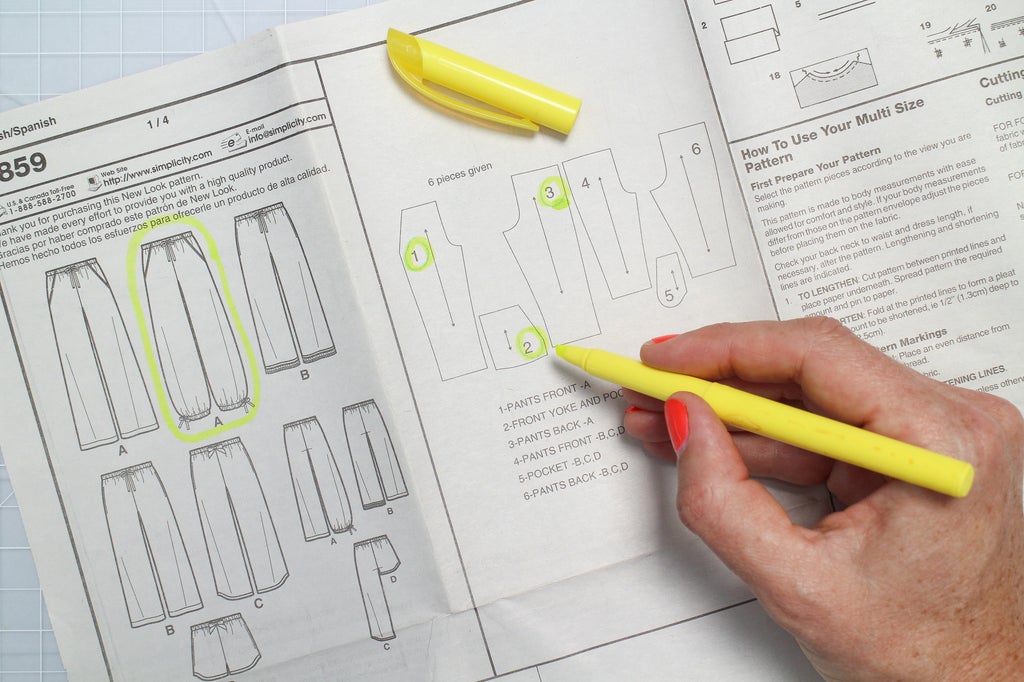
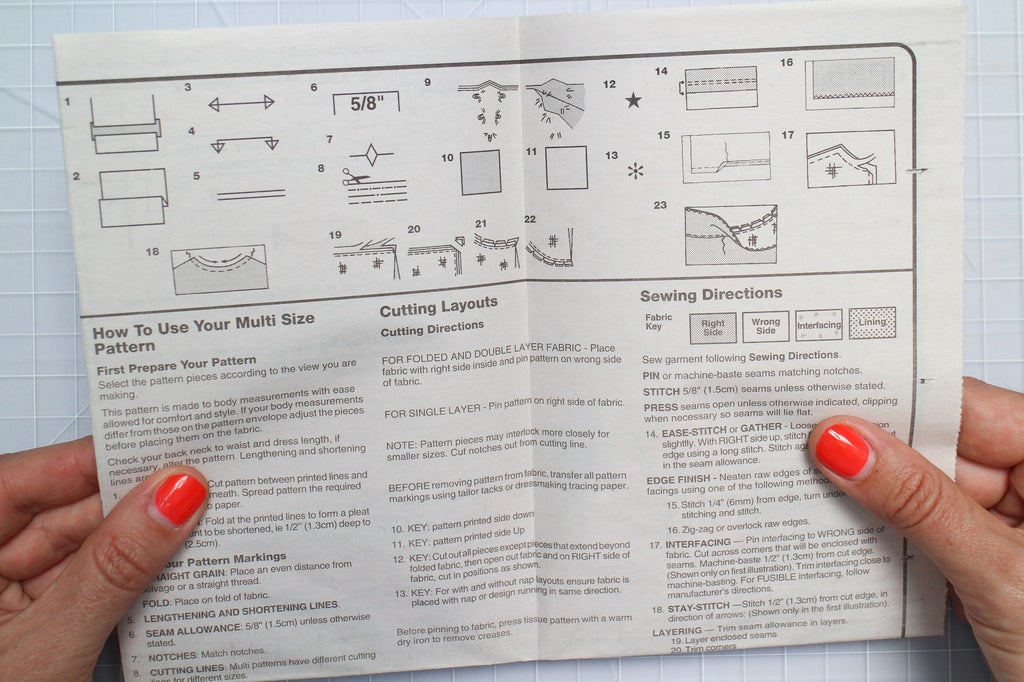
Instructions: patterns usually come with instructions, either as a booklet inside the envelope, or as part of the PDF download. Look at the instruction booklet to help you know which pattern pieces you need to cut out to make your design. I Iike to circle the options I'm choosing to help keep everything straight.
The instructions will also give you some "Cutting Layout" suggestions of the best way to lay out your patterns on your fabric, this will be useful a little later when we're cutting out the pattern.
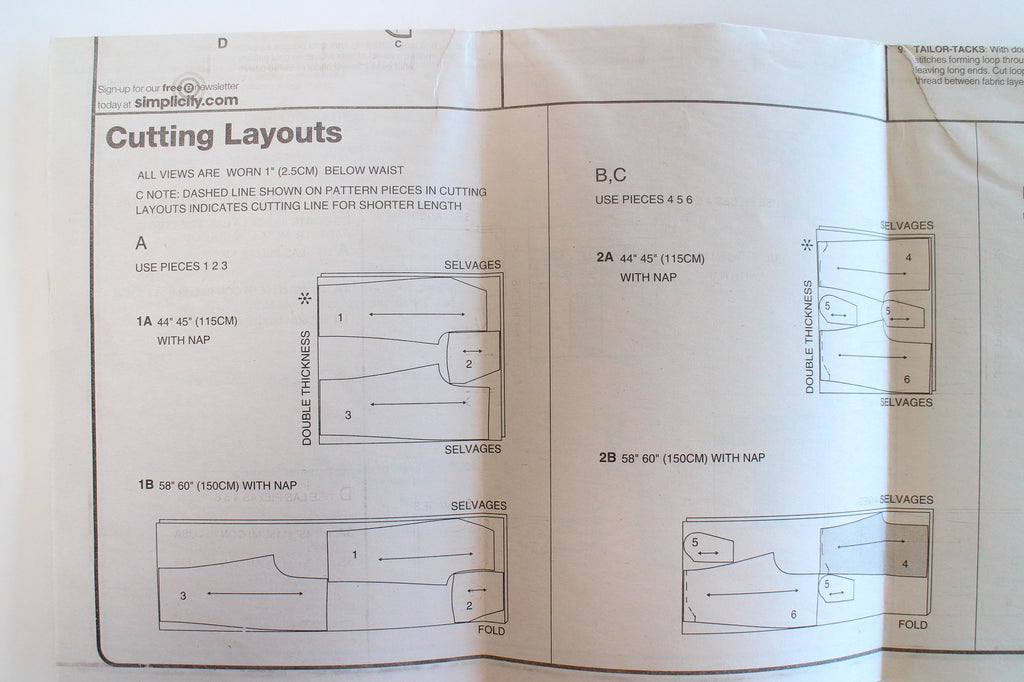
In the "Sewing Directions" section, you will find some important info, such as how wide your seam allowances should be, in the case of my Jalie pattern case 1/4", and how to finish your seams. You should also find some-step-by-step instructions that tell you how to sew the bodysuit. The one thing I'm not in love with about my Jalie pattern is that the instructions are extremely minimal, so I'm going to show you the process in photos too.
The Pattern Itself: Inside the envelope of a commercial pattern, you'll find the pattern itself, usually printed on very thin tan tissue paper.

If you are downloading a pattern, you'll have to print and then assemble your pattern from tiled 8.5x11" paper.


On a downloadable pattern, you'll also find a test measurement square that you need to measure to be sure your pattern has printed at full size.

On any pattern you will find a lot of different markings and words printed. You'll need to decipher all this to know which pattern pieces to use and which lines to follow.
Cut Lines For Different Sizes: On a multi-size pattern, each pattern piece will have not one, but several outlines that correspond to different sizes. On this pattern each size outline is printed in a different pattern of dots and dashes to help you follow the right line all the way around the pattern. Once you have chosen a size, you will find the lines that correspond to it and cut each pattern piece out along this line.
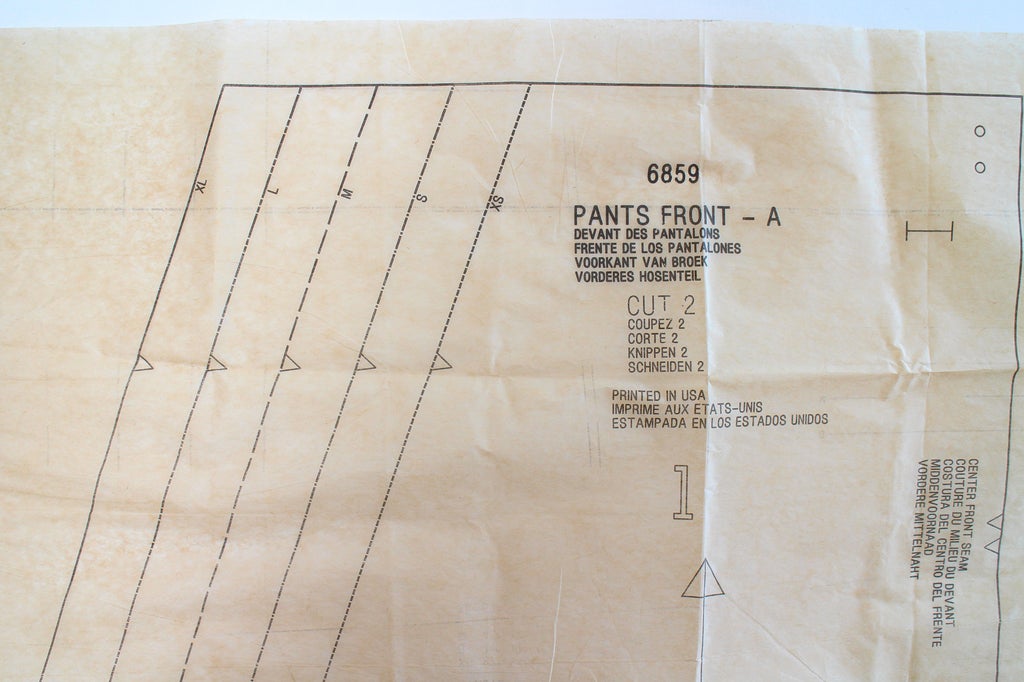
Grainlines and Cut on Fold Lines: on each pattern piece you will find either a straight line with an arrow on each end, or a line with arrows at 90 degree angles on each end. The straight arrows are grainlines that show you how to orient the pattern pieces in relation to the grain. Lines with 90 degree angles are cut-on-fold lines, meaning that you need to align this edge of the pattern with the fold of a folded piece of fabric, and not cut along this edge, so you create a pattern piece that is mirrored on both sides when you unfold it.

Notches: on most patterns, you will find one of two types of marking that indicate where to make a notch. On this pattern notches are shown as little triangles pointing in from the cutting line. To mark the notches you can either snip 1/4" into the seam allowance at each notch or cut a triangle past the edge of the pattern, pointing out away from the sewing line. Notches are there to help you align pieces properly with each other and and know which two piece go together. Some seams will be marked with single notches, and some with double notches - match double notches to double notches and single notches to single notches.
Step 6: Taking Your Measurements
If you don't know your measurements you'll need to take them to figure out what size of your pattern to choose. Look at the measurements that are used to identify the patterns, then take these measurements on yourself.
On this pattern you only need the height, bust, waist, hip, back neck to waist, sleeve and girth measurements (the girth is basically the torso measurement from your mid shoulder in the front, down between your legs and up to your mid shoulder in the back). Your pattern will often include a diagram that shows you where to take each measurement.
Once you have these measurements, write them on your size chart and check to see what size they correspond to on the pattern. If they correspond to a few different sizes, that's ok! None of us are average and you can combine sizes to get the pattern that is closest to your unique super-self :)
If your measurements are spread over a few different sizes, it's usually best to choose the larger size because it's easier to take something in than let it out. I'm a little smaller on top and larger on the bottom, so I chose a size T (small) on top and a size U (medium) on the bottom.
My height and "girth" (torso) measurements are outside the entire height range of this pattern, but this is something that can be remedied with some simple pattern alteration, which we will talk about in a minute.
Once I've chosen my sizes, I like to outline the cut lines I'm going to use in highlighter directly on my pattern.

Step 7: Tracing a Pattern

Patterns that are printed on tissue paper start to disintegrate when you use them more than once, and patterns taped together from paper are a little awkward. Also, if you want to make the same pattern in different sizes, cutting one size out prevents you from cutting another size later. For all these reasons I usually trace my pattern pieces off onto pattern paper before I use them.
There are a few different ways to trace patterns but the method I prefer is to lay blank white pattern paper over the printed pattern and just trace the markings through with a pencil and a ruler. Pattern paper is a bit translucent for this exact purpose, so you should be able to see the lines of the pattern through the paper. If you find the lines too difficult to see, you can try using actual tracing paper or tracing your pattern over a lightbox.

Choose the size you're going to make, and only trace off the lines that correspond to that pattern. I find it easier and more accurate to just mark important points, like corners and then use a ruler or a hip curve to fill in the lines between the marks.

In addition to the cut lines of the pattern, mark any other important information, like notches, grainlines and the pattern label and cutting instructions.

If you are using different sizes on different parts of the pattern, trace both lines, and then blend them together with your ruler or hip curve.

When you are done tracing cut each of your pattern pieces out along the cutting lines.
Step 8: Basic Pattern Alterations

The most basic alterations you should make on your bodysuit before you start sewing it are alterations for fit based on measurement. Your traced pattern should be as close to your size as the pattern you are using will accommodate, but you still may need to make a few changes.
One of the most common pattern alterations you can make at this point is an alteration in the length of the bodysuit. If you are taller, shorter, or have a longer torso than what corresponds to the size of pattern you have chosen, it is fairly easy to alter the pattern accordingly.
Bodysuit patterns will usually have a torso measurement on the list of garment measurements. In the case of my Jalie pattern this is the "girth" measurement. I have a very long torso, so this measurement on me was a full 5 inches longer than the measurement that corresponded to my size on the pattern. To make up for this you need to add some extra length to the pattern near the waist. The rules of patternmaking suggest that I should add half the difference to the front and back of the pattern, in my case 5"/2 = 2.5".


To do this, just cut the pattern at the waist, tape a piece of paper behind the cut and spread the pattern out the amount you need. This technique is called slashing and spreading, and it is used a lot in pattern manipulation in various forms. If you know that your extra torso length falls either above or below the waist, you can, also, cut the pattern a few inches up or down from the waist and spread it there instead like I've done here.


Now re-draw the curve of the waist or hip. Make sure you make this same length adjustment to the front and back pattern piece so the pattern stays balanced.

On the other hand, if you want to make a piece of the pattern shorter, you can remove some length by drawing a line and folding the pattern onto itself by half the distance you need to remove, then re-drawing the cut line.

One thing I have found however, is that many bodysuit patterns, including this one, are designed to be used for either 2-way or 4-way stretch fabric. If you are using 4-way stretch fabric as we are here the extra lengthwise stretch of the fabric will make up for the pattern being too short. If I was to add 2.5" to both the front and back of my pattern, it would be too much length, making the pattern loose and causing wrinkles.

A good rule of thumb is that the garment measurements of a spandex pattern should be 90% of your actual body measurements. You can test this by comparing your torso measurement to the pattern (remembering that the pattern includes seam allowances). If the pattern is around 90% the size of your body, you don't need to add or subtract any length. In the end I added 1.5" to both the front and the back which turned out to be a good amount. Sometimes with spandex patternmaking you have to do a bit of educated guessing, and the forgiving nature of the fabric will take care of the rest.
If your design is going to have a zipper in the front or back, making sure there is enough, or even a little extra room in the torso is definitely very important. The zipper will stop the fabric from stretching where it is attached, which can result in some unfortunate camel-toe action :/
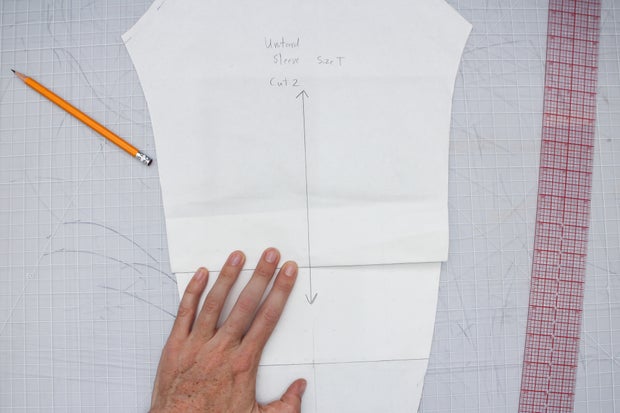
Making simple length alterations to other areas of the pattern such as sleeves, legs, etc, usually works the same way. Many patterns will have lines marked in various places that tell you where you should lengthen or shorten.
This unitard pattern has 3/4 length sleeves and legs, so I made the sleeves and legs full length by extending them. To do this I didn't just extend the lines of the legs and arms, but first measured my own wrists and ankles and made sure the cuffs and leg openings matched this measurement.
I also wanted to create a higher neckline on my garment than the scoop neck that the Jalie pattern has so I extended the front, raglan sleeve and back pattern pieces up to create a more fitted neckline. This is a slightly more complex alteration to make but still totally doable.

First I measured the pattern from waist to scoop neckline at the center front and center back, then subtracted this measurement from my front and back waist to neck measurements to see how much I needed to add to each piece.
I taped my front, sleeve and back unitard pattern pieces together with the seams overlapping, then put some extra pieces of paper under each one to extend them.


Using the measurements I had just calculated, I extended the center front and center back lines of the pattern and then used my hip curve to draw a new neckline that touched these points.

I extended the seam lines of the sleeve up to the new neckline as well, then added seam allowances, divided the three pieces and cut them out.


Some of these alterations might not be perfect the first time. That's why clothing is created through a cycle of patternmaking and fitting, and that's why we are creating a mock-up for our supersuit to take care of any small fitting alterations. Also spandex is very forgiving in terms of fit, so if some of this pattern alteration seems intimidating to you, don't worry, there is a lot of room for error in spandex patterns.
Step 9: Making a Mock-Up

Now that we have our pattern adjusted for our measurements, the best way to get it fit exactly and figure out where all our style lines will look best is to make a mock-up and try it on. If you really don't want to spend the money on fabric for this, you can try drawing your design lines directly on your pattern and dividing it up into separate panels without the aid of a mock-up, but this makes it harder to get a good fit and well placed style lines. See the section on Transferring Your Style Lines to Your Pattern for how to do this.
In order for your mock-up to be useful you need to make it out of fabric that has the same kind of stretch as the spandex you'll actually be using for the real version of the suit. Test your fabrics against each other in the store to make sure they have a similar weight and stretch percentage.
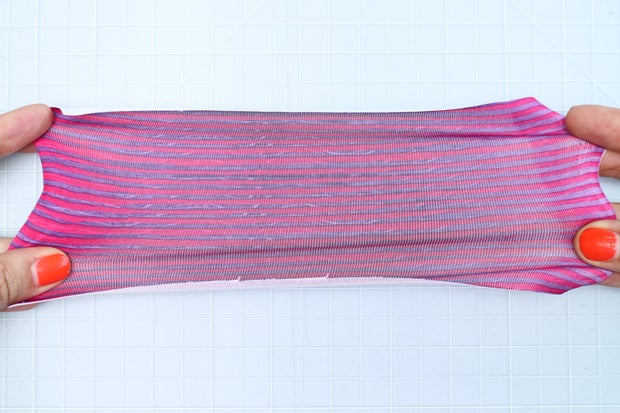
I'm the kind of person who can never have enough silly spandex bodysuits, so to help my mock-up not feel like a waste of time and fabric, I usually try to use some spandex I like, though using something with too much of a pattern will make it hard to draw your style lines. I found a nice spandex that has a crazy pattern on one side, but is white on the reverse side, which will work just fine because we can fit and draw style lines with the suit inside out. Make sure you have as much spandex as your pattern suggests, or more if you have increased the length substantially like I did.

Lay your fabric out on a large cutting surface as your pattern suggests, doubling it over with right sides together, and pin your pattern pieces down with the grainlines parallel to the grain of the fabric. There is some debate in spandex sewing circles as to whether you should be orienting your patterns with the most stretch going around the body, or up and down. When you are using 4 way stretch there is usually not a huge difference in stretch from one direction to the other, and I have found that laying out your pattern in either direction will work fine. So, as long as your stretch seems equal in both directions, lay your pattern out along either grain, perhaps so that the print on your fabric is oriented in a pleasing way.
If your pattern has any "cut one fold" lines with the perpendicular arrows like this one does, lay that edge of the pattern along the fold of the fabric as I've done below. I made sure to fold the fabric in a way that placed the diamond patterns along the center front fold because I thought that would look nice.


Use your scissors or cutting wheel to cut out your pieces and snip into your seam allowances at the notches.
Follow the instructions on your specific pattern for the best order to sew your suit together. If your pattern is complicated, make it as simple as possible for the mock up, for instance, don't set in any zippers, or finish any seams or hems.
There are a lot of different stitches you can use on a home machine to sew stretch, and we'll be talking about them more in the next lesson, but for the mock-up, I think the best stitch to use is a 1/4" wide zigzag with the zags set about 1/8"-1/4" apart. This stitch will stretch, but also won't be too hard to take out if you want to make alterations.


Pin your corresponding pieces together right sides to right sides, and mach notches.

In some places, especially around curves, you may find that one piece is slightly longer than the other. Distribute this ease as you pin, and then stretch the seams slightly in these areas as you sew so the length of each side is the same.
On my Jalie pattern, all the seams have a 1/4" seam allowance. I first sewed the center back seam, leaving about 7" open at the back to allow me to get into the suit:


Then I pinned the front to the back and sewed both side seams:

Sewing the inseam on a pattern like this can be a bit tricky because the shapes of the two pieces are opposite each other, the back is a point, and the front is a V. To pin these two pieces together, match the crotch points and place a pin here.

Then begin pinning down one side, then the other.


This will end up a bit awkward, with the front piece bunched up to fit around the point of the back. It can be a good idea to baste this area before sewing. I was lazy and didn't baste my mock-up. As you can see when I sewed it my stitches barely caught the edge of my front piece, which will make the crotch a bit unstable.
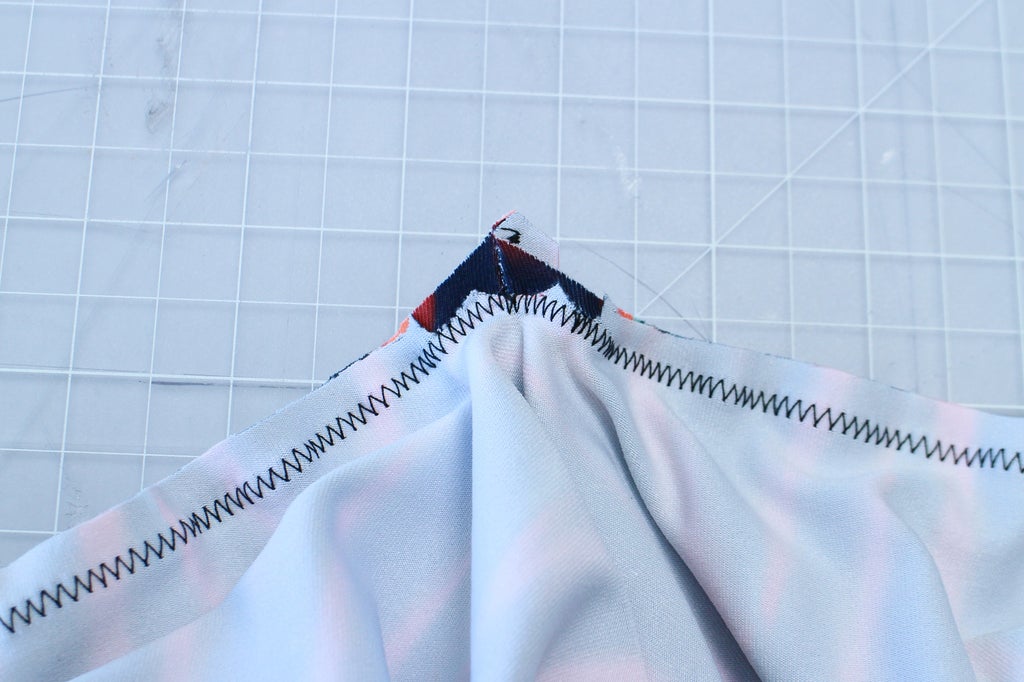
When I made the final version of the suit, I made sure to baste this corner first.

Next, I sewed the underarm seam of each sleeve together:


Then sewed the sleeves into the body of the suit:


Step 10: Fitting

Now it's time to try on the mock-up you've sewn. For this step, it can be helpful to have a buddy, hopefully someone who knows a little about clothing, or at least knows how to stick in a pin. You can totally do it alone though if you need to. I managed to fit and draw all the style lines on myself with the aid of a mirror, much to the amusement of my coworkers. You're definitely going to need a tape measure, pins or safety pins, and disappearing marker or chalk.


Put your suit on, how does it feel? How does it look? Look in a mirror, adjust it until it feels right. If there are places where it feels loose, make a mental note of them. Now take it off, turn it inside out and fit it with the seams exposed. Fitting it like this makes it easier to transfer your fit markings to your pattern, and it also means you are marking on the inside of the suit, not ruining the outside.
To correct the fit where it is too large, you (or preferably a handy buddy) are going to use pins to pinch the fabric together along seams until it fits better. It can be a good idea to use safety pins during fittings like this because they are less likely to poke you and more likely to stay in place, but you can also use regular straight pins.


Hopefully you can make all the adjustments you need by pinching fabric along the seams. But you can also pinch fabric in other places and take it out of the pattern later.
Once you've pinned our suit, mark the pin lines on both sides of the pinch of fabric with your disappearing pen.


Where the fit is too tight, or you want to extend the fabric, you need to make a note for yourself by either writing directly on the suit, or making notes on your pattern or flat sketch.


Step 11: Marking Style Lines

Once you have your suit pinned so it is fitting nicely you have two options: take the suit off, transfer the fit marks to your pattern (explained in the next section), and then sew the alterations into the suit so you can have it fitting well when you mark your style lines, or just mark the style lines with the suit pinned. It's good to do the former if your suit really needs major alterations, but if the fitting you did is fairly minor like mine was you can usually mark the style lines with it pinned.
Put your flat sketch in a place where you or your buddy can see it easily and start drawing the style lines onto your suit. If you are trying to do this by yourself you should be standing in front of a mirror.


One strategy for places you can't see well on yourself is to draw as much as you can and then just mark strategic places such as where you want the lines to hit the side seam, how low to make the neckline, etc.

After that you can take the suit off and try drawing the lines with it flat on the table, try it back on and make any adjustments until you have something you like.

I marked as many of my lines as I could on one side of the center front and back. Then I took the suit off and used my tracing wheel and transfer paper to transfer the lines onto the other side, then put it back on again and messed with the design until I like it. This isn't totally necessary, but it helps you see exactly how everything is going to look together.


Keep in mind that for cut-outs or necklines the fabric will tend to stretch more once the cut-outs are made. For example a low neckline will tend to drop even lower after it has been cut out, so you should make cut-outs a little smaller than you actually want them.
I didn't listen to my own advice here, and tried creating a very low V neckline on my suit. This neckline turned out to be way too open and I had to add a hook and eye closure below the bust. If I had made the cut-out narrower at the top I might have gotten away with leaving it totally open.
Step 12: Transferring Fit Adjustments to Your Pattern

Once you have your design drawn out in a way that you like, you need to alter your pattern to reflect the fitting adjustments you've made.
Some of the fitting adjustments can be done by eye, but for others it's useful to trace them through from the lines on the suit. Just lay the suit down on top of the pattern, lining up the seams and pinning the suit down to keep it in place. Use your spiky tracing wheel to trace any fitting adjustments through from the fabric to the paper like I am doing here with the leg. You may have to move the suit around a bit to get it lined up correctly in different places on the pattern.

To take the pattern in at the places you've marked, re-draw the fitting lines with a ruler or a hip curve, then re-add seam allowance and cut away the excess paper.


Remember that if you are taking in a seam you need to take the same amount off both the front and the back piece. You can do this by using your tracing wheel.

If you need to take the pattern out in any places make sure to tape extra paper along the seam and re-draw the sewing line farther out. Keep the lines smooth and blend them into the existing sewing lines, then add seam allowance.
If you need to take out or add any fabric to the length of the pattern do it the same way you did before sewing, by slashing and spreading or folding.
Step 13: Creating Pattern Pieces From Your Style Lines

Now that your pattern is the right size, you can transfer your style lines so you can create separate pattern pieces for them.
Use the same technique you used to transfer the fitting lines. Place the mock-up over the pattern and use your tracing wheel to trace the style lines through onto the pattern.


Then adjust the lines, smoothing them out with your ruler and hip curve.

Use your tape measure to check that the edges of matching pieces along the side and back seam are the same length so your style lines will match up.

Add some notches along the style lines to help you match-up the separate pieces later. It's helpful to put different numbers of notches on each edge of a pattern piece so you can keep corresponding edges straight. Two notches usually indicate the back edge of a piece. Notches should always be at right angles to the seam allowance. It's also especially important to put a notch on a seam where another seam intersects it.

When all your style lines are on your pattern there are two ways to turn these panels into separate pattern pieces. You can either cut up your pattern and add seam allowance, or trace off each piece onto a separate piece of paper leaving your original pattern intact. I definitely recommend doing the second if you ever plan on making another bodysuit in a different style. You now have a pattern base that is perfectly fitted to you which is a great thing to have around, and would be a pity to destroy.
Trace off each piece just as you did when you copied your out-of the package pattern. Remember, however, that while the outer edges of the pattern base include seam allowances, you still have to add seam allowances to the style lines once you've traced them. Also make sure you mark your notches on every piece, label them and mark the grainlines or fold lines.

The design of this pattern requires that it have a center back seam that does all the shaping in the butt and crotch area. Because the center back seam of my suit is straight above the waist and my suit has a waistband, I can eliminate the center back seam above the waist and in the waistband. This isn't at all necessary but I think it will look nice and make for less sewing.
To do this on the pattern, simply subtract the seam allowance from the center back of the waistband and the back panel and add "cut on fold" lines.

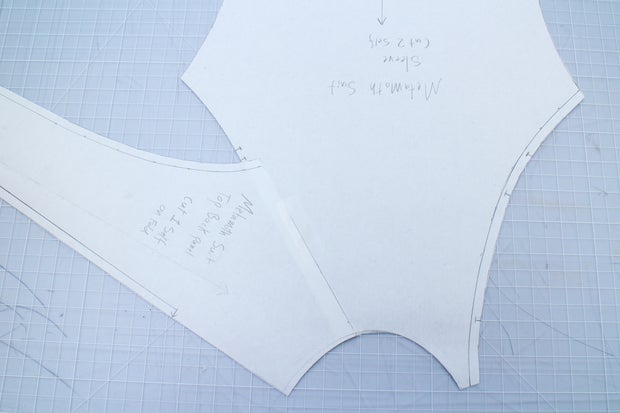
When I drew the style lines of my Metamoth suit I realized I wanted the front sleeve seam to drop a little lower than it is on the original pattern. Since the seam is basically straight in this area, it's not hard to adjust its position.

To do this, lay your sleeve and front pattern pieces on top of each other so the seam lines are lined up, then trace off a new sleeve piece that incorporates the top section of the front piece, and trace a new front panel with the same area subtracted.


If you have created a new neckline or new hems on the arms or legs, add enough seam allowance to create a hem, unless you plan to bind the edges. A good hem size for spandex is 3/8", so your hem seam allowances should be about 3/4".
When you've traced off all your pieces, cut them out.

Step 14: Additional Pattern Pieces
If you want to add any simple additional pieces to your suit, like collars or facings, you will need to make new pattern pieces for these. I decided to add a shaped stand-up collar to my suit which is a very simple pattern to draft when you are working with spandex.

To create the collar, I lined up my back piece with my sleeve, measured the length of my neck opening from front to back and doubled it. This is the distance all the way around the neck.

Then I drafted a collar pattern with this measurement as the base length. Fitted stand up collars like this shouldn't be more than about 2" tall.


To clean finish the edge of a collar like this, you need to create a second layer, or facing. For the collar itself you create the facing by just cutting out a second piece of the same pattern, but sometimes you need to create facings that are their own separate pattern pieces.

I wanted my collar facing to also extend down a few inches into the neck of my suit, creating a clean finish where I was going to place the center front closure.
To create this second part of the collar facing I placed a piece of pattern paper over my combined sleeve and back pattern pieces and created a facing that followed the neckline of the suit and extended 2" down.

If you are making any cut-outs in your bodysuit, facings can be a good way to finish the edges. To make a facing for a cut-out just trace the edge of the cut-out like I did with the neckline then add 2" on the garment side and a 1/4" seam allowance on the cut out edge.
Step 15: Sew Your Own Suit!
If you've made your own supersuit pattern and you're ready to finish it by cutting and sewing it in spandex, check out my Constructing a Spandex Supersuit Instructable take your pattern and turn it into a beautiful, custom fitted superhero costume!


