

Introduction: Experiments in Slit-scan Photography


At the KIKK festival in Belgium in 2014, I was inspired by the work of Adam Magyar who uses slit-scan photography to make beautiful serene and surrealistic images. So I decided to play with that technique myself, using just a webcam and the OpenFrameworks programming environment.
Step 1: The Technique


The slit scan technique is simple: you take one column of pixels from a moving image (for example from a webcam). You do this say 20 times per second and put all these columns next to each other. This gives an ever growing image like the one above. Every column of pixels in this image is taken of the exact same spot, but they are all taken at a different point in time. The video shows a screen capture of the tool I built in OpenFrameworks.
The next steps will explain how to install that tool so you can play around with slit scanning yourself.
Step 2: Download and Install OpenFrameworks


OpenFrameworks (OF) is 'an open source C++ toolkit designed to assist the creative process by providing a simple and intuitive framework for experimentation'. I think it is comparable to Processing but instead of Java, it is a C++ environment and therefore faster. OF makes grabbing and processing video from your webcam quite easy.
Download OF from their downloads page. There are versions for Mac, Linux, and Windows. I use the Mac version in the screenshots.
Unzip the downloaded file and move the resulting folder anywhere you like.
Make sure that Xcode is installed on your machine. If not, download and install it.
Step 3: Install the Slitscan Software


In the OpenFrameworks folder, find and double-click the project generator. This will start a small tool that can be used to (what's in a name) generate a project. Name it anything you like (I chose 'slitscanExperiment').
This will create a new folder under apps/myApps with the name of the new project.
In that folder find the src folder and replace the files ofApp.cpp and ofApp.h with the two files I included on this page (see below).

Step 4: Run the Software and Play!
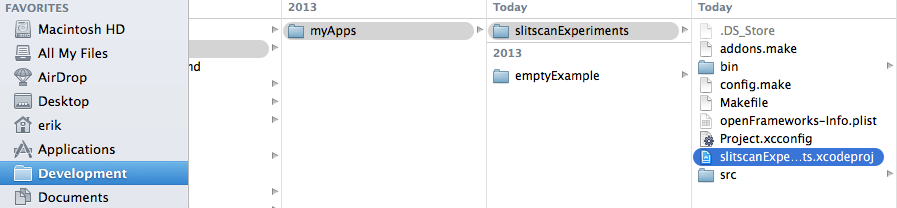


Now double-click on slitscanExperiments.xcodeproj. This will start Xcode and load the slitscan software.
Once loaded, make sure that 'slitscanExerpiments Debug' is the active scheme. Then press the play button at the top left of the screen and you're good to go!
At the top of the screen you see the video feed from the web cam. The white line shows what column is scanned (you can move it around by changing the slitScanGrabColumn variable in the program).
The resulting slit-scan image is shown at the bottom. Each time the image is 'full' (i.e. a 1000 lines have been scanned), the image is saved in the data directory.
Step 5: Circular Slit-scanning


I upgraded the software a little to allow for circular slit-scanning. Instead of scanning all pixels on a line in the video, now all pixels that lay on a circle are scanned. In every frame of the video, the pixels laying on the circle are taken and put in a straight line, one next to the other, just like in the ‘linear’ slit-scanning. This gives an even more abstract (and interesting?) image.
The image is above is made by pointing the web cam to a television screen playing Madonna's video 'Rain'.
Step 6: Folding the Timeline


This process of slit-scanning produces very long images, especially when slit-scanning a whole movie. I did this with the movie Fight Club, resulting in 240000 lines, i.e. a slit-scan image of 240000 x 250 pixels. There are several techniques to ‘fold’ such an almost 1-dimensional image into a 2D plane. These are called ‘space filling curves‘.
For folding the slitscan image of Fight Club I used the Peano curve and turned it 90 degrees clockwise, so the sequence starts at the top left, zigzags down, ending at the lower right. The rainbow-colored image shows the sequence by using color. Starting at the top left in red, going through orange, yellow, green, blue and purple, ending in red again.
Step 7: Fight Club in One Image


Folding the slit scan image of Fight Club results in the image above. It is the circular slit scan, folded in a Peano curve. It is too abstract to recognise the actual scenes from the movie, but it gives a nice overview of the lighting, the colours, and the pace of the movie.


