

Introduction: Flashing NodeMCU on Esp8266 and Getting Started


![STM32103: esp8266 NodeMCU ThingSpeak [using mbed.h]](https://content.instructables.com/FIN/4MND/IIEYTJZ0/FIN4MNDIIEYTJZ0.jpg?auto=webp&crop=1%3A1&frame=1&width=130)
![STM32F103: esp8266 nodeMCU Getting Started [using mbed.h]](https://content.instructables.com/F2V/D3SJ/IIDJE6ZX/F2VD3SJIIDJE6ZX.png?auto=webp&crop=1%3A1&frame=1&width=130)
In this Tutorial, I will show you how to Flash NodeMCU on esp8266 v1.
Components Needed:
- USB to TTL converter
- esp8266 v1
- Male to Male (2x) and Male to Female(6x) Connecting Wire
- Bread Board
Download esp8266_flasher.exe and nodemcu_integer_0.9.6-dev_20150704.bin from files attached.

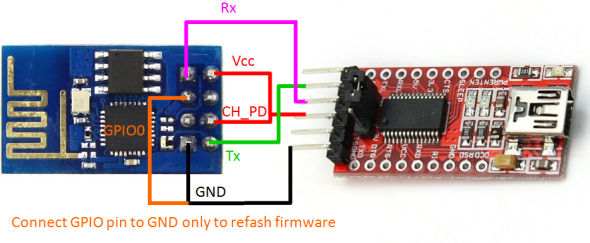
Step 1: Making Hardware Connections

Connect your USB to TTL converter to your PC (I assume that you have drivers etc. installed for this converter and that it's working properly.) Make connection as following:
- esp8266 Vcc -> 3.3V USB to TTl Converter
- esp8266 CH_PD -> 3.3V USB to TTl Converter
- esp8266 Tx -> Rx USB to TTl Converter
- esp8266 Rx -> Tx USB to TTl Converter
- esp8266 GPIO0 -> GND USB to TTl Converter
- esp8266 GND -> GND USB to TTl Converter
Note:
- If you just have single Vout then make sure to short jumper to 3.3V Side.
- As you have to connect two pins to Single +3.3V and 2 pins to single GND using BreadBoard will be a good idea.
- You can also use Arduino UNO as USB to TTL converter. Just connect RESET of your Arduino UNO to GND. That's it! Now, your Arduino Pin 1 is Rx and Pin 0 is Tx. Don't worry about 5v/3.3v of Tx/Rx pins.
- If your are using an external source to power esp8266 make sure to common the GND of external source and your USB to TTL converter.
[ Image Source]
Step 2: Uploading Firmware
Go to Device Manager in Control Pannel. Now, Under 'Ports ...', See COM port of your USB to TTL converter. Now, run esp8266_flasher.exe. Click on Bin Click on Bin Button, an open file dialogue will appear, navigate to directory/folder where you downloaded nodemcu_integer_0.9.6-dev_20150704.bin file. Select this file. Change COM1 to the COM port on which your USB to TTL converter is attached. Click on Download Button. One download is 100% programme might not show any signal. Programme might say Failed to leave Flash mode. Ignore that. Its Perfectly Normal. Just close the Programme and Restart the esp8266. (Disconnect and connect will work).
Note:
- Make sure no other programme is communicating with that COM port.
- If you find any error disconnect and connect the CH_PD pin from and to Vcc and try again.
- Some Time COM port just might not work because of one reason or the other. Try removing USB to TTL converter and inserting it back again. Now, try flashing again.
- If not connecting you might need to interchange Tx and Rx connections.
- Make sure that your GPIO0 pin is connected to GND.
Congratulations! you have successfully flashed NodeMCU to your esp8266.
Step 3: Hello World! NodeMCU.
So Now, you have NodeMCU running on your esp8266. Let say, Hello World! NodeMCU.
We will need a Serial Terminal software for communicating with esp8266 via USB to TTL converter. I will be using most widely used Putty (direct play .exe file attached). Run Putty.exe. Click on Serial. Select the COM port to which your USB to TTL converter is attached. NodeMCU sets default baud rate of esp8266 to 9600. Click Ok.
GPIO0 still connected to GND? disconnect it from GND. Now, restart you esp8266! you must see NodeMCU firmware version and '>' character. Now type in following line of code:
print("Hello World! NodeMCU.")and press Enter. and yes, it prints Hello World! Node MCU. :)
Note:
- you might see some warning about init.lua. Don't worry about that for now. that will be removed in next step.
Step 4: Changing Default Baud Rate
9600! but, we want if we want to change our default baud rate? let say change to 115200. Easy!
Run Putty. Open Serial Port (at 9600). print something (just like the previous step) to make sure that are good to go. Now, we will edit init.lua. This is the file which is executed every time esp8266 is powered on (or restarted). In this file, we will change baud rate to115200. you can also make it print something every time at startup. Now, to edit this file and change Default BaudRate type in following line of Code and press enter at the end of each line:
file.open("init.lua","w+")file.writeline([[uart.setup(0,115200,8,0,1,1,1)]])
file.writeline([[print("Baud Rate set to 115200 by ARK4579")]])file.close()
Now, Enter following line of code:
node.restart()
after you sometime after you press Enter this window will show garbage value. that because now it will be communicating at 115200 Baud Rate and you current Serial window is trying to communicate at 9600. Now, Close this window. Run Putty again. Click Serial. Select COM port. This time set Baud Rate is 115200. Click Ok. Now, try to print something. It must get printed. If not, something is wrong.
Step 5: Connecting to Wifi
What's the Whole concept of having esp8266 if you are not eager to connect it to wifi and see if it's actually getting response from internet or not. Let try to do that. Assuming you have all connections in place and Putty Serial Port Open and working properly. Type in following lines of code and press enter at the end of each:
wifi.setmode(wifi.STATION)
wifi.sta.config("yourWifiName(ssid)","password")wifi.sta.connect()
Now, that you must be connect to your WiFi acess point, let check. Type in:
print(wifi.sta.status())
If you get '5' as output this means that you are connected! If not, Something is wrong. Assuming you are connected let try to get our ip. Enter:
print(wifi.sta.getip())
and here is your IP. Now, that we are sure that we are connected to our WiFi access point let get response from some website Enter following lines of code onw by one:
sk=net.createConnection(net.TCP, 0)
sk:on("receive", function(sck, c) print(c) end )sk:connect(80,"207.58.139.247")
sk:send("GET /testwifi/index.html HTTP/1.1\r\nHost: www.adafruit.com\r\nConnection: keep-alive\r\nAccept: */*\r\n\r\n")Now, After few seconds you must get response! If you got, you will know. If nothing happens. Try to Enter Last two line of code again. :) Best of Luck.

![Tim's Mechanical Spider Leg [LU9685-20CU]](https://content.instructables.com/FFB/5R4I/LVKZ6G6R/FFB5R4ILVKZ6G6R.png?auto=webp&crop=1.2%3A1&frame=1&width=306)


