

Introduction: From Truck Tires to Life-lasting Bags / De Cámaras De Camión a Bolsos Eternos!


Eng: Few years ago I started getting involved with this idea of the environmentally friendly activities, recycling things, re-using mostly, and I watched on tv a programme on this topic, showing some of this bags made out of tires without showing how to do them. I was shocked at first with the idea but then I reallized that it was a great one. So I run to the nearest tire workshop and asked for some tiretubs that were useless for them and made my first tire bag.
After doing so much research on the net and also research on the local market, I realized I needed to make some tools myself to save some money, which was nice since I was reusing other things to make my tools (details inside instructable). I bought some tools and I already had some others.
So here I am now making these bags at friends demand during my free-time, and you can see more sample of my work at my facebook profile at https://www.facebook.com/JuampaBM/media_set?set=a....
AND THE BEST OF ALL .... HERE ARE THE INSTRUCTION TO MAKE THEM!!!!
If you like it, please consider voting for me in the "Trash to Treasure" and "Homemade Gifts" and "Bags" contests! :)
-----------------------------
Esp: hace unos años comencé a involucrarme con la idea de las actividades en beneficio del medio ambiente, reciclando cosas, re-utilizando la mayor parte de ellas, y ví en TV un programa del estilo, que mostraba unos bolsos hechos con las cámaras de los automóviles, pero no mostraban como hacerlas. Al principio me pareció rarísima la idea, pero luego me di cuenta que era una muy buena idea. Entonces salí corriendo a la gomería mas cercana y les pedí las cámaras que ya no tuviesen uso para ellos y armé mi primer bolso.
Luego de investigar un poco en internet y en las tiendas locales, vi que necesitaría hacerme algunas herramientas yo mismo para ahorrar dinero, lo cual fue bueno porque pude reutilizar otras cosas también (detalles dentro del Instructable). también compré algunas herramientas y otras las tenía.
Y acá estoy, haciendo bolsos a pedido de mis amigos durante mi tiempo libre, y pueden ver mas modelos en mi perfil de facebook https://www.facebook.com/JuampaBM/media_set?set=a....
Y LO MEJOR DE TODO ... ACA TIENEN LAS INSTRUCCIONES DE COMO HACERLOS!!!!!!
Si les gustó, por favor voten por me en los concursos de "Trash to Treasure" y "Homemade Gifts" y "Bags".
Step 1: SELECTING THE RIGHT MATERIALS / SELECCIONANDO LOS MATERIALES APROPIADOS.


After some tests I did at the beginning, I could finally identify that the following tools were totally necessary.
Pic1: A piece of tire-tube, not damaged, and big enough for the size of bag you want. I choose a big one since i'm doing a 3-pieces bag (1 big piece for main body and 2 pieces for sides).
Pic2: Strong scissors, comfortable for your hands since cutting rubber is harder than cutting paper. I got these from a gastronomy set, they came with some butcher knifes and a cutting board, as you can see in the picture, scissors have a nut cracker too.
Pic3: Detergent, hot water and a brush,
Pic4: Motor Cleaner, which is the soupy liquid you see in the picture and a piece of cloth. Motor cleaner removes almost everything and leaves the tire in its natural colour.
Pic5: Ruler and pen.
Pic6: Spacing-overstitch wheels. I made my own one see it at pic7.
Pic8: Hole Punch Tool. I bought a heavy duty one.
Pic9 and 10: Waxed threads and leather needles, I choose different Colors, but the ones I mosly use are the ones that match well with black rubber, like red, blue, fucsia, black, grey and white.
Pic11: Fastener. I found in a store this kind of metal buckle similar to the old suitcase ones, and I like them, but I also use the magnetic clasps or plastic buckles.
Pic12: D-Rings (2 pieces)
Pic13: Pliers
Pic14: metres of chain, I choose a double-ring chain, seems to be strong for a woman`s bag of this size. But you never know how much they can loan inside their bags. LOL!
----------------------
Después de algunas pruebas que intenté al principio, pude finalmente identificar que las siguientes herramientas son totalmente necesarias.
Foto1: un pedazo de cámara de goma, que no esté dañada, y lo suficientemente grande para el tamaño de bolso que quiero hacer. Yo elegí una bien grande porque voy a hacer un bolso de 3 piezas (1 pieza grande para el cuerpo principal y 2 para los laterales).
Foto2: Tijeras fuertes, cómodas para tus manos ya que cortar goma es mas difícil que cortar papel. mis tijeras las saque de un set de gastronomía, y venían con unas cuchillas grandes y una tabla de picar alimentos. como se ve en la foto, la tijera trae un partidor de nueces.
Foto3: Detergente, agua caliente y un cepillo.
Foto4: Limpia Motor, que es un liquido jabonoso como se ve en la foto, y un pedazo de tela/trapo. El limpia-motor quita prácticamente toda la suciedad que el detergente no pudo, y deja la goma en su color natural.
Foto5: Regla y birome.
Foto6: Ruedas marca-puntadas. Yo construí mi propia rueda como ves en la foto 7.
Foto8: Sacabocados. yo compré uno de uso profesional.
Foto9 y 10: Hilos encerados y agujas para cuero, yo elegí varios colores, pero los que más uso con los que convinan con el color negro de la goma, como el rojo, azul, fucsia, negro, gris, y blanco.
Foto11: Cerradura, Encontré en una tienda estos cierres similares a los de las maletas viejas y me encantaron, pero también uso cierres magnéticos.
Foto12: Aretes para las azas
Foto13: Pinzas
Foto14: 1,5 metros de cadena, yo elegí una cadena de doble eslabón, me pareció suficientemente fuerte para un bolso de mujer de este tamaño, pero nunca sabes cuanto cargarán ahi dentro.. jajaja
Step 2: Cleaning, Measuring and Cutting. // Limpiar, Medir Y Cortar.


I cut the tire in half or 3 pieces, get into the shower and wash it with the handset, hot water and detergent and bush untill clean. I hang the tubes so they dry alone.
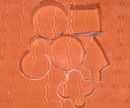
After first cleaning, I cut the pieces I want to use, depending on the size and shape I want for the bag. for this INSTRUCTABLE, I cut a rectangular piece as shown in pic1. and 2 long thinner pieces for the sides. Then I mark the borders and shape the pieces for the bag. Mark some curves on the flip top, and mark the round botom part of the sides, and the straight lines, and do the final cutting. Once I have the pieces ready, I clean them just rubbing the tire with the cloth wet with motor cleaner and dry with another cloth.
Unfortunatelly, I don't have pictures of the cleaning process, but pic1 shows how tires look like before cleaning and pic2 shows how it is after cleaning
----------------------
Yo corto la cámara en 2 o 3 partes, voy a la ducha, y las lavo con agua caliente, detergente y cepillo aprovechando la ducha teléfono que tengo en casa. luego las cuelgo y las dejo secar solas.
luego del primer lavado, corto las piezas que quiero usar dependiendo del tamaño y la forma que quiero darle al bolso. Para este INSTRUCTABLE corté una pedazo rectangular como se muestra en la foto1 y 2, y 2 pedazos largos pero mas finos para los laterales. Luego marqué los bordes y les dí forma a las piezas del bolso; marqué las curvas de las esquinas de la tapa del bolso, las lineas rectas bien prolijas, e hice los cortes finales. Una vez que tuve las piezas listas, las limpié resfregando con un trapo mojado con limpia-motor, y las sequé con otro trapo.
Desafortunadamente, no tengo fotos del proceso de limpieza pero en la foto 1 puedes ver la cámara antes de limpiarla y en la foto 2 el resultado final luego de limpiarla.
Step 3: Sewn by Hand // Costura Hecha a Mano


Once the pieces are clean, I prepare them for sewing. I sew them by hand, well... i do EVERYTHING by hand. Firstly, I mark the spots where I want to make the holes for sewing. As I want the holes to be evenly separated, I use a spacing overstitch wheel I made myself (I used a ruler at the beginning but took too much time marking spots one by one). (Pic1). Press and roll the spacing-overstitch wheel along the edge of each pieces and mark the spots for the holes. (Pic2 and 3).
After that, make all the holes with the hole punch tool, just pressing the tool on each spot marked with the spacing wheel. As shown in pic 4, 5 and 6.
Now, sewing time!!! To get a perfect sewing, I mark the lowest point of each side, and mark the middle point of the bottom of the bag, (Pic7) then put one side over the main body, respecting these marks and start sewing from that point to the front, (Pic8 -9) and then to the back, or viceverse. I just do some cross stitching using 2 needles, threaded with grey waxed thread, and go some holes with one needle from right to left, and then otherwise with the other needle, crossing the threads over the edge. Repite the same on the other side. (Pic10-11)
As you can see en pic11, there are holes made at the top edge of the front, and all along the flap edge. There is nothing else to sew there... I just use them to pass a thread all the way round the give the edge a different look, this way your eyes will look at the thread, not at the edge of the tire. You can see final look at pic12.
---------------------
Una vez que las piezas están limpias, las preparo para coserlas. La costura la hago a mano, bueno.... TODO los hago a mano. Primero que nada, usando la rueda marca puntadas, marco los puntos donde haré los agujeros para coser. Como quiero que los agujeros me queden todos a la misma distancia, uso la rueda marca puntadas que me hice (yo usaba una regla al principio, pero me tomaba demasiado tiempo marcar punto por punto) (Foto1) Presionamos la rueda y la hacemos girar a lo largo de todos los bordes de cada pieza marcando los puntos para los agujeros. (Foto2 y 3)
Luego hago todos los agujeros con la herramienta sacabocados, solo presionando con fuerza sobre cada punto marcado por la rueda, como se muestra en las fotos 4, 5, y 6.
Y ahora, hora de coser!!! Para lograr una costura perfecta, marco con birome el punto mas bajo de cada lateral, luego el punto medio del fondo del bolso (foto7), y luego superpongo las 2 piezas y comienzo a coser desde estos puntos hacia el frente (foto8-9) y luego hacia el fondo, o viceversa. Simplemente hago un punto cruzado usando 2 agujas, enhebradas con hilo encerado gris, y voy algunos agujeros con una aguja de derecha a izquierda y luego con la otra aguja de izquierda a derecha, cruzando los hilos sobre el borde. Repito lo mismo del otro lado. (Foto10-11)
Como pueden ver en la Foto11, hice algunos agujeros en el borde superior del frente y a lo largo de toda la tapa. No hay nada que coser ahí... simplemente los hago para pasar un hilo a lo largo de todos los bordes para darle otra vista. De este modo tus ojos solo verán el hilo y no el borde de la goma. La vista final se ve en la foto12.
Step 4: Setting the Fastener, Buckles and Chain // Instalando La Cerradura, Los Aretes Y La Cadena.


As you can see en Pic1, Fasteners consist mostly of 2 parts, a male and a female part.
To set the fastener in a perfect way, put the male part on the place where you want it to be, mark the hole you need to make to set the clamp of the male part of the buckle, then make the holes with the hole punch tool, place the fastener and fasten its clamp. Shown in pics 2-6.
Once you have the male part of the buckle in place, lock the other part of the fastener to the male one, and press againt the front part of the bag so the teeth of the clamp leave a mark on the tire, make hole on these marks, separate the female part from the male one, place it in its position with the teeth coming out on the other side of the tire, set the security tin, and fold the teeth over the security tin fastening the closure. (pics 7-10).
To set the Chain, I used some kind of triangular "D" Ring, sewn on the sides of the bags. As you can see in pic11, I cut the sides of the bag quite longer that the bag height, this is coz I fold the top of the side and sew it so to hold the D-Ring in its place as seen in pic 12. Result on Pic 13.
Finally, with a set of pliers, open the fisrt ring of the chain, place the D-Ring inside of it, and close the chain ring. Repeat the same with the other end of the chain.
-------------
Como pueden ver en la foto1, las cerraduras típicamente cuentan con 2 partes/piezas, una macho y una hembra.
Para colocar la cerradura lo mas perfecto posible, colocamos la parte macho en el lugar justo donde queremos que quede, marcamos los agujeros y los hacemos con la sacabocados. luego ponemos el macho de la cerradura en su lugar nuevamente, colocamos la traba y doblamos las patitas de la traba para fijar la cerradura en su lugar. ver Fotos 2 a 6.
Una vez que tenemos la parte macho en su lugar, trabamos la parte hembra con la otra parte ya fijada, presionamos con fuerza sobre el frente del bolso para que los dientes de la cerradura marque la goma y as ipodemos hacer los agujeros con la sacabocados en su lugar correcto. Luego separamos nuevamente la hembra del macho, la colocamos en su lugar con los dientes asomando por el interior del bolso, colocamos la chapa de seguridad, y doblamos los dientes sobre la chapa, fijando la parte hembra en su lugar. Ver Fotos 7-10.
La cadena va enganchada a unos aretes que van cosidos a los laterales del bolso. Como pueden ver en la foto11, yo corté los laterales del bolso bastante mas largos que la altura del bolso, para luego doblar la punta del mismo hacia adentro, y coserla para sujetar los aretes en su lugar, como se vé en la foto12. Resultado final en Foto13.
Finalmente, con una pinza, abro el eslabón de un extremo de la cadena, lo engancho al arete, y cierro el eslabón. repetimos lo mismo con el otro extremo de la cadena y el otro arete.
Step 5: Great Bag for Every Woman. / Grandioso Bolso Para Todas Las Mujeres.


And here you have the final result. A great bag, made out of very pollutant rubbish turned into and eco-friendly fashionable and very useful ellement.
I love these bags, and fortunatelly, many women and even men love them too. I make them customized at customer's request.
Hope you like my bags and this INSTRUCTABLE; you can do yours, and keeps on sharing all your projects at INSTRUCTABLE.COM as I did with mine.
BEST WISHES TO EVERYONE!!!
---------------
Y aqui tienen el resultado final. Un grandioso bolso, hecho a partir de basura altamente contaminante, convertiro en un elemento eco-amigable, de super moda, y muy util.
Yo amo estos bolsos, y afortunadamente a muchas mujeres e incluso algunos hombres también les gustan. Yo las hago personalizadas a pedido del cliente.
Espero les gusten mis bolsos y todo el INSTRUCTABLE; ahora ustedes pueden hacer sus propios bolsos, y sigan compartiendo todos sus proyectos en INSTRUCTABLE.COM como yo hice con el mio.
SALUDOS A TODOS!

Runner Up in the
Homemade Gifts Contest 2016

Participated in the
Trash to Treasure Contest 2017

Participated in the
Bag Contest


