

Introduction: God Particle Wearable LHC Demonstrator Shirt


So to advance fashion geekwear, I present the God Particle Wearable LHC Demonstrator Shirt. An academic tool to show off to your friends and impress them with an expanation of the LHC and how it works. What is the learning objective here? Make stuff to learn stuff. Good to wear to lectures where you are trying to inspire the youth of today to be engineers of the future. Engage them but do not allow them to press your buttons.
This is a derivative work of the Daft Punk LED Matrix Breakout Board based on the original Daft Punk Coffee Table. So what we have is an ordered bunch of blinking LEDs that is programmed to light up the LHC diagram. Powered by Arduino powered by the miracle of electronics.
If this may seem too advanced for you, maybe start out on the equally compelling Star Trek Phaser Red Shirt.
Step 1: Gather Your Particles...

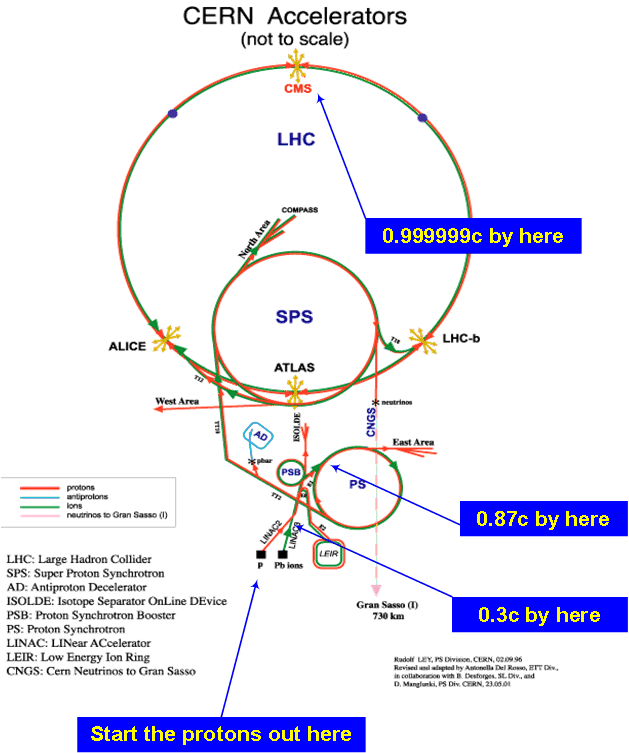
I found a more detailed image of the CERN overview of the accelerator complex here http://lhc-machine-outreach.web.cern.ch/lhc-machine-outreach/images/complex/Cern-complex.gif Interesting site to check out the other images if you are interested.
I had taken some notes after viewing Scientific American's video. I wanted to incorporate the animation to show the flow of the particles and indicate the energy or power used to accelerate them at each stage.
Basically, this project is to make a shirt to illustrate the workings of the CERN experiment to observe sub-atomic particles. The shirt to demonstrate the ATLAS detector to show the actions of the quarks and gluons may be a future project. Or...25 LEDs can go a long way to illustrate protein folding or DNA or chemical bonding.... Be ambitious and wire up a CRAY supercomputer or HAL 9000.
I will leave out a lot of detail in this build because they are covered in other instructables in detail.
Refer to the Daft Punk Coffee Table instructable to get an understanding of how to control a matrix of LEDs with an arduino microprocessor.
The arduino sketch and libraries used is there. The only thing I will offer is my frames.h file which contains the animation but will be less than useful since your final design and configuration/ how LEDs are sewn on probably wlll not match pin for pin.
Next, refer to the Daft Punk LED Matrix Breakout Board instructable to see how to create a workable interface for the LEDs so we can "free them from the grid" and place them artfully in our project.
So, you need a shirt or a hoodie or whatever garment you want to place this on.
Iron-on transfer paper to print out the image from an ink-jet printer(color laser copier-no color laser printer- stuff is more expensive and hard to find)
Electronics and soldering skillz.
LEDs, ribbon cables, arduino, perfboard, headers, female headers
Basic sewing skillz with needle and thread.
CAUTION: Learn how to solder safely. Learn how to sew safely. Both essential maker skills.
Step 2: Make It Easy on Yourself...


Follow the instructable to create a Daft Punk LED Matrix Breakout Board.
Woot, I broke down and got some headers(male with pins, female with the sockets). The male headers were easy to snap off to the number of pins I wanted. The female headers were not designed to be snapped off so you see the headers are kinda rough at the ends. I just gripped them with a pair of pliers and broke them off. I guess a hot knife would have been better to slice through the female headers.
Since I wanted this to be modular and have plenty of headers to work with, I put headers to use for the connections to the jumper wires going to the arduino.
I took some CAT5 ethernet unshielded twisted pair cable apart to use as my jumper wires to bridge the connections underneath my perfboard. Solder in the diodes and resistors where needed. I am not geared up to do any custom circuit board etching so I am going to run with my perfboard.
Building this is actually a good way to practice your soldering skills. Luckily I have a temperature controlled soldering iron with a fine tip to get in where I need to.
Step 3: Let There Be Light...

Once you have your breakout board ready, you are ready to work on the extension cables and header cables to the arduino,.
Using ribbon cable is great because you can peel off the number of conductors that you need. It is also flexible so that it can be comfortably used in our "soft circuit" or wearable application.
Peel apart the conductors at the ends of the ribbon cable.
Strip just enough wire to match the length of the header short side pin that you are soldering to.
Pre-tin the cable ends. Pre-tin the header pin with a small blob of solder.
Press the wire on to the solder blob on the pin with the soldering iron.
You should get a nice joint when the solder flows.
Step 4: Test, Test, and More Testing...


Just like the QA dept at ibles....maybe
Now that you have the breakout cables to the arduino, it is a good time to test all of your connections on the LED breakout board.
The arduino should be loaded and running the testmode to light up each LED. The female headers allow you to plug in your LEDs directly. Make any adjustments as necessary to get every position on the board working.
Now do the same thing with ribbon cable to solder the LEDs to the cable harnesses. Guesstimate how long you want the cables to be or refer to a mockup of your shirt on which way you will be routing the wires.
Keep the orientation of the LEDs consistent so that you can keep each cable pair organized. Since I had 5 LEDs on each terminal position, I used a 10 conductor cable to break out the positive connections and the ground buss which plugged into the breakout board.
If it is all good, check it out with your LED extension cables with the LEDs plugged into the breakout board.
Step 5: Make a Stickie Sticky...


Make any adjustments or additions to your downloaded graphic.
I added the power levels, resized the two smaller proton synchrotrons to be larger, and moved/enlarged some text to make it more readable. The gif was not in a very high resolution.
Print out your graphic of the CERN LHC accelerator complex.
Print out a paper copy to plan out where you are going to place your 25 LEDs.
Print out a copy on your iron-on transfer paper.
This stuff was for iron-on images for dark materials. You print normally with an ink-jet printer , not image-reversed, peel off and iron on with a special non-stick cover sheet. Instructions for your iron-on transfer paper might be different.
Apply the iron-on transfer to your shirt or garment with an iron and the special non-stick cover sheet.
Check to make sure all is adhered and let cool.
Step 6: Wire It Up and It's a Wrap...


Place your components on the shirt to see where you want to place everything.
I will just sew my components on. The breakout board and arduno have holes to pass the loops of thread through. I could have made arduino sew easy mounting shields but direct application is just fine.
By the way, I will power this with a 9V battery. I got the battery clip and the power plug that fits into an arduino ( Radio Snacks, Size M, coaxial, 5.5mm O.D. x 2.1mm I.D, positive + center/tip). I used some cable ties around the 9V battery and sewed to the plastic loops.
Methodically go around and sew each of the LEDs in place. Yeah, you could have put some shrink wrap on the LEDs but I was going to sew each lead apart so it would be separated and not able to short out. Meh, 50 pieces of tiny heat shrink tubing and maybe a heat shrink overwrap did not seem like much Fn fun.
Anchor some of the main cables by sewing a loop attached to the fabric around the cables.
Separate the ribbons more if you need flexiblity . Use tie wraps to bundle and gather the loose wires.
Step 7: Animate It...
My animation turned out to be 181 steps or frames. Use the widget to indicate which LED is on or off. Do it step by step starting from the first LED and then add more. The sketch loops all of the frames into an animation. Note that the frames.h file may download with a random-generated name from the ibles system, just rename to frames.h
So use this project as an inspiration for other concepts that can be translated to a cool geeky light up shirt. This is soft circuits, old school.
Enjoy!


Participated in the
LED Contest with Elemental LED

Participated in the
Hurricane Lasers Contest

Participated in the
Back to School Contest


