

Introduction: How to Build a Guitar Speaker Box or Build Two for Your Stereo.


I wanted a new guitar speaker to go with the tube amp I'm building. The speaker will stay out in my shop so it doesn't need to be anything too special. Tolex covering might be too easily damaged so I just sprayed the outside black after a light sanding. I found a great "cheap" grille cloth material. I can't wait to try it out on my new amp that's about finished. It sounded great when I tried it out on my shop radio.
The WARNING!
Before we get too far into this let me say this, I'm not trying to teach a complete course in woodworking or include all of the steps needed to complete this project. I'm not going to warn you of all of the dangers of working with tools. You will have to fill in some gaps here and there or maybe huge gaps in some places. I don't take any responsibility for any loss either financial, physical, mental etc. either real or imagined.
If you don't agree to this please look at another instructable. If you do then I hope you have as much fun building yours as I did building mine.
Step 1: Materials and Tools Needed
Materials needed.
One half sheet 3/4" MDF or cabinet grade plywood. ( MDF is better for this than particle board)
Alternate material: 1 x 12 pine or poplar boards would make great side and top pieces. It would eliminate some long cuts and the front and back would be perfectly parallel. The downside is that good 1 x 12 boards are more expensive.
Wood glue
1 1/2" wood screws. I used black sheetrock screws
2" finish nails if not making biscuit joints
4 plastic feet or small casters
A handle of your choice
1/4" jack
Speaker wire
Speaker of your choice
Mounting bolts to fit the speaker and long enough to pass through the MDF.
Grille cloth if you want to protect you speaker and have a more finished box
Tools you must have
Eye protection
Ear protection if using power tools
Saw to make a straight cut
Saw to make an inside curved cut. May be a coping saw, saber saw etc.
Screw driver (to fit the screws of course)
Measuring instruments
Marking instruments
A square of some sort (something as simple as a heavy index card would be useable)
Compass to draw your speaker circle
Heavy duty stapler
Tools it would be nice to have
Circular saw and guide for long cuts better yet a table saw
Electric drill with drill for pilot holes and screw bit for power screwing
Router with 3/4" flat bit and circle guide
1/4" round over bit for Router
Rotozip saw with circle guide or saber saw with circle guide
Biscuit cutter and size #20 biscuits
Several different sized bar clamps
8" square
Random Orbital Sander and pads
Power stapler
An air conditioned and heated workshop
Step 2: Design and Planning the Build

Decide what your use for the speaker is and how big it really needs to be. You should have your speaker in hand already. There are many websites devoted to speaker cabinet design. I chose a closed box system because I've had great luck with them before. Lots of instrument speakers are open backed systems. A few are tuned port designs, but doing a tuned port system properly takes lots of technical knowledge about your speaker to make lots of calculations and even then you have to do trial and error testing.
I picked up a 10" surplus speaker and am building a box for that. From the info I found on the net, my box needs between .75 and 1.5 cubic feet on volume to be efficient. I estimate that I have approximately 1.28 cubic feet not counting the space that the speaker takes up. So I should be in the middle of the size range.
Here is a drawing of my speaker showing construction and sizes. You should double check your sizes before you cut your parts out.
Step 3: Cut List for My Cabinet

If you are careful about how you lay out your cuts, you can save on material needed. Measure and mark then cut your pieces apart.
When I cut the front and back pieces, I cut them an inch or so wide and long so I could cut them to fit later.
Also you should decide what kind of joint you are going to use to join the top and bottom to the sides. If using a rabbet joint you will need to cut the side pieces longer.
http://www.dixieline.com/woodjoint/woodjoints.htm see fig. 11
Be careful!
Step 4: Here's How Your Parts Should Look at This Point.

Lay out all of the parts in the approximate position so you can see that you have them all. I like to lay them inside up and mark them as to location and orientation. The rougher face should be on the inside. Since this is going to be a closed box, it doesn't matter how I write the names of the parts on them.
Step 5: Assembly

If you have the tools you can use rabbet joints. I used biscuit joints and glue. 3 - #20 biscuits per joint.
http://www.dixieline.com/woodjoint/woodjoints.htm see fig. #8.
If you are going to use a butt joint you will have to add finish nails in addition to the glue. Otherwise just glue and clamp your sides, top and bottom.
http://www.dixieline.com/woodjoint/woodjoints.htm see fig. #1.
If you use rabbet joints be sure to allow for that when you mark and cut your wood.
Clamp the joints and clean off the glue squeeze out.
Check that the box is square and make it square if it is not. The clamp on top that is on a diagonal is there because mine was slightly out of square and I tightened the clamp until it was square on all sides.
Let the glue dry at least 12 hours or per the label.
Step 6: Installing the Blocking Pieces.

Leave the box to dry at least 12 hours or you'll end up with a box that's out of square or joints that are weak.
Remove all of the clamps.
Using one of the blocking pieces as a guide,draw a line around the inside of the box to align the blocking pieces so that the back will end up flush with the sides. The offset should be exactly the thickness of the back piece.
For the front piece if you're going to cover it in a grille fabric recess the blocking pieces a bit for that. I think I added 1/8" and the face ended up being just about flush with the front edge.
I trimmed the blocking pieces to fit and installed the shorter ones first.
Attach the blocking with glue and 3 screws each. Drill pilot holes before putting on the glue. Be careful that they don't slip when you are putting in the screws, the glue is very slippery. An electric drill with a screw attachment makes this part very easy.
When all 8 blocking pieces are installed your box should look like this - minus the extra biscuit slots.
Step 7: Fixed My Mistake.

I thought this would be a good time to fix my "extra" biscuit slots. I just glued biscuits in the slots and let them dry for an hour or so then took a flush cutting hand trim saw and cut them off flush with the side.
Then I filled the remaining opening with wood dough/putty and as soon as that was dry I block sanded it all flat. After it's painted you can hardly see the fix.
Step 8: Cut and Fit the Back


I used the speaker box itself to mark the back. Marking it by using the box as a guide is much more accurate than measuring and transferring that measurement to you stock.
You want the piece to be snug but not tight. The more airtight the box is, the more efficient the speaker will be.
In the picture you see the back has been test fitted to the box.
In the second photo you see a view from the back.
Do the same measuring and fitting operation for the front piece. Remember to allow clearance for your covering material.
Step 9: Soften the Edges of the Box

I didn't want the exposed edges of the box to be sharp 90 deg. corners so I used a 1/4" round over bit in my router on all of the exposed corners.
The same could be done with a block of wood and course sandpaper by sanding at an angle and round off the corners. Then using finer sandpaper to smooth.
You could leave the corners sharp but they will get damaged easier that way and I think the round corners looks more finished.
Step 10: Fitting the Speaker


Draw an "X" from corner to corner to locate the center of the front. You can locate your speaker there or up or down. If you're using multiple speakers locate the center of each one.
You need to decide whether you are mounting from the front or from the rear. Use a compass to draw the correct size circle.
Cut out the opening as carefully as you can. set you speaker on the opening and mark for you mounting holes. Put the speaker in a safe location and drill the holes.
Mount the speaker using the bolts, washers and lock washers. Don't tighten the bolts too tight and crush the frame. The mounting location must be flat or you will distort your speaker (bad distortion).
I used a Rotozip saw with a circle cutting gig to cut out my opening. I also used a router with a 3/4" flat bit to recess my speaker from the rear.
You may also notice that my front panel is now made of 3/4" plywood. I didn't like the way I mounted the speaker the first time in the MDF so I made another front panel. I was out of MDF so I used a piece of plywood that I had in my stockpile.
Step 11: Mounting the Speaker


Before mounting the speaker spray paint the face panel to match the color of your grille cloth so it won't "shadow" through the grille.
Align the speaker over the opening and insert the bolts and tighten the nuts.
Step 12: Cover With Grille Cloth


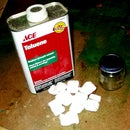
I didn't want to use a $20 piece of Fender grille cloth on a shop speaker but I found a very good and cheap replacement. Ace hardware and probably most other good hardware stores carries what they call "Solar Screen". I saw it in black, green and tan. It's very open and should last since it's meant to be hung as screens over your windows on the exterior or your house. Four dollars worth will cover 4 or 5 speakers this size.
Lay your speaker down on the material aligned with the weave and trim it leaving a couple of inches extra all around.
Fold over the first edge and staple every inch or so then turn it around 189 deg's. and carefully, starting in the middle slightly stretch the fabric. Staple. Move an inch or so and do the same. Watch that you don't stretch too much or too little or your fabric will warp and it won't look as good as it might. I know this is just a shop speaker but crooked grille cloth will look particularly shabby.
Next work on the corners.I folded the corners in at a 45 deg. angle and stapled. Then the sides and top will just fold over them neatly without bunching up. If it does bunch up just work with it until you get it smoothed out.
Now fold over the top and bottom edges and staple as before.
It should now look something like what is below.
Step 13: Paint the Outside of the Box

There is not a benefit to painting the inside of the box.
You could cover the outside with Tolex of something similar. I didn't want that kind of covering on my speaker so I painted it gloss black.
Lightly sand all of the outside and clean off the dust. Spray a light coat of the color of choice. Lightly sand just to knock off the fuzz that the paint raises up. Then spray another light coat and sand again. One last coat should be enough but you can be you own guide there.
Don't forget to spray the area where the front panel rests, the grille cloth might not close the entire gap.
Also don't forget to spray the back panel also. Cover up the jack if it has been installed already.
Step 14: Install Front Panel


After the paint has dried set the front panel into the box. I used 6 black sheetrock screws approx. 2" long to screw through pilot holes in the front panel and into the blocking. You could use finish washers to dress it up if you like but I couldn't find any in black and didn't want chrome ones on the front.
This would be a good time to add the rubber feet or casters to the bottom and a handle to the top.
Step 15: Install the Dampening Material

Dampening material is needed to cancel out some of the sound that is coming off the back side of the speaker cone. It is 180 deg. out of phase to the sound in front and the more the speaker is dampened the better you will like it. (to a point)
You can use fiberglass insulation. You can probably get the hardware store to give you a piece out of a broken package that is big enough for a box this size. You might get some from a constructionsite trash bin but ask for it don't steal it. About half full will probably be enough. Peel the paper backing off and just place it inside the box as shown.
You could use carpet insulation, foam rubber, old socks and underwear, your mother's wedding dress (better not!). You could even wad up your sister's masters thesis. Just keep what ever you use from touching the speaker.
Step 16: Wire the Speaker and Install the Back


Soldier the speaker wire to the jack. If you're building two speaker boxes make sure you wire them the same way with the same color wire going to the same terminals or they will be out of phase. Out of phase speakers tend to cancel out each other. Exactly the opposite of what we want to happen.
You have to make sure the impedance of your speaker matches your amp. There are ways to wire multiple speakers to change the impedance.
http://www.about-guitar-amps.com/speaker_ohms_calculator.html
A good site that explains the difference in series and parallel speaker connection. I might be easier just to buy the correct impedance speaker in the beginning.
I used slip on terminals to attach to the speaker because that was set up that way. If you do this make sure they are very tight so they don't fall off damaging your amp.
It is probably better to soldier the connections to make them permanent. You do know how to soldier don't you?
http://www.youtube.com/watch?v=I_NU2ruzyc4
Give the speaker a test before you go further. If it don't make sound you're gonna have to open it back up otherwise.
Now you can add the back and close it up. I applied a layer of very thin foam self adhesive "weather stripping" to seal the the back. The more airtight the box is the better. I got the foam from a hobby shop. It is used as "wing seat tape" and I used it because I had several rolls of it laying around.
Install the 6 screws just like you did on the front.
Step 17: Finishing Up
That's about it. All that's left to do now is plug it in, turn on the amp and make some "recognizable racket"!
Here's mine sitting in my practice room. When I first decided to build a speaker box for the shop, I didn't envision one so well finished. I was planning on more of a knocked together unfinished box of sound.
Now all I gotta do is finish that amp I'm working on.


