

Introduction: How to Cut and Apply Carbon Fiber to a Skateboard


This tutorial goes through the steps involved in cutting and laminating carbon fiber onto the top and bottom of a skateboard deck. Adding a layer of composite material can increase the strength and rigidity of an existing board. Using the Thin Air Press vacuum bag is a great way to laminate these materials with a controlled and even pressure.
Tools:
Straight Edge Ruler
Sharp Utility Knife
Masking Tape
Foam Roller
20" x 70" Offset Thin Air Press (TAP) Vacuum Bag
TAP Hand Pump
File or Coarse Sandpaper
Materials:
Carbon Fiber Cloth
2 Part Epoxy with Pump, Mixing Stick and Tray
Release Film
Breather Ply
Existing Skateboard Deck
Step 1: Cut the Carbon Fiber, Breather Ply and Release Film


It is easy to pull individual strands of carbon fiber while cutting. Here is an easy fix that will help keep your carbon fiber straight and without annoying pulls in the cloth. This tip will help the finished job look cleaner and more professional.
The material has been rolled out flat, on a clean table. You will find that the cloth can twist. Try to make the cloth square before cutting. Use a corner of a table or a builders square as a guide.
Apply masking tape to the areas where you want to cut the carbon. The cloth in the photo below has sewn kevlar on the outside edge. No need to tape over this. Make sure your cut piece of cloth is larger by a couple of inches than the length and width of the decks shape you are laminating it to.
Using a long straight edge and a very sharp utility knife. Cut along the middle of the tape. Make sure you cut all the way through the tape and cloth.
Once cut, the remaining tape holds the carbon cloth from twisting and prevents pulls in the material. Do not remove the tape while laminating.
Now cut your Breather Ply and Release Film to the same size.
Step 2: Preparing the Epoxy


I am going to laminate two layers of carbon cloth, one on top and one on the bottom of a handmade drop deck. The deck has to be sanded smooth (150 sandpaper) with no bumps or ragged edges before applying the carbon. I have left all the edges sharp and not rounded.
All of the materials have been cut in the previous step. This includes:
2 pieces of Carbon Cloth
2 layers of Release Film
2 layers of Breather Ply
You also will want to have your epoxy, Thin Air Press and masking tape on hand ready to use. Making sure everything is ready is a must when working with composites.
I am using West System epoxy. It is a general duty epoxy and will work fine for this type of laminating. I use 105 resin and 206 hardener. The hardener begins to set in around 45 minutes depending on the air temperature.
When epoxy is in mass, it heats faster than when it is spread thinly, so apply it to your project as quickly as possible. Do not let it sit for long in the mixing pot! Epoxy has to be measured properly, too much hardener and it will heat too quickly. Too little hardener and it will not set properly. The pumps are a good idea as they measure the epoxy precisely. To begin with, I used 8 pumps from each container and mixed them together for at about 60 seconds.
Step 3: Applying the Epoxy/Carbon


Using the roller, apply an even layer of epoxy onto the bottom surface of your deck. I have added carbon powder to the epoxy which turns the epoxy black. This is not necessary but it helps to prevent the wood color from showing through the composite. I would not normally use it for most work as it dulls down the nice looking shiny carbon cloth.
Lay the carbon fiber cloth onto the wet deck. Try to keep it as straight as possible, lengthwise to the deck. An extra set of hands is helpful with this. Flatten the carbon to the deck and use the roller to get the air bubbles out of the material.
Step 4: Apply the Release Film and Breather Ply


Apply an even coat of epoxy over top of the carbon cloth. Wet it out completely.
Lay the layer of release film onto the wet carbon cloth. Try to keep it straight as well. Press the material down until it conforms to the shape of the deck. Again, use the roller to get the air bubbles out. Pull any wrinkles straight. It is a good idea to wear rubber gloves (unlike what you see me doing).
Now lay the breather ply down. Pat it down so it conforms to the deck surface.
Step 5: Flip and Repeat!


Carefully flip the deck over. Try not to shift the carbon layer on the bottom. Now repeat the same steps on the top of the board:
Apply an even coat of epoxy onto the entire deck.
Lay the second piece of carbon cloth onto the wet deck.
Evenly wet out the carbon cloth with the roller.
Lay the release film down and flatten it to the deck with the roller.
Now do the same with the last layer of breather ply.
Using masking tape, apply pieces around the deck, taping every 6-8 inches as shown. This will hold the loose material together when putting it in the TAP bag.
Step 6: Vacuum Seal the Epoxied Deck


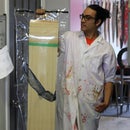
Carefully place the deck into the TAP bag. One way of doing this is to open the bag fully by blowing air into it with a vacuum cleaner. While standing on a chair, carefully lower your project from above into the bag which the other person holds open.
Keep your hands clean during this step. Do not get epoxy on the sealing tape or close to the opening of the TAP bag as the sealing tape will not stick properly if even a small amount of epoxy gets on it. Use plain white vinegar to clean your hands (not the bag), it removes epoxy really well!
Seal your TAP bag using the manual pump to pull the remaining air out of the bag. Be sure to position the valve off the deck, but over the breather ply right beside the deck. This ensures that the air can get out but will not make a mark on the top of your smooth carbon area.
*This is what's called an Offset Valve, which can be requested on any 20"x70" TAP Bag from Roarockit.
In a couple of minutes, check to see if the vacuum is still holding tightly. If any air has leaked in, check by re-pressing the sealing tape first and re-pumping the bag.
The epoxy will start to harden in a couple of hours. Leave your project in the bag for at least 8 hours.
Step 7: Removing Excess Material


You will need to peel away the release film and breather ply after removing your project from the TAP bag. This will take a fair amount of pulling, and sometimes cutting along the edge of the deck.
Once you have the release film and breather ply removed, it is time to clean up the edges of the deck. A sharp utility knife works great. The epoxy/carbon cloth it is very sharp. Be careful!
Trim as close to the edge of the deck as possible. Using a file or coarse sandpaper with a sanding block, remove the remaining carbon to the edge of the deck.
Once you are satisfied with the edge, you can apply any protective coating or graphics you may want. This is about all you need to know about the basics of laminating carbon fiber to a deck! Most of the work is in cutting the material and getting everything prepped.
Courtesy of Ted from Roarockit


