

Introduction: How to Build a Quality Puppet

The Muppets have had a huge impact on our culture. So much so that the Smithsonian has an exhibit detailing how the Muppets have impacted our world. The creations of Jim Henson have certainly impacted my life.
Because of the Muppets, I have a love of puppetry. And it's because of this love that I started to look for ways to create my own puppets. Sadly, however, most of the information available only teaches poor and sloppy puppet building techniques. Thus began my quest to find quality instruction for the building of puppets.
After searching through countless forums and Youtube videos containing hideous monstrosities claiming to be puppets, I came across this website www.projectpuppet.com. On this site you will find a pattern for every skill level. And each pattern is like a lesson in crafting quality puppets.
The puppet that I'm making here will cost about $35 in materials. This assumes that you already have needles, scissors and a low temperature Hot Glue Gun.
As the foundation for the puppet. I will be using the Roly Pattern from Project Puppet.com. Because this is their pattern, I will not be showing all the pattern parts. The pattern costs about $25 and is a downloadable PDF file. What I will do, however, is show you how to hand sew the puppets so as to hide the seams and to give you some tips and tricks for assembly.
I would also like to note that a puppet is a type of working sculpture. It is your creation. What sets a quality puppet apart from a disaster is the amount of time you spend paying attention to the DETAILS. Things like, "Can the seams be seen," and "Are the eye pupils perfectly round or were they poorly hand painted on," make ALL the difference. If you take your time while making your puppet, you will have a project that you can be proud of; even if it doesn't look like a "Muppet."
If you would like to watch a YouTube video of this pattern being constructed with Faux Fur, check out this link at Puppeteers Unite!
Step 1: Materials
- 3/4 yard of fabric (Antron/Nylon fleece or Anti-Pill fleece)
- 6 X 9 piece of 1/2 inch polyfoam or reticulated foam (a.k.a. speaker foam)
- 71/2 X 11 of 1/2 inch polyfoam or reticulated foam\
- 1 sheet of pattern plastic used by quilters to create patterns.
- 1 square of Black Felt
- Hot glue and glue gun. (it's worth the money!)
- Quality Thread the same color as your fleece.
- Bees Wax
- 1 inch elastic
- Polyester fiberfill
- Sharpie Fine Point marker.
- Basic sewing supplies
Note:
A great source for Antron or Nylon Fleece is Puppet Pelts.
If you would like a different material for the body you can reduce your fleece purchase by 1/4 yard and get 1/4 yard of another material for the body.
I found everything on this list at Jo-Ann's Fabric
Note:
This pattern will create a very small puppet. You can increase its size by enlarging the pattern on a photocopier.
Step 2: Trace and Cut the Materials

I never recommend building a puppet from scratch until you have a basic understanding of puppet construction.
Because we are going to hand sew this puppet you will not need the sewing machine allowance drawn on the pattern for the head or body.
Place the pattern on the back side of the fabric. It's also known as the "wrong" side of the fabric. You do this so as to not get marker on the front of the puppet where people will see it.
IMPORTANT!! When placing the pattern on the fleece for the head, make sure the pattern is sitting on the fabric so the fabric stretches from the front of the puppet to the back of the puppet. Not up and down. Also make sure the "Nap" or "Grain" of the fabric is going the same directions for both halves of the puppet. Other wise the seam will be obvious no matter how you sew it together.
Use the Sharpie to trace the pattern. Don't press hard! You don't want the marker to bleed through the fabric.
Do the same for the foam. You can cut out the Foam with a sharp pair of scissors, Exact-o knife or razor blade. The foam will dull the blade.
For the Mouthplate, if you can't find stiffened felt you can use plastic pattern sheets in place of the stiff felt listed on the Puppet Project pattern. Be sure to snip off the very tip of the sharp corners. This will help make sure a hole is not created in the puppet's mouth over time.
Step 3: Foam Skull and Mouthplate


The mouthplate is the foundation for this type of puppet. There are many ways to make to make a mouthplate; this is simply one way. In general, the cheaper the materials you use, the less durable the puppet will be. No puppet will last for ever. If, for example, you use cardboard for your mouth plate; you can expect your puppet to fall apart in short order, as cardboard is not very durable.
4
Start by taking the two plastic mouthplate pieces and gluing them to the foam mouthplate as shown in this photo.
I then add the elastic to the back of the mouthplate on the half that will be the top of the mouth. This helps to keep your hand in place for this kind of puppet.
Next glue the foam skull pieces together. First glue the individual seams then glue the two halves together.
At this juncture do not glue the mouthplate to the skull. If you do it will make putting the mouth plate in the puppet more difficult.
Here are a few tips on hot gluing foam:
--Apply the hot glue to only one edge of the seam, but be generous.
--When applying the glue, get close to the edge but not over.
--Glue one to two inches at a time, less if you are gluing around a tight curve.
--Press your seams together, line the surfaces with each other, and hold it in the most natural position possible. Foam will stretch and although this can be a redeeming feature it can also be a downfall. Again, try to keep the foam in a natural position and allow the glue to cool completely.
--Look ahead to ensure your seams are ending where they should. Foam will stretch, but it is better to make adjustments gradually and not all at once.
Note: A lot of people will say you need to use Contact Cement to put the puppet together. However, the fumes from this process are harmful if proper ventilation is not available. I recommend using a low temperature Hot Glue Gun. You'll get great results without the harmful fumes.
Step 4: The Henson Stitch

If you want the skin of your puppet to fit the foam structure, you will have to sew different pieces of fabric together.
When you do this, it creates seams. These seams can be hidden, however, using a stitch Jim Henson developed.
This stitch is often referred to as the Henson Stitch, Puppet Stitch, or Ladder Stitch as seen in this link by TheCreatureWorks.
This stitch works best on fabrics that are fuzzy. If you try to use this on non-fuzzy fabric you will get a strange zigzag effect on the seam. Fuzzy fabric hides this.
This stitch can be used while the fabric is on or off the foam base.
For this demonstration by Tom Stewart, a thread color different than the color of the fleece is used so you can see what is being done.
1. Place the two pieces of fabric side by side, right sides up.
2. Put a knot in the end of your thread that has been waxed using bee's wax so your thread won't tangle.
3. Push your needle through the fabric starting from the underside. Pull the thread all the way to the knot. This should be about 1/8 of an inch or less from the edge of the fabric. (if the knot comes out, make the knot bigger and try again.)
4. Take the needle and push it into the other piece of fabric from the top. Do not push the needle all the way through.
5. Catch a small amount of material on the needle, like a quilter would do, and pull the thread through. Do not pull this stitch tight.
6. Now go back across to the other piece and, starting close to the first stitch, repeat the above step.
7. Do this for 5 to 6 stitches; keeping the stitches loose.
8. Pull the stitches tight. This pulls the fabric together.
9. With the tip of the needle, gently pull out the fleece that was trapped in the seam. Be careful not to pull out your stitches.
10. Repeat this process all along the seam.
You now have a seam that is very hard to see and gives your puppet a professional look.
Step 5: The Head


Sew the two halves of the head together using the Henson Stitch as described in the previous step. Do NOT put right sides together for this as it will put the seam on the outside of the puppet.
You need to put the pieces next to each other with right sides facing up. Start by sewing the relief seams first. Make sure you line up all of your seams. You want your puppet to look symmetrical.
Now turn the head inside out so we can add the felt mouth.
Line up the felt mouth with the fleece; right sides together.
Using a whip stitch, attach the felt to the fleece. You're going to have to work to keep the edges flush as you sew around the mouth. The extra effort it takes,however, is worth it in the end.
Step 6: The Body


Now sew the two halves of the body together and then turn inside out so the right side of the fabric is on the outside. You can can sew the body and arms with the sewing machine if you like.
Also sew up the arms. (right sides together) Turn them "inside out" so the right side of the fabric is now on the outside and the seams are on the inside. stuff the arms with the polyester fiberfill.
Attach the arms to the body.
An option for this, if you like, is to use a different material for the body. You can do this so you don't have to put "clothes' on the puppet.
Step 7: The Mouthplate

With the puppet head still inside out, glue the mouthplate to the felt mouth; making sure everything is lined up. Take your time on this and don't rush it.
Be sure to use glue all along the edges of the felt.
Don't glue the fleece to the mouth plate.
Step 8: Attach Skull to Mouthplate


Determine which half of the mouthplate is the top half.
Glue the skull to the mouthplate making sure the skull is centered.
Step 9: Turn Puppet Head Right Side Out
Turn everything right side out. The puppet may be stubborn but with a little work and patience it will happen.
Step 10: Attach Head to Body
Using the Henson stitch, attach the body to the head. Again line up the body. To get the best results, pin the two together so the fabric stays centered as you sew.
Step 11: Adding Character Features
There are so many possibilities when it comes to character features, I can’t even begin to think of everything that might work. I strongly suggest referring to your original character sketches or character ideas. The goal is to find, in the three-dimensional world, a way to mimic the two-dimensional features drawn on paper. Always stay true to your character. Some suggestions of materials you may consider are listed below.
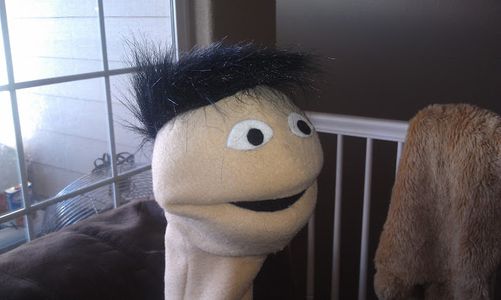
A note on eyes:
Because of the round head, you must make the pupil of the eye focus towards the nose. This gives the puppet focus. Otherwise it looks like the puppet has two lazy eyes. If done correctly, the puppet won't look like it's eyes are crossed.
Eyes:
-Ping pong balls
-racquetballs
-Foam practice golf balls
-Plastic spoons
-Felt
-Marbles
-Fake eyelashes
Hair:
-Fake fur
-Old wigs / hair pieces
-Feather boas / Ostrich feather boas
-Yarn
-Craft feathers
Noses:
-Foam balls
-Foam golf balls
-Patterned sheet foam
-Carved foam
-Sewn noses
-Teady Bear Safety eyes covered in material


