

Introduction: How to Hang a Farm Gate/Fence


Add a new level of safety and security to your country property with the installation of a properly hung gate. Two farm fencing experts demonstrate this 'DIY' project. A few important steps help insure that the next time you hang a gate on your land it will swing correctly and not sag over time. Brought to you by The Progressive Farmer.
For this project we worked with Gene and Alicia Hamman of Quality Farm Fencing. The husband-and-wife team has been building fences for a long time, Gene for 18 years.
Step 1: Preparation

In this Instructable we are hanging two 10-foot gates to create a 20-foot opening.
Two steps are important to keep your gate from sagging. First, put in sturdy hinge posts. For this project we used 7-foot, creosote-treated round posts. We sunk them 2 feet, 6 inches in the ground. For larger spansâ16- or 20-foot gatesâuse 8-foot posts buried 3 feet deep. Take your local conditions into account. Cold climates require deeper postholes to avoid damage from the frost.
The second step is to use the correct hinges. The gates here come complete with screw-in hinges. Over time, however, this type of hinge tends to pull loose from the post.
Instead, use 3/4-inch, all-thread hinge bolts that extend all the way through the post. That way the nut can be adjusted as the position of the gate changes with time.
Step 2: Align the Gate

Line the gate up along the vertical center line of the hinge post. Also use this step to locate the position of the bottom hinge. If the ground isn't level, make sure the far end of the gate is high enough off the ground to allow free movement. You can use string tied to pins to establish a straight line and level height.
Step 3: Install Brace Post

Sink the first fencepost to the other side of the hinge post, opposite the gate. Locate a 4-inch-diameter brace post between those posts. Each end should be supported by a notch cut into the two posts. The notches don't need to be more than 3/4 inch deep.
Step 4: Support the Gate and Fencing

Drill holes through the hinge post, as well as the first fencepost, and into the beginning of both ends of the brace post. Drive 12-inch galvanized spikes into those two holes. To give strong support to the gate and the fencing, make sure to add lengths of strainer wire to the first pair of posts on either side of the gates. These are wiresâpulled tight by a strainerâmounted diagonally between the hinge post and the first fencepost. The strainer wire balances the downward pressure exerted by the gate and the outward, pulling pressure of the fenceline.
Step 5: Hinge Posts

Stretch a line across the length of location for the gate. Along that line, sink two hinge postsâone for each gate. The 7-foot posts are round and treated all the way through with creosote. Here, they are buried 21/2 feet in the ground. Add two bags of dry concrete. You don't have to add water, unless the ground is extremely dry. For longer gates use 8-foot posts.
Step 6: Drill Holes for Bolts

At the location of the bottom hinge, drill holes through the posts to accept the all-thread hinge bolts. For this project we used 3/4-inch bolts. Screw-in hinges were included with the gate, but they can pull out over time. These bolts—$11 each at Tractor Supply Company—can be adjusted over time as the position of the gate changes.
Step 7: Install Top Hinge

To locate the position of the top hinge, measure the distance from the bottom side of the bottom hinge to the top of the top hinge. Remember, the top hinge bolt is pointing down. This prevents cattle or horses from lifting the gate off its hinges and also slows thieves from removing the gate. Slide the hinge bolts through each post. Loosen the top hinge on the gate and slide it down. Set the gate onto the bottom hinge bolt. Position the top gate hinge immediately below the top hinge bolt. Slide the gate hinge back into place and tighten.
Step 8: Align Two Gates

Align the two gates. Make sure they close with only a small space separating each gate. Also, make sure the gates align horizontally. Make these adjustments by turning the hinge bolts in or out.
Step 9: Bolts

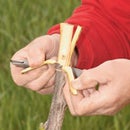
Here are detailed photographs of the two types of hinge bolts considered for this project. We used the all-thread bolt (left) that can be adjusted over time to prevent sagging. The screw-in bolt (right/top) will not hold the gate level for long.
Step 10: Quick Tips to Remember

Here are six things to remember:
1) Make sure the top hinge points down.
2) Make sure the gate is mounted high enough on the hinge post to keep the far end of the gate off the ground.
3) Use dry concrete to set the posts.
4) Use heavy-duty, all-thread bolts. They cost more, but allow you to adjust the gate.
5) Use strainer wire to balance the gate with the fence running on either side of the gate.
6) Hang the gate after the strainer wire is in place.
Please see the video of this project in the final step.
Step 11: Video


