

Introduction: How to Install Gutters


Gutters don't look very impressive, but they're about as important as the roof over your head. Most basement water problems are really gutter and downspout problems. In fact, leaky, overflowing gutters can buckle basement walls in just a few years, so it pays to keep your system working properly. When the time comes to replace your gutters, you'll have tow major options: professionally installed, seamless aluminum gutters and do-it-yourself steel or aluminum systems available at the retail level.
Seamless aluminum gutters are attractive and can last a long time, but they're expensive. Eo-it-yourself components are more affordable, and the quality is really quite good. When installed and sealed correctly, they'll last as long as seamless gutters. Steel components, which dominate the retail market, are usually zinc coated and painted, inside and out, Galvanized, unpainted gutters are also available, as are plastic and aluminum systems, though aluminum can be hard to find in home centers. To prevent corrosion, avoid combining steel and aluminum.
Prices will vary with the house and the market, of course, but a comparison we made points to real savings. For a basic 1960s 24x40-ft ranch with a hip roof, our contractor's estimate was $670, which included removal of the old gutters. In contrast, home center prices for the steel components to handle the same job come in just under $200. [Editor's Note: these price estimates were accurate c. 2001.]
This project was originally published in the March 2001 issue of Popular Mechanics. You can find more great projects at Popular Mechanics DIY Central.
Step 1: Aluminum Vs Steel
If you have a choice between steel and aluminum systems, which is best? Steel is stronger and heavier than aluminum, so it's less susceptible to wind, ice, and tree damage, downspout extensions are less likely to be blown away or crushed at the ends, and the ladders won't crease the gutters wen they're placed between fasteners. Steel gutter components are zinc coated and carry 20- to 25-year corrosion warranties and up to 40-year paint warranties. And steel expands and contracts less than aluminum, which means less stress on sealed joints. As for the price, steel costs about 15% more than aluminum.
On the other hand, if you'll be working alone or with unskilled help, or if you're working 20 to 30 ft. above the ground, aluminum might be a better choice. It's easier to assemble and drive fasteners through, and much easier to lift from one end,. These are important advantages when you're clinging to a ladder. Because aluminum doesn't rust, warranties focus on paint durability, usually 20 to 25 years.
Step 2: Component Overview
Gutter components are made by several manufacturers and are available through lumberyards, hardware stores, and home centers. The most popular gutter style is 5-in. Type K. It's a universal size and shape, so you can mix brands, In fact, there are times when it pays to shop around. Our local home center, for example, had attractive prices, but only sold gutters in 10-ft. lengths. To get the 20-ft. lengths we wanted, we bought a different brand at a lumberyard and combined these with components from the home center.
Gutters come in 10-, 20-, and 33-ft. lengths. Downspouts come in 3- and 4-in. widths, 10 ft. long. If you have trees overhead, choose 4-in. downspouts and outlet fittings and then install gutter screens. This inexpensive combination can save you from repeated overflows, corrosion, and dangerous ladder work.
Beyond the gutter and downspouts, you'll find inside and outside corner pieces, end caps, slip[joint slice fittings, downspout elbows and a variety of fasteners. And to make the system watertight, you'll need a tube or two of high-quality, gutter lap sealer. The components can be joined with either 1/8 in. Pop rivets or sheetmetal screws. Screws and rivets are usually available in the same colors that the gutters come in. Touchup paint is also available.
The greatest variety is in the hangers and fasteners. For years, gutters were fastened with spikes and ferrules or hanger straps. Spikes and ferrules were used most often on eaves with vertical fascia boards. Hangers worked better on roofs with angled fascias or exposed rafter tails. Today, hidden hangers are almost universally preferred. These span the inside of the gutter, and cannot be seen from the found.
We found two types of hidden hangers: a heavier version with a built-in fastening screw and a lighter version that can be nailed or screwed. The lighter hangers cost less and work well, so we used them almost exclusively, about every 2 ft. We used the heavier design at stress points such as corners and near downspouts.
Step 3: Getting Started, Part 1


Because you'll want to assemble as much as you can on the ground, set a sheet of plywood on a pair of sawhorses to serve as a workstation. Then, determine where to start your gutter job. With a gable roof or a simple hip roof, just start at one end. Ours is a hit roof with a front dormer, so the easiest place to start is in tone of the inside corners.
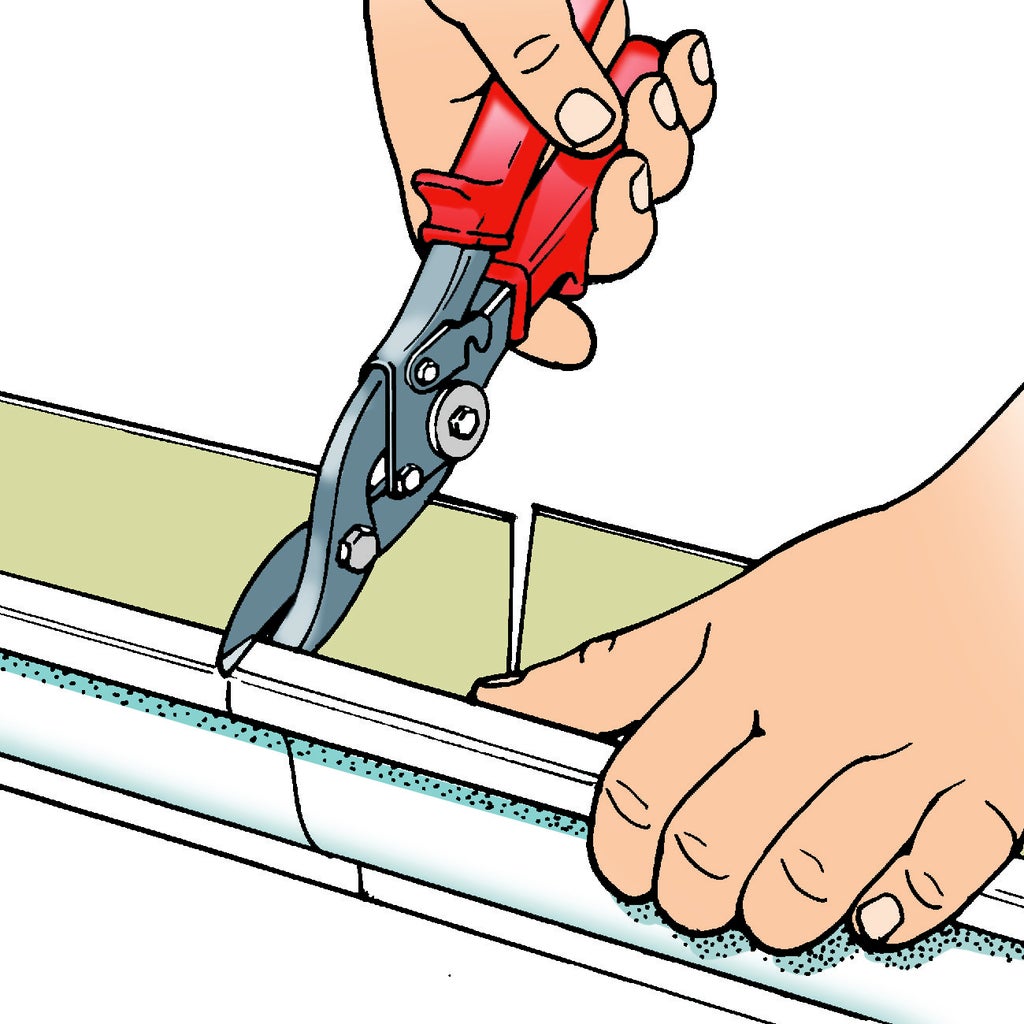
Begin by installing a slip-joint splice on each end of an inside corner fitting. Slide the splices on as far as they'll go. Then, trim the first section of the gutter to length with tin snips. Use a square and pencil to mark the gutter length and cut to the line. If the tin snips distorts the profile of the gutter, just bend it back into shape with needle-nose pliers. Gutter material also can be cut with a chop saw or sabre saw, but be sure to wipe the steel filings from the painted surface.
To fasten these components, you can use either short sheetmetal screws or Pop rivets. Rivets are more work, but they're more attractive and they don't leave sharp piunts inside the gutter. If you choose rivets, begin by boring several 1/8 in. holes through the fitting into the hole. When it bottoms out, squeeze the handle several times until the rivet flattens and the stem shears off.
Step 4: Getting Started, Part 2


If the opposite end of this gutter terminates, install an end cap. Caps come in left and right profiles, and can be mechanically fastened with screws or rivets, or simply glued in place with gutter lap sealer. We riveted the top front flange and used lap-seal caulk on the rest of the joint.
Next, install a downspout outlet fitting in the gutter. Measure carefully to determine the best location for the outlet fitting. Then, set the fitting on the bottom of the gutter and trace around it. Cut a starter hole in the gutter with a chisel, drill, or sabre saw and nibble out the finished opening with tin snips. Use the flange to mark the screwhole locations and bore 1/8 in holes through the gutter. Finally, insert the filling into the hole and fasten it with short screws. As an alternative to installing the outlet fittings, you can buy 12-in. lengths of gutter with factory-installed outlet fittings.
With all the necessary fittings attached to this length of gutter, install a hanger bracket every 2 to 3 ft. Tip the hooked end of the bracket under the front flange and press the remaining end over the back fo the gutter. With help, lift the gutter in place, and secure the corner first, screwing the bracket into the roof's fascia. Secure the rest of the hangers with 2-in galvanized nails or screws.
While it makese sense to slightly slope the gutter toward the downspout - about 1/4 in. over 10 ft. - gutters are often installed level for appearance. And, a level gutter is the obvious answer when there's a downspout at both ends, such as on our hip roof. Longer gutters and larger roofs require more downspouts. As a general rule, install one downspout for every 30 ft. of gutter.
Step 5: Splicing and Outside Corners


You have two options when it comes to splicing gutters end to end. You can use a splice fitting, like those used on the inside corner, or you can overlap in the direction of the water flow. Both methods work, but we prefer to overlap. A slip coupling, no matter how ell attached, tends to work as a hinge, Overlapping keeps things straight and draws less attention.
Begin by applying a heavy bead of lap sealer with a caulk gun at least 4 in. from the end of the receiving gutter. Run the bead up both sides. Then, set the new length of gutter into the installed length with about 5 in. of overlap, snap the front flanges together and screw the overlap together with sheetmetal screws.
Where the gutter wraps around an outside corner, first attach splice fittings to the corner piece with rivets, connect one splice to the preceding length of gutter apron. Install the next length of gutter and fasten it in place with hidden brackets, and then rivet the splice connections. Continue in this fashion until you've installed all the necessary gutter and downspout outlets. Finally caulk all seams with a generous amount of gutter lap sealer.
Step 6: Downspout Work


All that remains now is to install the downspouts and downspout extensions. Start by pushing the female end of a downspout elbow onto the first outlet fitting. Then, hold a second elbow against the corner of the house, in line with the first elbow. Measure the distance between these fittings and cut a short length of downspout to join the, allowing for about 1 1/2 in. of insertion on one end. Slide the short length of the downspout onto the bottom of the top elbow and slide the top of the lower elbow onto the short length. Rivet all joints, including the connection with the outlet.
Install two U-shaped downspout brackets on the corner of the house, one high and one low. Bring the downspout to within 1 ft. of the ground and install the last elbow. Finally trim a notch in one end of a 36-in. length of downspout to make a fold-up extension. Just cut several inches from the top half and screw the extension to the elbow on each side. This arrangement delivers the water well away from the house, but allows you to tip up the extensions when mowing your lawn.


