

Introduction: How to Make a Bike Rim Bottle Opener


Bikes and beer have a magical relationship. Wherever you find one, the other is likely nearby. Sometimes they combine and turn into a metaphorical Megazord of awesomeness. This bike rim bottle opener is one of those combinations!
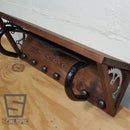
In this Instructable, I demonstrate how I made 14 bottle openers out of a bicycle rim, spokes and chain links. Since the process of making one of these bottle openers means destroying a rim, you might as well make several of them because they make awesome gifts! Let me know what you think in the comments section.
Step 1: Optional Add On


You could just cut up a rim and call it a day. However, extra style points are earned by reusing a chain link and a spoke to create a hook to hang the bespoke tool on your bar/workbench/wherever. The process of installing the chain link on the rim was a serious challenge, but in the end I think it adds tons of style/character and was well worth it.
Step 2: Materials & Tools


Required Materials:
Aluminum bicycle rim
Optional:
Chain
Spoke
Nipple
Required Tools:
4" Angle grinder (with metal cutting disk)
Metal file
Marker
Optional:
Chain breaker tool
Custom chain link jig
Pliers
Ratchet set
Step 3: Rim Selection and Planning


There's no need to destroy a good wheel for this project. Bent, warped and scrap rims can be found in numerous places. I'd suggest starting at your local bike shop or bike co-op. I used a 700C aluminum rim that was warped beyond repair.
It is worth noting that there are several types of rim materials and dozens of designs that may affect the performance of the opener. The rim I chose was single walled aluminum and it just so happened to work out great. I can't comment on how well a single walled steel rim would work. A double walled aluminum rim would be plenty strong, but cutting out the opener slot might be tricky. Have yourself a busted carbon rim, do ya!?!? Please make an opener out of it and let me know how it works!
Once a rim is acquired, determine how many bottle openers you want to make and divide that by the circumference of the rim. I used a pencil to mark the cut locations so it could be easily removed. I was very strategic about where I made the cut locations relative to the spoke holes. Each section was cut just ahead of the spoke hole. This gave me adequate space on one end to cut out the opener slot AND a place to install the chain link/spoke hanger on the opposite end.
Step 4: Create a Template


A template is crucial to ensure uniformity when marking the opener slot on all of the rim pieces. I had a flat bottle opener which I used as a reference guide and then made a template from a thin piece of cardboard. I pressed it to the contour of the rim and left the sides long so that I could line them up with the end of the rim. This allowed me to cut the opening for the bottle cap at exactly the same distance from the end of the rim on each piece.
It's a really good idea to try out the opener shape on a bottle to make sure it works before you cut the rest of the pieces.
Step 5: Get Your Grind On


This step is where the first beers you open with your radical bicycle rim bottle opener are earned! I used a 4.5 inch angle grinder with a thin metal grinding disk to make several "slices" perpendicular to the face of the rim and then carefully angled the grinding disk to remove the slices. There were numerous burs that resulted from the grinding so I used a rotary tool with a conical grinding wheel and a fine metal file to clean up the edges. It sounds easy enough, but cutting each opener slot took almost a half an hour. Beers = Earned!
It should go without saying that you definitely need eye and ear protection when wielding such equipment. A pair of leather gloves also comes in really handy because the rim gets extremely hot from the grinding.
If you happen to have access to a CNC router, this is the time to use it and save yourself some sweat. Remember, work smarter, not harder!
Step 6: Chain Breaker Jig


It turns out pushing a pin back into a chain without a chain-breaker tool is incredibly difficult. I wasn't able to use a chain-breaker tool because it wouldn't fit over the rim so I had to create a custom jig to push the link back in. Actually I had to make two because the first one wasn't strong enough and broke!
The first jig I made was just some scrap bar stock (1" x 1/8") bent into a U shape around a 2x4 with a 1/4x20 tapped hole. A matching bolt was used to push the pin back in but under the pressure of the friction fit between the pin and the chain link, the whole setup just kept sinking deeper into the wood. Then I thought screwing a small piece of metal to the 2x4 would help... it didn't.
At this point I got serious and bought a strong U shaped bracket from the local hardware store and used angle iron for the tapped hole. I thought there was no way this setup would bend and I'd be able to muscle the remaining pins back into the chain links (reminder: I was making 14 of these bad boys). I was right, but I didn't consider the possibility of shearing the bolt in half!
Finally, I got wise and used my rotary tool to slightly grind down the sides of the pin. That made it much easier to push the pins back into the chain links.
Lessons learned:
- Consider grinding down the diameter of the pins just a bit. No one will ever notice and you'll save yourself a lot of time and frustration.
- Use as big of a bolt diameter as possible with a high of TPI (threads per inch). This will ensure a strong bolt, and reduce the risk of stripping the threads on the bolt or the tapped hole. I used 1/4x20 tap and bolt because that's what I had on hand.
- Tap the hole into the thickest piece of metal to reduce threads stripping. I tapped into the angle iron, but should have tapped into the bracket.
Step 7: Chain Link Details
Regardless of whether you use a new or an old chain, it should be cleaned first to remove dirt, grease and oil. I thought it would be cool to take a chain that I actually biked with and use that. Judging by the pictures, I probably should have cleaned it better!
I found that it was much easier to install two chain link spacers on the free end and then one spacer on the end that gets fixed to the rim. When trying to install the ends of the chain link to the rim without a spacer it was difficult to keep everything lined up and the links from bending. This also created a lot of free space between the chain link and the rim which I didn't care for. The spacer was just thick enough to create a bit of friction between the rim and chain link and hold everything together snugly. Adding the spacer also made the chain link look more natural on the rim.
Step 8: Spoke Hoop

The spoke hoop was really easy to make and provided an excellent means to hang the bottle opener on the bar, in the kitchen or a workbench. The spokes were taken from a 16 inch bike wheel. I used a three inch pipe to bend the spokes into a circle and locking pliers to bend the threaded end 180 degrees for the J hook end to catch. Lastly, I screwed on the spoke nipple with a drop of lock-tite on the threads to keep it in place.
I think this add-on, paired with the chain link, really completes the bottle opener and gives it a true sense of craftsmanship.
Step 9: Personalize It
The sidewall of the rim is a perfect place to commemorate a name, initials, team name, event and/or date.
Step 10: Assemble & Enjoy


Once all the openers were assembled, it was time to crack open a cold one!
*Update!* After opening numerous bottles with the opener, I noticed that it often took two attempts to pry the cap off the bottle. While that's nothing to sweat about, I knew it could be better! The reason appeared to be caused by the small size of the mouth of the opener which when placed on a bottle cap created a challenging angle for the top of the opener to effectively pry the bottle cap off. So I dusted off the angle grinder and enlarged the mouth a bit. The original size was about 15 mm and I opened that up to 20 mm. Initial tests show a substantial improvement in effectiveness and the bike rim bottle opener now pops off bottle caps in one shot every time!

Participated in the
Maker Olympics Contest 2016

Participated in the
Metal Contest 2016


