

Introduction: How to Restore the Arduino UNO R3 ATmega16U2 Firmware Using the Arduino IDE


NOTE This was written with the IDE version 1.6.5 or 1.6.6. This Instructable is now outdated and I am not maintaining, validating, or revising it at this time. You will need to adapt or improvise if you use the Instructable. For help with Arduino, in my opinion the best place to go is https://forum.arduino.cc/.
If you have a need to re-flash the ATmega16U2 chip with the stock firmware to restore the Arduino UNO back to normal, this is often done on the command line using avrdude or dfu-programmer, or with the Windows program Flip. The easier way for me is to just use the Arduino IDE.
Note: if you are reading this Instructable because your board is in an unknown state, before proceeding you should determine if your ATmega16U2 really needs the firmware restored. Do the loop back test: http://forum.arduino.cc/index.php?topic=73748.0
If the loop back test works, your ATmega16U2 is probably fine, and if you're having trouble uploading to your board it could be the main processor on your board (ATmega328P) needs to be bootloaded. So you need to find a different procedure for bootloading the main processor, perhaps http://www.gammon.com.au/bootloader
Step 1: Background
The avrdude command is used when you have an ISP programmer or are using another Arduino as an ISP programmer. You connect the programmer to the ICSP header of the ATmega16U2 and upload the firmware. The command is long and tedious, and I need to keep notes about the command somewhere and copy and paste it to the command line. It is so long that I usually split it up into separate lines. It goes something like this:
PATH=$PATH:/Applications/Arduino.app/Contents/Java/hardware/tools/avr/bin
cd /Applications/Arduino.app/Contents/Java/hardware/arduino/avr/firmwares/atmegaxxu2
avrdude -C/Applications/Arduino.app/Contents/Java/hardware/tools/avr/etc/avrdude.conf -cstk500v1 -p m16u2 -P/dev/cu.usbmodem411 -b19200 -v -U flash:w:Arduino-COMBINED-dfu-usbserial-atmega16u2-Uno-Rev3.hex -U lfuse:w:0xFF:m -U hfuse:w:0xD9:m -U efuse:w:0xF4:m -U lock:w:0x0F:m
The dfu-programmer command on Mac or Linux is used to upload the firmware using a USB cable after activating the DFU bootloader on the ATmega16U2 chip by shorting pins 5 and 6 on the ICSP header of the ATmega16U2 to reset the chip.
For Windows you can download another program from Atmel called Flip. Put the UNO processor in DFU mode to upload with Flip. You will also need to install another driver because the UNO will appear as a different and new device when it's running the DFU bootloader.
DFU programming usually isn't useful for me, since the hacking I do often overwrites or replaces the DFU bootloader.
I don't care to use any of those methods above when I am done with a day of hacking the 16U2 and want to set the UNO back to stock. This comes from a guy who does not even like to sweep the sawdust off the floor after cutting a board with a saw in the garage, so I don't know what makes me want to be neat and restore the UNO when done messing with it for a while. But, I do. When I do, I want it to be quick and easy.
Step 2: Prepare Arduino IDE With Custom Boards.txt Entry
This method does not require using the command line and does not require DFU programming. It does require an understanding of how the IDE 3rd party customizations work, and an understanding of where the Arduino documents and Arduino IDE program files are on your computer.
In your documents directory and Arduino subdirectory, you have the ability to create a hardware directory structure that includes a boards.txt file and any supporting files such as bootloaders and cores.
The directory structure and file specification for custom boards.txt, bootloader directory, and other add-ons in the Arduino sketches directory is detailed in the Arduino IDE 1.5 3rd party Hardware specification page here:
https://github.com/arduino/Arduino/wiki/Arduino-IDE-1.5-3rd-party-Hardware-specification
It is worth taking the time to read and understand.
Location of custom boards.txt file
I have created a directory structure in my documents/Arduino subdirectory called hardware/custom/avr and that is where I keep my custom configurations.
The full path on my Mac computer is
/Users/david/Documents/Arduino/hardware/custom/avr
On my Windows computer it is
C:\Documents and Settings\David\My Documents\Arduino\hardware\custom\avr
On my Linux computer it is
/home/David/Arduino/hardware/custom/avr
Find your Arduino document or sketch directory on your computer and create the hardware/custom/avr subdirectories. Files in that directory supplement the built-in hardware files that are in the Arduino application's directory structure. This is where you can put a boards.txt file which contains custom board definitions to add to the Arduino IDE menu.
Location of custom bootloaders directory
Also, create a bootloaders subdirectory in the avr directory. This is where we will place a copy of the firmware.
The full path on my Mac computer is
/Users/david/Documents/Arduino/hardware/custom/avr/bootloaders
On my Windows computer it is
C:\Documents and Settings\David\My Documents\Arduino\hardware\custom\avr\bootloaders
On my Linux computer it is
/home/David/Arduino/hardware/custom/avr/bootloaders
Location of the Arduino application's default boards.txt
The Arduino application's directory structure where you will find the built-in boards.txt may vary from one computer to another, depending on where you installed Arduino IDE.
The full path on my Mac computer is
/Applications/Arduino.app/Contents/Java/hardware/arduino/avr
On my Windows computer it is
C:\Program Files\Arduino\hardware\arduino\avr
On my Linux computer it is
/home/David/Applications/arduino-1.6.5/hardware/arduino/avr
You don't normally need to edit or otherwise alter the boards.txt file or other files in the Arduino IDE installation, but you can get copies of files from here and you can also study how the files are composed.
Location of the Arduino application's firmware for boards
The firmware we need to install is further down in this directory structure. If you look in the subdirectory firmwares/atmegaxxu2 you will see the firmware files.
The full path on my Mac computer is
/Applications/Arduino.app/Contents/Java/hardware/arduino/avr/firmwares/atmegaxxu2
On my Windows computer it is
C:\Program Files\Arduino\hardware\arduino\avr\firmwares\atmegaxxu2
On my Linux computer it is
/home/David/Applications/arduino-1.6.5/hardware/arduino/avr/firmwares/atmegaxxu2
How to build the custom boards.txt entry
Notice the file
Arduino-COMBINED-dfu-usbserial-atmega16u2-Uno-Rev3.hex
This is the firmware file which is loaded onto the Arduino Uno's ATmega16U2 processor when it comes from the factory. There are also some other files in here.
Arduino-COMBINED-dfu-usbserial-atmega16u2-Mega2560-Rev3.hex is for the Mega2560's ATmega16U2
UNO-dfu_and_usbserial_combined.hex is for the older Uno ATmega8U2
MEGA-dfu_and_usbserial_combined.hex is for the older Mega board ATmega8U2
This Instructable is for UNO with ATmega16U2. If you are working with a different board, adjust the following instructions for your board based on the information above.
Copy the Arduino-COMBINED-dfu-usbserial-atmega16u2-Uno-Rev3.hex file from the Arduino application's avr/firmwares directory to your bootloaders (/Users/david/Documents/Arduino/hardware/custom/avr/bootloaders) directory, then create a custom board in boards.txt file in the next directory down (/Users/david/Documents/Arduino/hardware/custom/avr) to match the options selected.
Create or add to your custom boards.txt:
unorestore.name=UNO 16U2 Restore Firmware
unorestore.bootloader.tool=arduino:avrdude
unorestore.bootloader.low_fuses=0xff
unorestore.bootloader.high_fuses=0xd9
unorestore.bootloader.extended_fuses=0xf4
unorestore.bootloader.file=Arduino-COMBINED-dfu-usbserial-atmega16u2-Uno-Rev3.hex
unorestore.bootloader.unlock_bits=0x3F
unorestore.bootloader.lock_bits=0x0F
unorestore.build.mcu=atmega16u2
unorestore.build.f_cpu=16000000L
unorestore.build.board=uno.build.board=AVR_UNO
unorestore.build.core=arduino:arduino
unorestore.build.variant=standard
After editing boards.txt, quit the Arduino IDE if you had it running, and re-launch it for changes to take effect. This creates a new board in your IDE menu in Tools, Board.
Step 3: Upload Stock Firmware With the Arduino IDE and Burn Bootloader Option
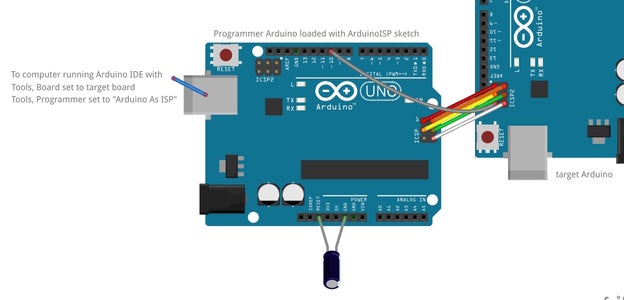
In this example wiring, I am using another UNO as an ISP programmer to burn the firmware, using the ArduinoISP example sketch that has been uploaded to the programmer UNO.
Connect all pins of the ICSP header on the programmer UNO to the ICSP header on the target UNO, except pin 5, the RST pin. Connect pin 10 of the programmer UNO to the RST pin of the ATmega16U2. Add a 10uF or larger capacitor between GND and RST on the programmer UNO to keep it from resetting upon serial connection. The negative lead goes to GND.
Connect the programmer UNO to the computer via USB. In the Arduino IDE menu goto Tools, Board, and select "UNO 16U2 Restore Firmware." Goto Tools, Programmer, and select Arduino as ISP. Goto Tools, Port and make sure the port of the programmer UNO is selected. Goto Tools, Burn Bootloader. After a few seconds you should see the message Done Burning Bootloader near the bottom of the IDE.
Unplug the USB cable and disconnect all wiring. The UNO's USB chip has been restored. This method restores both the DFU bootloader and the USB-to-serial adapter program all in one whack. Connect your newly restored UNO via USB, and change the Board in the IDE menu back to UNO, and upload a test sketch, such as Blink.
If you have difficulty uploading, do the loop back test as described at the beginning of this Instructable (loop back test in the arduino.cc forum) to confirm the ATmega16U2 firmware works OK, then proceed with other troubleshooting steps such as burning the bootloader on the main processor (ATmega328P).
Step 4: Further Reading
Atmega_Board_Programmer:
Nick Gammon has an excellent web page with details and pictures on wiring various different Arduinos to each other in preparation for burning boot loaders.
http://www.gammon.com.au/bootloader
The web page deals with using a different sketch in place of the example ArduinoISP. It is Atmega_Board_Programmer. The wiring is done the same way with Nick's sketch or with the ArduinoISP sketch. One of the examples is How to flash the USB chip on the Arduino Uno and there is great information and pictures.
Nick's sketch works in a different manner compared to ArduinoISP sketch, because the bootloader hex files are embedded in his sketch and reside in the programmer UNO, and disabling automatic reset of the programmer Arduino is not necessary. With the ArduinoISP sketch, the bootloader hex files reside on the computer and are sent to the target Arduino, going through the programmer Arduino. If you have an Arduino you are using as an ISP programmer and it automatically resets upon serial connection, such as an UNO, you will probably need to disable automatic reset when using the ArduinoISP sketch. More info about that:
http://playground.arduino.cc/Main/DisablingAutoResetOnSerialConnection
A Leonardo or other ATmega32U4-based Arduino does not automatically reset upon serial connection, so I often use my Leonardo or Pro Micro to do ISP programming. To use the ArduinoISP sketch on those, I need to change "#define RESET" line from SS to 10. If I'm using an UNO, I add the 10uF or greater capacitor between GND and RST as described in the above linked article.
Nick's sketch current version (as of July 3, 2015) burns just the DFU bootloader on the ATmega16U2 and not the combined full contents of the flash.
Hoodloader2:
Nico Hood's hoodloader2 project has the same functionality as what I describe in this Instructable, where the UNO R3 firmware can be restored in the same manner by selecting the board "Original 16u2 DFU Firmware" and burning the bootloader using an ISP programmer.
https://github.com/NicoHood/HoodLoader2
I'm not trying to re-invent the wheel, just providing an Instructable that shows behind the scenes how the IDE 3rd party customizations work to accomplish uploading software using the Burn Bootloader function. Sometimes the software you upload with Burn Bootloader can include more than just a bootloader. In this case it is uploading a hex file that has a bootloader and a USB-to-serial program.
The DFU way:
https://www.virtuabotix.com/how-to-cure-sudden-uno-death-syndrome/
The avrdude/ISP way:
See step 1


