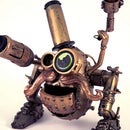
Introduction: How to Make a Steampunk Mr. Potato Head
You can pretty much Steampunk anything. Here's how to make a Steampunk Mr. Potato Head.
You will need:
a cutting mat
X-Acto knife
hot-glue gun
Dremel Tool Kit
Premo Sculpey - Baking Clay
Thick card stock paper
Discarded materials around the house. Plastics, wire, metal piping, ect.
Black, yellow, silver, and copper acrylic paint
Paint brushes
Sandpaper
Step 1: Make a Rough Sketch
I bought this Mr. Potato Head at Target for less than 10 bucks!
Sketching helped me get started. But ultimately, I let the the materials that were available to me guide me. I first envisioned my Mr. Potato Head to look more like the sketch in the upper right hand corner.
Step 2: Change Mr. Potato Head's Stance
For placement purposes, I drew in some eyes on my potato head. Then, I drew a circle on each side where I wanted my legs to sprout from. I wanted to be mindful of the areas that would be covered up or cut out.
Next, I used a household dremel tool to cut a hole on each side of the body. Then, I attached the two metal pipes to a small plastic beam inside of Mr. Potato Head.
This is a picture of my potato head from the back. The three holes along the middle were part of the original toy design.
Step 3: Be Creative With Discarded Household Materials
Collect as many discarded items from around the house. Use your imagination and start working with what you got. Don't worry about miss matching colors and materials. You will be painting over everything later for a cohesive look.
As you can see, I used a soap dispenser for the gun. I used an empty mini plastic shampoo bottle for the cannon, metal piping for the legs, thick card stock to make the wing-tipped shoes, a contact lens case for the eyes, and old cell phone charger wires for detail.
Step 4: Use Premo Sculpey Oven-bake Clay for Detail Work
For parts of Mr. Potato Head that I couldn't make from card stock or household items, I sculpted out of Premo. Here is a picture of the mustache and several different eye pieces. I placed them on a baking sheet and threw them in the oven.
You can find Sculpey at art supply stores, such as Blick. I bought 1lb of Premo Sculpey, but I only ended up using half of it. After you are done sculpting, set the oven to 275 °F. Place your clay on a baking sheet in the oven. The package suggest baking your clay 30 min per 66mm (1/4").
How I made:
Guns:
Plastic soap dispenser piece and Premo.
Rivets:
I made rivets out of Premo and glued them on with superglue.
Mustache:
Sculpt mustache with your fingers. Use a toothpick or a sculpting tool to add texture.
Monocle:
Cut a perfect circle with a cookie cutter or a measuring cup. This will be your monocle. Take a smaller cookie cutter or cup, place in the center, and gently push down to create the illusion of a eyeglass frame. Next, make a rectangular piece that is the same thickness as your monocle. Attach it to your the eyeglass piece and cut out the middle. I also added a chain to the monocle.
Step 5: Paint Mr. Potato Head to Look Steampunk
Paint everything black with acrylic paint or spray paint. Detail shot. Everything looks like one solid color. Every nook and cranny is covered. It was easier for me to get full coverage by taking the toy apart and painting in pieces.
Wait for the black coat to dry. Then, mix the yellow, silver, and copper paint to your liking. If you can take your toy apart, I suggest you paint it in pieces. Dry brush your paint onto your toy. Make sure to brush even strokes in one direction. Let the some of the black color show through. Leave the edges and seams black to create more depth.
Last but on least my potato head needs an eye shining through his monocle. I want him to look alive!
So, there you have it! Steampunk Mr. Potato Head. Enjoy!!!
I'm also selling some fun items on Society6:
Iphone Skin
Iphone Case
Art Prints
For more process photos, click here .
For More Spudnik Photos, click here .
Also, view more of my work at www.amongmadpeople.com and say hello!


