

Introduction: Human Dalek Costume!


More by the author:


About: depotdevoid is short for The Depot Devoid of Thought, the place where you go when you lose…
Who remembers that episode of Doctor Who, "Evolution of the Daleks," when Dalek Sec turned into a human-dalek hybrid? I do, because it was STUPID. Dalek Sec was the least threatening creature I have ever seen, it looked like Cthulhu had a baby with a cyclops, and somehow it turned out all inbred and whiny. Take a page from the Spartans and cast the abomination upon the rocks, I say!
Still, it was kind of a cool concept, even if the execution was terrible. As Halloween approached this year and it became more and more apparent that I wouldn't have the funds and time to build a full size Dalek, I decided a compromise was in order: I would build a Human Dalek costume, only it would be much more awesome than Dalek Sec's nasty tentacle face could ever be!
This way, I would have a cool costume to wear, some parts of which will be reusable for the real Dalek costume I will be building next year (for realsies this time). In particular, the dome and the electronics, all of which were a huge pain in the rear, will be completely reusable.
Here's a video of me being frustrated and exterminating things:
So, without further ado, let's learn how to build a Human Dalek costume!
Step 1: The Dalek Master Plan

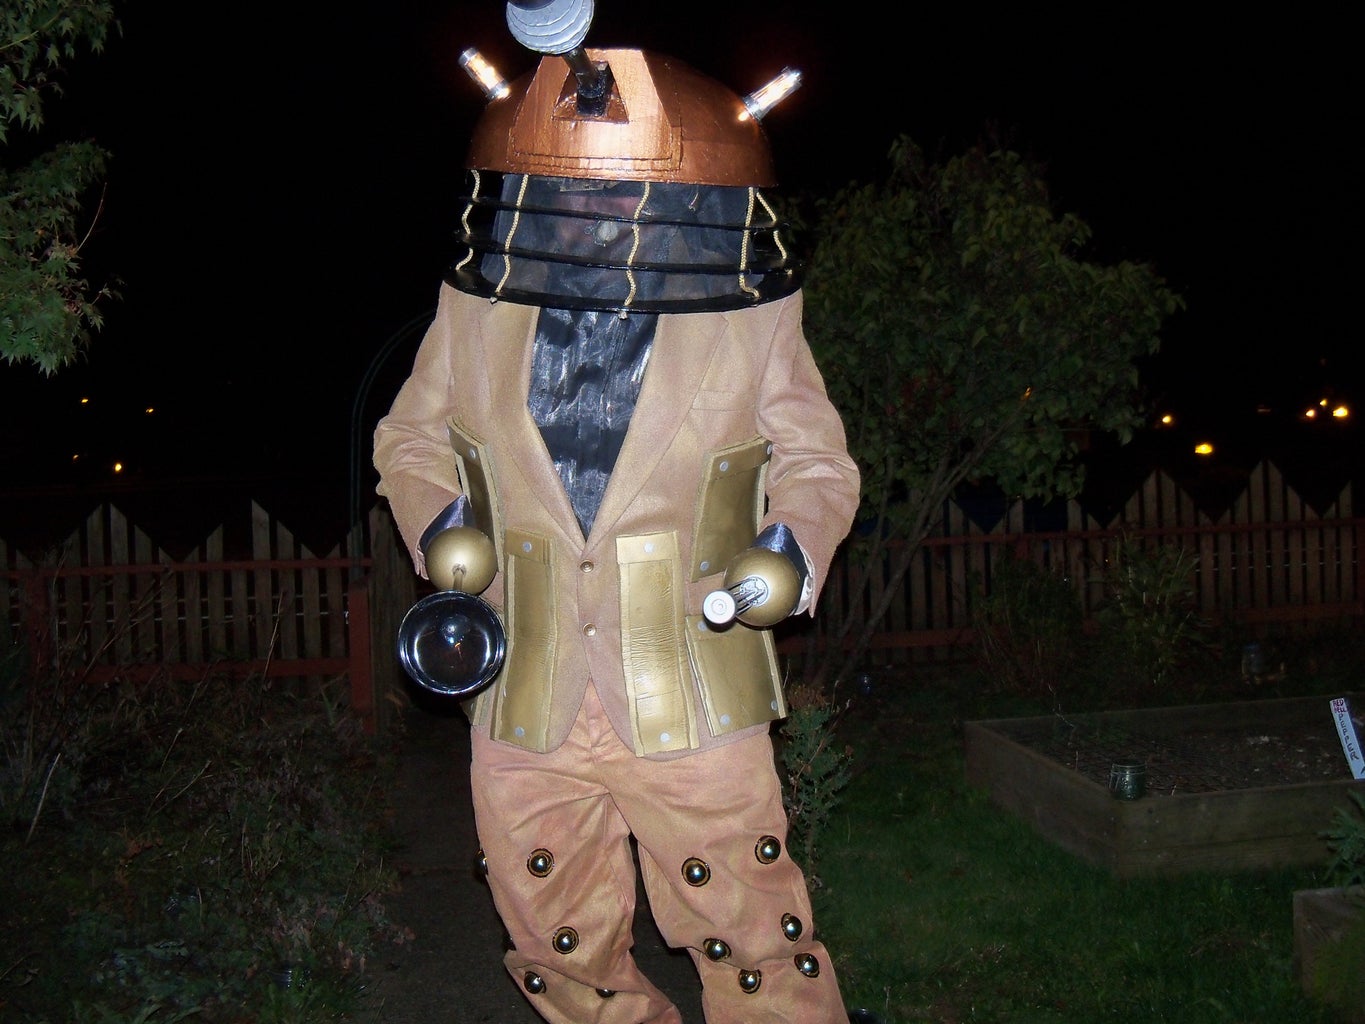
I wanted to build a full size, ride around Dalek mounted on an electric wheelchair, but as those are prohibitively expensive, and every single alternative I tried failed miserably, I decided I'd build myself a suit stylistically similar to a Dalek. The color scheme would be loosely based around the final 2005 series Dalek, seen in the 2010 episode "Victory of the Daleks."
The suit would consist of four major parts, two of which would be reusable once I do build a full size Dalek:
The suit would consist of four major parts, two of which would be reusable once I do build a full size Dalek:
- The Slacks -- to be similar to the Dalek skirt and bumper section, including the hemispheres
- The Suit -- to be similar to the Dalek shoulder section, including death ray and manipulator arm
- The Helmet -- to be essentially identical in broad strokes to the actual dome, so as to be reusable later on
- The Electronics -- to be housed in the dome, but complex enough that I thought of them as a separate entity, including the voice modulator and voice activated lights, all to be reusable when I build a full size Dalek
Step 2: Materials of the Daleks

Much like the proton packsI havebuilt, much of this costume came from stuff I already had laying around . . . or at least, that was the original plan. I used several things I already had, but some stuff I had to buy this time. I probably spent most on the spraypaint, which it turned out I needed a lot more than I had at hand.
Usually on this step, I would give a pretty exhaustive list of things required, but because of the convoluted way this was done I will simply list the tools I used, then be specific about materials on each step further along.
Tools required:
Usually on this step, I would give a pretty exhaustive list of things required, but because of the convoluted way this was done I will simply list the tools I used, then be specific about materials on each step further along.
Tools required:
- Hot Glue Gun
- Soldering Iron
- Dremel / Rotary Tool
- Pliers (Needle Nose and Standard)
- Sturdy Scissors
- Box Knife
- Ruler
- Square
- Long Straightedge
- Wire Cutters
- Drill
- Good Epoxy (If I keep pimping E-6000, do you think they'll sponsor me or something?)
- Awl
- Punch
Step 3: Pants of the Daleks


Materials required:
I rounded up a bunch of gold Christmas ornament balls from the dollar store and sliced them all in half with a box knife. Luckily, they are so cheap and thin that a sharp razor just slid right through them with no trouble at all. After marking the pants with a regular grid (I used the outer seam and the bumper line as reference), I used hot glue and epoxy to affix them, a total of 32 hemispheres are required. Technically a Dalek has 56 of these (they act as a self destruct device, and possibly generate the Dalek force screen) but I didn't have that much room on my legs.
After the epoxy cured, the final touch was to run a black permanent marker around each hemisphere. Done!
- Slacks from a thrift store
- Cheap Christmas ornament balls
- Masking tape
- Copper, gold, and dark bronze spraypaint
- Hot glue
- Epoxy
- Permanent marker
I rounded up a bunch of gold Christmas ornament balls from the dollar store and sliced them all in half with a box knife. Luckily, they are so cheap and thin that a sharp razor just slid right through them with no trouble at all. After marking the pants with a regular grid (I used the outer seam and the bumper line as reference), I used hot glue and epoxy to affix them, a total of 32 hemispheres are required. Technically a Dalek has 56 of these (they act as a self destruct device, and possibly generate the Dalek force screen) but I didn't have that much room on my legs.
After the epoxy cured, the final touch was to run a black permanent marker around each hemisphere. Done!
Step 4: Suit Jacket of the Daleks, Part One


For the main "Shoulder" section you will need:
The jacket was the only one I could find even close to my size that wasn't a dark color, and it was made of wool and quite fuzzy. The problem with fuzzy wool is that it doesn't accept spraypaint very well. I had to do 3-4 coats rather than just two, and even then it wasn't nearly as dark as I would have liked. Still, it looked pretty good, it just took more work than I wanted!
The Dalekanium (a special alloy created by the Daleks) panels were tricky as well. I wanted a flexible material that had some bulk to it, so they would look heavy duty, like armor. I settled on a pilates mat, the foam was about 1/2" thick and nicely flexible. If I hadn't been rushing at this point, I could have done much better, but it turns out the material is difficult to cut in a straight line--as you cut it, it has a tendency to stretch. Instead of a sharp box knife which would have given nice, smooth cuts, I had to use scissors to keep straight lines. Sadly, the cuts weren't as even and smooth as I had hoped, but again, they still looked pretty good. Also, if I had more time I would have made each plate narrower and used more of them.
After they were all cut, I painted them with a couple of coats of the Rustoleum "hammered" spraypaint, which gives a very cool textured appearance to the panels. After that dried I assembled the panels, sticking them together with hot glue and gave them one last coat of paint to get the spots I had missed. Finally, I applied some round cork stickers I had painted silver to represent bolts. Another mistake I made at this point was using only hot glue to stick the panels to the jacket, I should have used my usual method of hot glue followed by epoxy. In the end, I lost a couple of panels at inconvenient times.
- A cheap, light colored suit jacket
- Copper, gold, silver, and "hammered" gold spraypaint
- A pilates mat or similar sheet of flexible foam (be careful here, some types of foam are dissolved by spray paint)
- Cork surface protector stickers
- Hot glue
- Epoxy
The jacket was the only one I could find even close to my size that wasn't a dark color, and it was made of wool and quite fuzzy. The problem with fuzzy wool is that it doesn't accept spraypaint very well. I had to do 3-4 coats rather than just two, and even then it wasn't nearly as dark as I would have liked. Still, it looked pretty good, it just took more work than I wanted!
The Dalekanium (a special alloy created by the Daleks) panels were tricky as well. I wanted a flexible material that had some bulk to it, so they would look heavy duty, like armor. I settled on a pilates mat, the foam was about 1/2" thick and nicely flexible. If I hadn't been rushing at this point, I could have done much better, but it turns out the material is difficult to cut in a straight line--as you cut it, it has a tendency to stretch. Instead of a sharp box knife which would have given nice, smooth cuts, I had to use scissors to keep straight lines. Sadly, the cuts weren't as even and smooth as I had hoped, but again, they still looked pretty good. Also, if I had more time I would have made each plate narrower and used more of them.
After they were all cut, I painted them with a couple of coats of the Rustoleum "hammered" spraypaint, which gives a very cool textured appearance to the panels. After that dried I assembled the panels, sticking them together with hot glue and gave them one last coat of paint to get the spots I had missed. Finally, I applied some round cork stickers I had painted silver to represent bolts. Another mistake I made at this point was using only hot glue to stick the panels to the jacket, I should have used my usual method of hot glue followed by epoxy. In the end, I lost a couple of panels at inconvenient times.
Step 5: Suit Jacket of the Daleks, Part Two


To round off this representation of the Dalek shoulder section, you'll need two of the most iconic parts of a Dalek: the egg beater and the plunger. Of course, they're actually a death ray and a manipulator arm, but it's pretty clear what they look like. Materials required are:
The death ray was even simpler. I pounded the rod of a paint roller straight and cut it off about six inches below the roller part and painted it silver. I drilled a hole in the other half of the plastic ornament ball (which I also painted gold), slipped the rod through, glued it in place and then epoxied for strength. Now I was armed!
- Paint roller (found mine at the dollar store)
- Longish metal rod (mine was scrounged from a broken printer)
- Plastic cocktail glass
- Gold, black, and silver spraypaint
- Split hollow ornament ball
The death ray was even simpler. I pounded the rod of a paint roller straight and cut it off about six inches below the roller part and painted it silver. I drilled a hole in the other half of the plastic ornament ball (which I also painted gold), slipped the rod through, glued it in place and then epoxied for strength. Now I was armed!
Step 6: Helmet of the Daleks, Part One


For this step, you're going to need:
When you look at Dalek plans, it becomes clear that the dome starts at a steep angle and about 2-3 inches above the base changes angles slightly, so it's not a perfect hemisphere. To achieve this look, I took the guard from a broken fan and cut the top off. I bulked that up a bit with cardboard and duct tape, then used a large round flower pot to get the dome shape on top of that. Since the pot had a flat bottom, I cut that off and used strips of cardboard and duct tape to finish the dome shape.
I paper mached the whole thing. Once that was dry (thanks Shianne!) the top had sunk down a bit, so I used spackle to bulk it up. When that dried overnight, I sanded it smooth and added one last layer of paper mache.
Once dry, I marked off two spots on opposite sides of the dome and drilled holes. This is where the lights will be mounted eventually, the holes are for wires. I ran a piece of string through the holes and used it and a carpenter's square to find the center line between those holes. Using cardboard, I built a housing for the eyestalk along that center line and drilled another hole in the middle of that for the eyestalk electronics.
The final touch was two coats of "hammered" copper spraypaint.
- Large bowl
- Old fan (optional)
- Newspaper/phone book
- Cardboard
- Flour
- Water
- White glue
- Spackle
- Duct tape
- "Hammered" copper spraypaint
- Hot Glue
- Epoxy
- Sandpaper
- Patience
When you look at Dalek plans, it becomes clear that the dome starts at a steep angle and about 2-3 inches above the base changes angles slightly, so it's not a perfect hemisphere. To achieve this look, I took the guard from a broken fan and cut the top off. I bulked that up a bit with cardboard and duct tape, then used a large round flower pot to get the dome shape on top of that. Since the pot had a flat bottom, I cut that off and used strips of cardboard and duct tape to finish the dome shape.
I paper mached the whole thing. Once that was dry (thanks Shianne!) the top had sunk down a bit, so I used spackle to bulk it up. When that dried overnight, I sanded it smooth and added one last layer of paper mache.
Once dry, I marked off two spots on opposite sides of the dome and drilled holes. This is where the lights will be mounted eventually, the holes are for wires. I ran a piece of string through the holes and used it and a carpenter's square to find the center line between those holes. Using cardboard, I built a housing for the eyestalk along that center line and drilled another hole in the middle of that for the eyestalk electronics.
The final touch was two coats of "hammered" copper spraypaint.
Step 7: Helmet of the Daleks, Part Two


For this part you will need:
Once finished, each light was glued to a large washer. A length of speaker wire ran through that and into the helmet, and the whole thing was hot glued / epoxied in place.
- Light diffusers from dollar store solar lights
- Strips of flexible metal
- Hot glue
- Epoxy
- Small incandescent bulbs
- Speaker wire
- Two large washers
Once finished, each light was glued to a large washer. A length of speaker wire ran through that and into the helmet, and the whole thing was hot glued / epoxied in place.
Step 8: Helmet of Daleks, Part Three


Here's what we need to build the eyestalk:
- Some PVC pipe
- Pole from a stainless steel solar light
- Old piece of tupperware
- Blue LED
- Speaker wire
- Hot glue
- Epoxy
- Black and silver spraypaint
- Translucent plastic
- Cardboard
- Masking tape
The main eyepiece is simply a rubbermaid food container of the correct shape I found at the Goodwill, painted black and with some translucent plastic cut from a milk jug glued over a hole cut in the front. Inside, a hole is cut in the back with a blue LED and some speaker wire fed through it. The stainless post is attached there, with six cardboard discs glued to it. The discs are wrapped in masking tape and painted silver.
Since the Dalek eyestalk is mounted on a wheel that allows it to go up and down, I made a half circle of cardboard and attached a short length of black painted PVC to it. That whole mess is painted black, and the rest of the eyestock is glued to that. The result is then epoxied in place inside the eyestalk housing of the helmet, with the speaker wire attached to the LED fed through the hole in the dome. As you can see from the pictures below, I had to attach some more cardboard to the front of it to make it more stable.
Step 9: Helmet of the Daleks, Part Four


The last thing for the helmet is to build the rings and shroud. You'll need:
- Corrugated cardboard
- Masking tape
- Window screen mesh
- Rope
- Hot glue
- Epoxy
- Gold and black spraypaint
The next day, I punched holes just big enough for the ropes in eight places around each ring. I used some blocks of wood to space the rings out equally and inserted a gold rope all the way through, hot gluing and epoxying at each level. Once those dried, I glued all the ropes to the inside of the helmet.
I put two layers of window mesh inside the rings and hot glued that to the inside of the helmet. I think three layers would have been better for hiding my ugly mug, but each layer reduces visibility quite a bit.
Step 10: Electronics of the Daleks, Part One


Ah, electronics. I am slightly skilled with this sort of thing, I usually tell people that I know just enough to break things. Most of the time--and this is no exception--my electronics solutions are kludges at best.
The first major electronics component of the Dalek is a voice modulator. Here's the parts list
The central, most important part of this circuit is a device called a ring modulator (I found plans here). The basic purpose of this circuit is to add two audio signals together and output them as a single sound. The Dalek voice heard on the TV show all the way back to the sixties is simply a human voice added to a 40hz sine wave. The ring modulator is an unpowered, unamplified circuit, so the other parts of the circuit are there to boost the signal.
The beauty of this circuit is that if there aren't two input sounds, it outputs nothing. Therefore, you feed one of the inputs a constant 40hz sine wave (available for download here) through an mp3 player, and attach the other input to a microphone. When you speak into the mic it completes the input and outputs your voice modulated with that wave. I already had the diodes lying around, and I scrounged the transformers from an old telephone, but they are both available from Radio Shack if you need to buy them.
The other three parts are all amplifiers. I used a very stripped down version of the circuit that instructables user killersquirrel11 demonstrates here.
The two input amps are wired up thus, based on the pins of the LM386 (starting at the top of the IC, which is denoted with a dot, the legs are numbered 1-8 counterclockwise):
This circuit is functional, not pretty. It has some flaws I suspect could be fixed by someone more knowledgeable about electronics than myself. It really just tears through batteries, I suspect all that amplifying is just too much for a single nine volt. Also, the signal is very dirty, but I couldn't seem to work that out--every time the sound smoothed out it started playing freakin' republican talk radio! Curse you Lars Larson!
I hope my instructions here are clear enough (and correct), but if you need a clarification or have a suggestion for where I went wrong, let me know and I'll fix the instructions.
The first major electronics component of the Dalek is a voice modulator. Here's the parts list
- 3 x LM386 IC
- 3 x 220uf electrolytic capacitor
- 3 x 10uf electrolytic cap (optional)
- 2 x 10k ohm resistor
- 1 x 100k potentiometer
- 1 x 9v battery clip
- 1 x Speaker
- 1 x Microphone (I actually used the speaker from a telephone)
- 1 x 3.5mm audio jack
- 4 x 1N4048 diode
- 2 x TM018 or equivalent transformer
- Perfboard
- Wire
- Mp3 player
- 9 volt battery
The central, most important part of this circuit is a device called a ring modulator (I found plans here). The basic purpose of this circuit is to add two audio signals together and output them as a single sound. The Dalek voice heard on the TV show all the way back to the sixties is simply a human voice added to a 40hz sine wave. The ring modulator is an unpowered, unamplified circuit, so the other parts of the circuit are there to boost the signal.
The beauty of this circuit is that if there aren't two input sounds, it outputs nothing. Therefore, you feed one of the inputs a constant 40hz sine wave (available for download here) through an mp3 player, and attach the other input to a microphone. When you speak into the mic it completes the input and outputs your voice modulated with that wave. I already had the diodes lying around, and I scrounged the transformers from an old telephone, but they are both available from Radio Shack if you need to buy them.
The other three parts are all amplifiers. I used a very stripped down version of the circuit that instructables user killersquirrel11 demonstrates here.
The two input amps are wired up thus, based on the pins of the LM386 (starting at the top of the IC, which is denoted with a dot, the legs are numbered 1-8 counterclockwise):
- Pin 2 connected to ground
- Pin 3 connected to 10k ohm resistor, then to input (one wire from the mic / audio jack)
- Pin 4 connected to ground, input, and output (one wire each from the battery, mic / audio jack, and modulator board)
- Pin 5 connected to + leg of 220uf cap, then to output (one of the wires to the modulator board)
- Pin 6 connected to +9v
- Pins 1 and 8 can be jumped with a 10uf cap to increase the gain if your mic or mp3 player are still too quiet, but I found I didn't need this
- +9v and ground are bridged by a 100uf capacitor to clean up the sound
- Pin 3 goes to the central pin of the 100K pot instead of the static resistor
- Output from the modulator board goes to the other pins of the pot
- Looking straight at the pot from the knob side, ground goes to the left hand pin
- Outputs go to the speaker instead of the modulator board
This circuit is functional, not pretty. It has some flaws I suspect could be fixed by someone more knowledgeable about electronics than myself. It really just tears through batteries, I suspect all that amplifying is just too much for a single nine volt. Also, the signal is very dirty, but I couldn't seem to work that out--every time the sound smoothed out it started playing freakin' republican talk radio! Curse you Lars Larson!
I hope my instructions here are clear enough (and correct), but if you need a clarification or have a suggestion for where I went wrong, let me know and I'll fix the instructions.
Step 11: Electronics of the Daleks, Part Two


The second part of the electronics are the all important voice activated lights. I had to fudge things here, I couldn't find a simple circuit to use with parts I already had, so I kinda cheated. If you know a simple voice activated light circuit, please let me know!
I used:
The one real problem with this circuit is that it makes an annoying whine whenever activated, so again I would really like to try a better circuit if you'd like to recommend one.
I used:
- A length of speaker wire
- A sound activated EL wire driver from coolneon.com (I actually won mine in the 2009 Halloween contest)
- 9 volt battery
The one real problem with this circuit is that it makes an annoying whine whenever activated, so again I would really like to try a better circuit if you'd like to recommend one.
Step 12: Electronics of the Daleks, Part Three


Finally we bring it all together, with:
I found a baseball helmet for $3 at the local goodwill, and it just barely fit my giant freak head. It was very snug, which I decided was a good thing for keeping this oversized Dalek dome in place. When I got it home, the first thing I did was chop off the back and sides with my dremel. I also removed the foam, and then replaced it with some that was slightly thinner so it would fit me a bit more comfortably.
When everything else was ready, I cut a couple of strips of cardboard and glued them to the side of the helmet, as a kind of basket to hold the mp3 player. I cut up an old garden kneeling pad as a spacer, and glued it to the top of the helmet. This would hold the dome up and away from my shoulders a bit.
At this point I soldered the incandescent bulbs to the voice activated driver, and glued that to the side of the helmet. I soldered the light in the eyestalk to a 470 ohm resistor and then to the battery on the voice modulator circuit, and added a switch to turn it all on and off. I stuck this mess to the brim and front of the hat.
I glued a length of stiff wire to the brim of the had and bent it so it would be right in front of my mount. I attached the mics from the modulator and lights here, gluing it all securely.
The speaker was then glued to the front section of mesh, so it would at least seem like the modulated voice was coming from the front of the dome. Finally, I glued the baseball helmet with it's crazy mishmash of electronics into the dome. And it was finally DONE!
- Baseball helmet
- Kneeling pad
- Cardboard
- Stiff wire
- Hot glue
- Epoxy
- Alcohol (optional, and only for those 21 and over, please)
I found a baseball helmet for $3 at the local goodwill, and it just barely fit my giant freak head. It was very snug, which I decided was a good thing for keeping this oversized Dalek dome in place. When I got it home, the first thing I did was chop off the back and sides with my dremel. I also removed the foam, and then replaced it with some that was slightly thinner so it would fit me a bit more comfortably.
When everything else was ready, I cut a couple of strips of cardboard and glued them to the side of the helmet, as a kind of basket to hold the mp3 player. I cut up an old garden kneeling pad as a spacer, and glued it to the top of the helmet. This would hold the dome up and away from my shoulders a bit.
At this point I soldered the incandescent bulbs to the voice activated driver, and glued that to the side of the helmet. I soldered the light in the eyestalk to a 470 ohm resistor and then to the battery on the voice modulator circuit, and added a switch to turn it all on and off. I stuck this mess to the brim and front of the hat.
I glued a length of stiff wire to the brim of the had and bent it so it would be right in front of my mount. I attached the mics from the modulator and lights here, gluing it all securely.
The speaker was then glued to the front section of mesh, so it would at least seem like the modulated voice was coming from the front of the dome. Finally, I glued the baseball helmet with it's crazy mishmash of electronics into the dome. And it was finally DONE!
Step 13: Final Thoughts of the Daleks

Sadly, it turned out that the costume party I was going to wear this to was finishing up about the time I was gluing the helmet together--It was on Friday night and not Saturday as I had originally believed. I couldn't find anyone to go out with on Saturday night, and then on Sunday when I went to another party, the helmet got dinged up in the car and the eyestalk and one of the lights broke off on the way over! So I was never able to wear this thing except to exterminate things in the yard and in front of the bathroom mirror!
Ah well, it was still a cool build and a neat concept. What's more, I have learned two important lessons here:
If you've enjoyed my little tale, please stop and leave me a comment, rate, and subscribe! I love to hear back from my readers, so make sure to let me know your thoughts, and let me know if I need to clarify anything.
If you happen to build your own humanoid Dalek costume, or something similar, post a picture in the comments below, I'll send you a digital patch! If you can come up with better voice modulator, voice activated light, or sine wave generator circuits that are simple enough for me, and I build them, I'll send you a patch and a three month pro membership!
Ah well, it was still a cool build and a neat concept. What's more, I have learned two important lessons here:
- 1 1/2 weeks before Halloween is too late to start on an involved costume like this
- Sometimes, hot glue and epoxy are not enough
If you've enjoyed my little tale, please stop and leave me a comment, rate, and subscribe! I love to hear back from my readers, so make sure to let me know your thoughts, and let me know if I need to clarify anything.
If you happen to build your own humanoid Dalek costume, or something similar, post a picture in the comments below, I'll send you a digital patch! If you can come up with better voice modulator, voice activated light, or sine wave generator circuits that are simple enough for me, and I build them, I'll send you a patch and a three month pro membership!

Finalist in the
Halloween Epic Costumes Challenge

Participated in the
Hack It! Challenge

Participated in the
Make It Glow Challenge


