

Introduction: Infinity Mirror Pendant


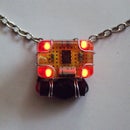

I've seen numerous infinity mirrors and always liked the effect. However, I've never seen a really small one. I had recently purchased a new type of resin and wanted to try it out. What popped into my head was the infinity mirror pendant. The main challenge would be to create an infinity mirror small enough to fit in a pendant. The infinity mirror is composed of a mirror, lights, and a one-way mirror. The square bezel for the pendant had an interior depth of roughly 5 mm (3/16 of an inch). I would have to find LEDs that were small enough to fit while making sure they were low voltage (as I wanted to minimize the size of the required battery). Without LEDs small enough, this project would be over before it started. On a trip to the electronics shop, I found some LEDs that looked like they would fit and after purchasing a few more electronics components, it was time to start.
I initially intended to do only a square pendant but mid-way through the project, I decided to try making a round one as well. The results weren't bad for a first attempt. Not great but not bad. And definitely serves as a decent proof-of-concept.
Step 1: Equipment and Materials


The materials you'll need for a single pendant are as follows:
- Pendant bezel finding with an interior depth of at least 5 mm (3/16 inch). Square/rectangular pendants are easier to create than curved ones. The square pendant used is 3.2 cm (1.5 inches) each side. The circular pendant is 3.2 cm (1.5 inches) in diameter.
- 1.8 mm LEDs (get roughly 20 for a square pendant of the size used or 15 for a circular pendant)
- Resin
- Mirrored sheet with adhesive backing
- Privacy film for windows (not shown in photo)
- Flexible wire for the connection to the battery
- Stiffer wire for connecting the LEDs (not shown in photo)
- 3V batteries
- Paint (not shown in photo)
- Electrical tape (not shown in photo)
- Circuit board (not essential but recommended for square pendants)
The tools and additional materials you'll need are as follows (few are shown in the photo):
- Solder and soldering iron
- Drill with drill bits designed to go through metal
- Hacksaw and sandpaper. Preferably, use a Dremel with a cutting disc for plastic and a high speed cutter).
- Protective mask and safety goggles
- Clay (optional but recommended)
- Rubber cement, wax, or latex mold making material (the type that's brushed on)
- Safety gloves (use the ones that come with the resin or nitrile gloves)
Important notes on the items listed above:
The mirrored sheet is an item I found at the art store. (The art store is Deserres and here's the link to the material: http://www.deserres.ca/en-ca/search/avery-mirror-vinyle/AMIR/. It's sold by the roll online but you can get it by the meter in-store. I'm not sure where exactly you would find it outside of Canada but with searching in art stores is a good start.) It's a sheet with a chrome finish that is extremely reflective and it has an adhesive back. Photo 2 shows how reflective it is. It's not quite as good as a glass mirror but it can be cut with scissors and is very thin.
The resin shown is a new resin from Pebeo. It has some characteristics that are very different from polyester resin (and probably epoxy resin as well). Unlike polyester resin, the Pebeo resin is extremely low odor so use indoors is not a problem. Also, polyester resin goes from liquid to gel-like consistency very quickly, then slowly cures the to fully solid. So, you only have a few minutes to pour the resin and/or position items in the resin. The Pebeo resin, by contrast, has a much more linear cure rate. It'll stay liquid for quite a while so you can take your time when pouring or positioning items. More will be said about this later.
The circuit board is a generic one which has long lines of connected slots. This is to make connecting the LEDs easier while providing a firm framework for the LEDs.
Nitrile gloves come in at least two varieties. One type is designed for use by mechanics and has textured fingertips. The other type is more general purpose and is completely smooth. The smooth type is preferable when working with resin, as it is less likely to leave marks in the resin (if the resin is handled before it is fully cured). Also, make sure to get the powder-free gloves.
The safety mask and eye protection is essential when cutting the circuit board and drilling the bezel finding.
I found the LEDs were prone to burning out (possibly from the heat from the soldering iron). Only 12 are in the square pendant but I believe I had to replace approximately 5 burned out LEDs. So, the number of LEDs listed above includes the replacements. If you're especially paranoid, you can get even more.
For this instructable, I'll be using the term "Dremel", as that is what I own. Any rotary tool will do so if you don't have a Dremel, you can translate "Dremel" as "rotary tool".
For the window privacy film, I used the Gila Privacy Control Window Film, mirror finish. You can find this in hardware stores. Some stores may only offer it through online purchasing.
Step 2: Cutting and Drilling


Now, time to prepare the circuit board and the bezel finding.
To prepare the pendant, you will need the following:
- Pendant bezel finding
- Reflective sheet with adhesive backing
- Scissors
- Drill and drill bit
- Protective mask and safety goggles
First, cut the reflective sheet to fit the bottom of the bezel finding as exactly as possible. Cutting it slightly small is preferable to having it too large. Having the reflective material a bit short on the sides is not a big deal. Make sure the bottom of the pendant is free of dust and dirt. Remove the paper backing and attach the reflective sheeting to the inside bottom of the bezel finding. The first photo shows the pendant with the reflective sheet in place.
Next, choose a drill bit that is slightly thinner than the wires you'll be using to connect the LEDs to the battery. The holes drilled will be wider than the drill bit. Drill two holes in the pendant. The exact location of the holes will depend on where you want the wires to come out. For the square pendant, I chose to drill one hole in each of the top corners (see photo 2). For the round pendant, I drilled both holes near the top center. Make sure to use the mask and goggles when drilling.
To prepare the circuit board, you will need the following:
- Circuit board
- Hacksaw or Dremel with cutting disc for plastic
- Sandpaper and/or Dremel with high speed cutter
- Protective mask and safety goggles
First, mark the circuit board to indicate where the cuts should be made. I found that a strip with 9 holes would fit in the pendant nicely.
Next, use the hacksaw or the Dremel and cutting disc to cut out portions of the circuit board.
Finally, use the sandpaper and/or Dremel and high speed cutter to trim the edges so the circuit board piece is as small as possible. Initially, each piece of circuit board had two rows of holes (as seen in the photo) instead of just one. The size was reduced in an effort to reduce the width of the final product.
Don't forget to use the mask and safety goggles.
Skip the circuit board preparation if not using a square/rectangular pendant.
Step 3: Attaching LEDs


Time to attach the LEDs. This step assumes that a square/rectangular pendant is being created. If using a round bezel finding, only the first few portions are different so make sure to read this section before going to the next step.
First prepare the circuit board framework. Skip this portion if not using a square/rectangular pendant. You will need the following:
- Circuit board pieces prepared in the previous step
- Wire
- Wire cutter
- Wire stripper
- Soldering iron and solder
Cut four pieces of wire and strip one end. Make sure there's plenty of exposed wire. Take two of the circuit board pieces and feed one of the stripped wire ends through the end holes. Feed it through such that the wire enters the copper side of the first piece and exits the copper side of the second piece. Twist the wire until there is little slack and the two circuit board pieces are well connected. Take another circuit board piece and another wire. Attach this circuit board piece to one of the connected pieces. Repeat until all pieces are connected as shown in the first photo.
Now it's time to connect the LEDs. For this step, you'll need the following:
- LEDs
- Soldering iron and solder
- Circuit board framework (created above) - not used for round pendants
- Stiff wire
- Modeling clay (optional)
Each LED has two leads, one slightly longer than the other. The longer lead is the positive lead and the shorter lead is the negative lead. For the pendant, we will be connecting the LEDs in parallel (all positive leads connected and all negative leads connected). Choose whether you want all the positive leads connected to the circuit board framework or all the negative leads connected.
Add the LEDs one at a time and solder the lead to the circuit board. I angled the LEDs so the other lead was resting directly on the circuit board piece. This was done in order to reduce the height of the finished product. I pressed the LEDs into the clay to hold them in place while I soldered. It's possible to do this without the clay but I'm not sure what would make things easier. Attaching something to the lead being soldered to draw away some of the heat might reduce the number of LEDs that fail but I didn't do this so I can't say for sure whether or not it would help.
Take the stiff wire and strip a long portion of it (long enough to connect all the LEDs). Shape the wire to match the shape and size of the circuit board framework. Solder the wire to the leads resting on the circuit board framework. Make sure that no solder connects to the circuit board. If desired, test the LEDs and replace any that are burned out.
We now need to connect the wires that will run to the battery and finalize this piece. For that, we need the following additional materials and tools.
- Wires to go to the battery
- Wire cutters
- Electrical tape
- Sandpaper, file, or Dremel with high speed cutter
- Protective mask and safety goggles
Solder one wire to the circuit board framework. Solder the other wire to the stiff wire. Now that everything is connected, we can snip off all the protruding leads and the extra wire (the corner connecting wire portions). Use the wire cutters to snip off the unnecessary portions. Test to see if the LED setup will fit within the pendant. Make sure there's a bit of extra room for the electrical tape. If the LED setup doesn't fit, use the sandpaper, file, or Dremel and high speed cutter on the soldered portions, wearing them down to be as close to the circuit board/wire as possible. When done, cut a thin piece of electrical tape and wrap it around the circuit board framework. Test if the framework with the tape still fits in the pendant. If not, remove the tape and use the sandpaper, file, or Dremel again. When the LED setup fits in the pendant, connect up a battery and make sure all the LEDs work properly. If any are burned out, remove the tape, solder in new LEDs (sanding/filing/using the Dremel as necessary). The tape is used to make sure the LED leads don't come in contact with the walls of the pendant.
If desired, paint the circuit board pieces and the exposed wire portions black.
Step 4: Attaching LEDs (Circular Pendants)


Attaching the LEDs for a circular pendant is trickier than a square/rectangular pendant. The square/rectangular pendants use circuit board pieces as a firm framework. The circular pendants don't have that luxury. So, for circular pendants, I essentially used stiff wire on both sides.
First, take a block of clay and make sure the surface is flat (I used a utility knife to cut out a block). Press the pendant into the clay so the walls of the pendant leave a distinct mark in the clay (see the first photo).
Next, use the impression as a guide and create two wire loops using the stiff wire (see second photo). Put these aside for now.
Press the LEDs into the clay such that they form a circle that is small enough to fit in the wire loop (see photo 3). Leave enough room to account for the solder and electrical tape. (For full disclosure, the LEDs as shown in photo 3 did not allow for enough room so I had to remove one LED and shrink the loop. This was partly due to the wire loops not lining up properly, not just the solder and the tape.) Make sure either all the positive leads are on the bottom or all the negative leads are on the bottom.
Now the first of two tricky parts. Take one of the wire loops and solder it to the topmost leads. You'll probably want to attach one of the wires that lead to the battery to the wire loop at this point. (If you don't it makes soldering it on more difficult - the heat may loosen the solder on adjacent LEDs.)
Once this is done, proceed to the next tricky part. Flip the LEDs over and press them into the clay. Solder the second wire loop onto the leads. The LEDs may shift if you apply too much pressure. Also, it is difficult to get the two wire loops to line up exactly. Attach a wire leading to the battery on this wire loop.
You should now have the LEDs connected by two wire loops. Test the LEDs to make sure none are burned out. Carefully replace any that are no longer functioning. Once all are confirmed to work, snip off the extraneous portions (see the previous step) and test for fit.
Step 5: Adding Resin (First Pour)

Before adding any resin, take the LED assembly and place it in the pendant, feeding the battery wires through the drilled holes. Use rubber cement, wax, or brush on latex to seal the holes. Do the sealing on the exterior (back of the pendant) rather than the inside. Do not use clay (a mistake I made). The resin will bond to the clay and make removal difficult. Clay also doesn't form as good a seal as the other materials so some resin may leak down the wire or onto the back of the pendant.
Set the pendant on a flat surface I used the edge of a bookshelf, with the wires over the edge ( a bit difficult to tell from the photo). Make sure there's something that can ensure no dust falls onto the pendants. This can be as simple as wedging something between two books so that a portion of it will extend above the pendants.
Use the safety gloves (or nitrile gloves) and mix the resin according to the instructions. Only a small amount is required - less than 30 ml (1 oz). So, you may want to have some resin molds ready for the excess. For the Pebeo resin, mix 1 part hardener to 2 parts resin (pouring the resin into the hardener). The measuring cups that come with the resin have 10 ml, 20 ml, and 30 ml markings (1/3, 2/3, 1 oz) so it's easiest to mix 10 ml hardener with 20 ml resin. Mix very carefully to ensure there are no air bubbles.
Pour the resin slowly into the pendants until the resin is just covering the LEDs. Alternatively, pour the resin halfway up the LEDs. Check to make sure there is no leaking down the wires. Wait for the resin to fully cure (24 hours).
Cut off protruding bits of the electrical tape. If the resin was only filled up halfway, mix more resin and fill up to the top of the LEDs and wait for the resin to fully cure.
Step 6: Adding the One Way Mirror


Now it's time to add the one way mirror.
For this step, you'll need the following:
- Window privacy film
- Scissors
- Resin
- Nitrile gloves (recommended)
Put on the nitrile gloves if you're using them. They will help avoid marks on the privacy film.
Cut out a piece of the privacy film so that it covers the LEDs. As can be seen from the photo, the pieces I cut do not extend beyond the top wire. This is to ensure the wire doesn't get reflected, just the LEDs.
Mix a small portion of resin and add it to the center of the pendant. There should be enough to cover the area inside the wire. You'll definitely want something else to use the excess resin on, as you'll only be using a few drops of resin per pendant. Place the privacy film on the pendant, pressing lightly to ensure the resin coats the entire bottom of the privacy film. It's okay if a tiny bit of the corners sticks up.
Resist the urge to pour resin on top of the privacy film, at least for the square pendant (and presumably the rectangular ones as well). Initially, I did the steps above and without waiting for it to cure, I poured a generous amount of resin on top of the privacy film. Within a few minutes, the privacy film went from flat to a "C" shape (the center rose). I had to remove the resin, cut a new piece of privacy film and try again. Interestingly enough, the circular piece of window film didn't exhibit this behavior but you'll probably still want to follow the same steps as those for a square pendant just to be on the safe side.
Wait for the resin to cure. With this, the privacy film should be stuck to the pendant with resin as the "glue".
You can now test the infinity mirror effect. Note that the wire is extremely visible (see photos 2 and 3).
Step 7: Adding Resin (Final Pour)


Time for the finishing touches and the final bit of resin.
Before adding the last bit of resin, you'll probably want to paint over the portions not covered by the privacy film. Use black paint (or another color if desired) and paint the area not covered by the privacy film. You may want to paint the edges of the privacy film as well (see photos). This hides the wires and stops the light escaping from the sides. Wait for the paint to dry. I used professional artist grade black (Golden Carbon Black to be exact). (Professional grade paints contain more pigments so you'll probably only need a single coat. Student grade paints contain more fillers so you might need additional coats to fully stop the light leakage.)
Mix some resin as per the resin instructions. Set the pendant on a flat surface, as before. Carefully pour the resin on the pendant. Let the resin go right to the edge. The surface tension of the resin should keep the resin from flowing over the edge and down the sides (unless you add too much). You can use a toothpick to ensure the resin goes to the edge. Wait for the resin to cure.
You are now finished with the pendant.
Step 8: Adding a Battery Holder - Part 1 - Equipment


For a power source, there are several options. The first is to run the wires up the chain (or whatever you're using as the necklace the pendant is attached to) and have a battery attachment at the back, out of sight. The second option is to use the wire as the necklace and have the battery or batteries as part of the clasp. A third option is to have a battery holder on the back of the pendant.
Here's a quick and easy way to create a battery holder.
You'll need the following items:
- Double sided tape
- Iron-on patches
- Rubber coated paper clip
- Wire stripper
- Iron (for ironing clothes - not shown)
- Switch (optional)
- Soldering iron, solder, wire cutter (optional - used only if attaching the switch)
Step 9: Adding a Battery Holder - Part 2 - the Battery Clip


First, we need a way to attach the battery to the wires. Strip the ends of the wire to expose a fair bit of the wire (a cm or two or half an inch should be enough - see photo 1).
Next, bend a paper clip to shorten the longer portion. Then add a bend so the two portions are slightly apart and parallel (see photo 2).
Take one wire and loop it around one portion of the paper clip (see photos 4 and 5).
Now repeat with the other wire using the other end of the paper clip (see photo 6).
Place the battery in the clip to test if the clip works (see photo 7).
Of course, this wouldn't be very comfortable to have next to your skin so we'll need a holder. On to the next step.
Step 10: Adding a Battery Holder - Step 3 - the Holder


Now it's time to make the holder for the battery clip.
First, cut out a small patch of the iron-on patch. Cut it in the shape shown in photo 1. The smaller portion should be slightly smaller than the pendant. This will form a "pocket" that we can attach to the back of the pendant (see photo 4).
Next, fold the patch so that the edges of one side line up with the other (see photo 1 for which portions connect, photos 2 and 3 for how to fold it to line up the edges). Make sure that the cloth is on the outside and the smooth adhesive sides are touching. Carefully iron the edge so that it sticks together.
Repeat for the other side (folding may be slightly more awkward).
You should now have a "pocket" as seen in photos 4 and 5.
Apply the double sided tape to the back of the pendant (see photo 6). Peel off the backing and attach the "pocket" to the pendant.
At this point, you can cut the wire and add in the switch if desired. I left the wires long but if you use this as your battery holder, you'll want to shorten the wires. Make sure the wires will still be long enough to pull the battery out of the pocket. If the wire is thin and flexible enough, any excess can also be tucked into the "pocket".
Step 11: Final Notes
Here are some final notes to end the instructable.
The photo of the two pendants shows the pendant each using a 3V battery. Using 6V (two 3V batteries) will give you brighter LEDs. With batteries that are extremely thin, this won't be much of an issue in terms of the battery holder.
For more options in terms of connecting to the battery, you'll want to use the thinnest, most flexible wire you can. The wires I used are not extremely flexible and it does have an effect on what I can do in terms of hooking up to a battery holder.
The long curing time of the resin used makes it highly susceptible to dust. I suspect there was some dust in the resin for the square pendant, giving it a bit of a cloudy look. You'll want to be especially careful when shielding the curing resin.
I've never used epoxy resin so I don't know its curing characteristics and whether or not it would be a good choice for the resin.
One thing you'll notice when looking carefully at the square pendant is the LEDs are not directly opposite those on the other side. This is a result of the LEDs being tilted in the same way (clockwise). Not sure if it's that important from an aesthetic standpoint but it is something to consider.
For the stiff wire connecting the LED leads, I placed the wire on top of the leads and soldered it to the leads. This increased the height of the assembly. It may be a better (but more difficult) choice to place the ring on the other side of the lead. For the square pendant, that would mean leaving a bit of room between the LED and the circuit board pieces and placing the stiff wire on the inside of the circuit board assembly, underneath the topmost lead. This would need to be done before the LEDs were soldered to the circuit board sections (probably right after the circuit board pieces are connected.
If you want a border other than black, you may want several layers of paint. A black layer to block the light, an optional white layer, and a layer for the final color. (The white layer will help lighten the top coat, especially if the top coat is translucent or transparent.)
The privacy film for both pendants wasn't completely flat and that caused a bit of warping in the effect. I'm not sure how to correct this at the moment but one idea is to apply resin to a larger sheet and cut out the required size from that. (In essence creating something like a traditional mirror substituting resin for the glass and the privacy film for the chrome/silver.) Not complete sure this will work but in theory it should.
If you make a pendant similar to these, you've hopefully learned from some of my mistakes and use that knowledge to make something even better. I hope you've enjoyed this instructable.

Finalist in the
Make It Glow Challenge

Participated in the
ShopBot Challenge


