

Introduction: Inner Tube Tool Roll


It is always a good idea to have some basic tools on hand or in your car. Not being a fan of a heavy noisy toolbox in the back of my car, I made this easy to stow tool roll that won't let the tool scratch and hit against each other making a noise.
The Tool roll can also be attached to a bicycle or be used to store different objects such as n knife set or tent pegs.
Step 1: The Tools

Tool are what separates us for pre tool equipped cavemen, well that and computers, the internet and everything else.
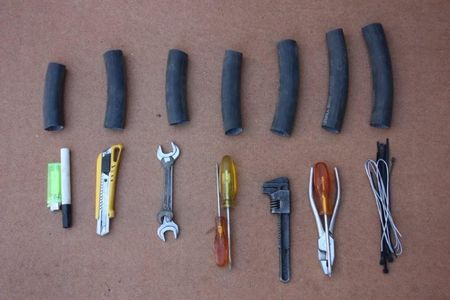
So in my basic tool I have included.
- 2 Metric open-end spanners sized 10 - 13 and 17 - 19
- Adjustable spanner (Mine's very old and made by Ford)
- 3 Screwdrivers (2 Flat and 1 Phillips)
- Simple Pliers
- Utility Knife and spare blade
- Cable Ties and about a meter long piece of steel wire.
- Lighter
- Permanent Marker.
Step 2: The Tools of the Trade

To make the tool roll I use the following tools and supplies
Tools
- Large scissors
- 600mm Ruler
- Glue Brush
- Chalk
Supplies
- Contact Glue
- 2x 26inch Bicycle tubes
- 13inch Car Tire tube (Ended up using only a small piece for the strap)
- 120 Grit Sandpaper (Not shown)
- Electrical Tape
Step 3: Everything Have to Have Its Place
I grouped some of the tools together so that less pockets and a tighter wrapped up package at the end.
When the tools where grouped up, I took my first inner tube and made my separate pockets, long enough so that it will hold the tools but short enough so that one will not be digging around to remove the tool from its pocket. I also added about 15mm(9/16'') extra because the end will be glued and folded over.
Step 4: You Must All Stick to Together


To close the ends of the tube I sanded the insides of all the pockets and rubbed some glue about 15mm (9/16'') in and following the in instructions written on the glue can. The glue was left to dry and the end where flattened.
While I waited for the glue to dry, I started by cutting the backing piece of inner tube 500mm(20'') long. The math was my 7 pockets was about 50mm(2'') wide plus an extra 150mm(6'') for the flap. The extra piece will ensure that there are no tools exposed. The tubes where then cut open length wise to form a single back layer.
If you are planning to make a tool roll with much more pockets than I did, then I just what to mention that you can extend the backing so that you can add some pockets on the opposite side of row of pockets.
Step 5: Back Up

The backing is whats holds all the pockets together and what later forms the outside of the roll.
When the glue dried on the inner of the pockets, I pressed the tubes flat as seen on the previous step.
The next steps is the gluing of the pockets to the backing. To do this I sanded and glued about 15mm (9/16'') on each pocket flat side to the backing.
Once the pockets the are glued, I glued three other backing strips with a 8mm(3/8'') overlap.
Step 6: The Flipside


Once all the pocket and backing is glued, its time to glue the pockets in its final position on the backing.
To do this I first folded and held the pockets in place and marked the position with my blue chalk block. Once I had the marks I sanded and brush on some glue to the pockets and the backing.
Once the glue dried I folded the pockets into place and for neatness I taped the seam together where the pockets meet.
In my final act of neatness I trimmed the edge of the backing so that everything was in line and square.
Step 7: The Home Straight


Once I was finished, I repacked the tools into there own pocket.
To close the roll you have to flip the top of the backing over and start to roll on the side of the tools so that the edge with no pockets will the on the outside.
The very last thing to do is make the strap that holds the roll from unrolling. My strap was made from a cars inner tube because I didn't have any bicycle tubes left.
The ends was cut and glued back together to form the strap.
Finalist in the
Alchemy Goods Inner Tube Reuse Contest
Participated in the
Epilog Challenge


