

Introduction: Kite Aerial Photography Rig


Kite aerial photography is already a trodden path in DIY land - there's even at least one Instructable on a rig. But we'd like to show how to make one with professional applications on a very tight budget. This rig is well tested in a construction site in a rural village in Cambodia. And with geo-tagging enabled on your camera, the rig could help fill out 3D models of buildings or almost anything that's tall.
Wil Cao, a structural engineer at Parsons Brinckerhoff in New York City, and a member of the New York Professionals chapter of Engineers Without Borders-USA, brought us this guide to building a remote-controlled camera rig for a kite.
In 2005, Wil and the Engineers Without Borders team were repairing an embankment on a river near a rural village in Cambodia and they needed aerial photos of the site. Google Earth didn't have good shots of the region, and renting a helicopter was out of the budget.
Wearing their thinking caps and their sweaty shirts, the engineers decided to make a kite rig. Actually, they had several kinds of images and the shots from the kite filled in the gaps. They had a blurry satellite photo from a predecessor of Google Earth, which they overlaid with Cambodian military topographical maps and filled in holes with shots from anywhere they could get them, including helicopter passes, satellite photos from private firms, and, relevant to this Instructable, a camera on a kite.
The kite rig went through two phases. The one shown here is a fancier second version, but, at the risk of false advertisement, this Instructable is on the first, homemade, truly DIY rig that Wil made at home. (We don't photos of the camera in the original rig because that camera was the only one available at the time... sorry!)
Our design here is highly customizable. We'll draw lines around how to assemble it, and you can fill in your own measurements and other details. Here's how to make it.
Step 1: Specs & Parts

Specs
The rig rotates the camera 270 degrees and tilts 180 degrees. The remote control is from an RC plane and it has a range of 2000 ft. (Wil's kite string was 1000 ft, so it was always in range).
What you'll need
Aluminum flat plates (Home Depot)
Servo equipment, can come in a package: (Servocity)
-Hand-held controller (transmitter)
-Receiver
-Three servos
Gears (salvaged parts from an old printer)
Epoxy and Super Glue
Coat hangers (optional)
Fiber mesh for strength (optional)
A fancy kite
Cost: About $200, depending on what parts you can salvage
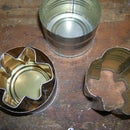
Step 2: The Frame Part 1

Wil says: Weight is an issue. Just think: Your camera alone is heavy. Then work backwards from there.
Start with the aluminum flat plates. Cut them to size to fit your camera. Cut the bottom part of the assembly to snugly cradle the camera. You can also put something soft and spongy in that part for added shock absorption. Or you can just send your camera out into the cold, cold sky in nothing but its aluminum cage.
To stick the plates together, try epoxy or just use screws. Sheet metal screws will do.
The bottom unit should rotate vertically on its axis on a bolt held in place with a nut. It also rotates horizontally on an axis in the vertical centerline of the whole unit.
Keep in mind that these photos are a reference, but your assembly should be custom built to your camera.
Step 3: The Frame Part 2

Here's another shot of the assembly frame.
The wires coming out are from all sides are coat hangers. They provide legs for the unit, so if it plummets out of the sky they can mitigate some of the damage. To attach them, drill holes in the frame and thread pieces of the coat hangers through.
These are an optional feature. Maybe there's a better shock, but not a cheaper one.
Step 4:

Wil says: My toughest challenge was the rotating bearings at the connections. After scratching my head for days…and days…and days, I came up with a nut-and-screw system.
Sticking the screw through a hole that you drill to just the right size creates high rotational friction. Instead, try threading the screw through its own nut, and then glue the nut to the frame. The tolerance is low, and friction is minimal. Oil it regularly.
To reinforce all of the "nut" joints, try using a fiber sheet mixed with the clay epoxy. If the rig were to break, it should break at these nut joints.
The fiber mesh pictured is scrap from a bathroom tiling project.
Step 5: Attaching the Servos

Mount the servos to pieces of balsa wood or some other material. Glue the wood to the aluminum frame. Try Crazy Glue (This is a rough cut of the rig, not a streamlined, perfectly efficient instrument).
Match the servos to the camera, so the piece that presses the shutter button should be aligned with that button.
Step 6: Attaching the Rest of the Hardware, Pt. 1

Simply glue on the battery pack and receiver (and servos) where they need to be.
In this design, the battery pack is on top and the wires from the servos go into the receiver to the left of the battery pack. You can mount these parts wherever they fit on your assembly. Just try to keep the whole thing somewhat balanced. That, and the shape of your camera, should dictate where you put the different parts.
Step 7: Attaching the Rest of the Hardware, Pt. 2

This is a close-up of how the hardware is arranged on top of the rig.
And that's about it! Here's a 30-second video that shows the rig in action:
Step 8:

One of Wil's colleagues on the project, Chai, feeds up the rig in this photo. The Engineers Without Borders-USA team writes this tip on a blog they maintained throughout the project:
After a couple of trial and error, we figured out a strategy to get the unit up. Attaching the unit too close to the kite causes difficult initial launching, since the wind at ground level is not usually as strong to lift the unit. Launching the kite by itself for the initial 100' or so allows the kite to catch onto stronger winds above, hence, "locking" the kite up there. At this point, attaching the camera rig to a newly tied knot will easily draw the entire unit up.
Step 9: How to Shoot Photos


Operating the kite rig took four people. One person flew the kite, another used the remote control, another untangled the kite string (an ongoing struggle) and the fourth stood in every shot pointing a PVC pipe north for reference and scale.
Step 10: Shots From the Cambodia Work Site

This is a collage of shots of the work site in Cambodia that the kite rig took. For dozens more, see this Picasa gallery.


