

Introduction: Long Reach Stapler -- Make Your Own


If you need to make a booklet, you need a long reach stapler. These can cost several times more than a standard desk stapler. The office where I work now has one shown here. A few years ago I was working in an office where there was no money for a long reach stapler, but we needed to make booklets.
The long reach stapler shown here is really heavy duty with very strong components. Someone did tape corrugated cardboard pieces to the steel base for stops on different sizes of paper.
Step 1: Choose the Stapler

You need a donor stapler that lends itself to the necessary modifications. A Bostitch-Stanley desk stapler like the one shown here works well. This photo is from Bostitch-Stanley.
Step 2: Remove the Plastic Base

A new longer wooden base will be used. Pry the old plastic base off of the stapler. It is the black part shown along the bottom portion of the graphic. You will not be needing it, so do not worry about any damage inflicted, although it should snap right off with ease.
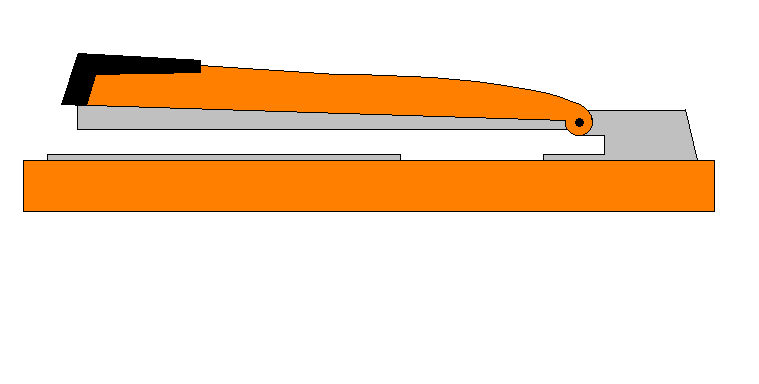
Step 3: Begin Remaking

Grind the head from the pin that is the axis for the stapler. Here it is the filled black circle at the right end of the graphic. Remove the stapler from its steel base and cut the steel base off with a saw at the red line in the graphic.
Step 4: Turn Part of the Steel Base Around

After sawing the steel base where shown in the last step, turn the portion at the rear of the stapler around
Step 5: Make the New Wooden Base
Use a piece of decent wood a little longer than the new configuration for the stapler with its elongated throat. Drill a hole to accommodate the spring plunger under the steel base. What I am calling the spring plunger allows the anvil portion that bends the ends of the staples to be rotated so staple ends point inward or outward when bent around. Drill a couple of holes in the forward portion of the steel base and countersink for bevel head screws. Screw the forward portion of the steel base to the new wooden base. Align the opening where the staples come out of the stapler with the anvil. Carefully mark existing holes in the rear portion of the now reversed steel base and fasten it to the wooden base, too. A flat spring to return the stapler to its upward position will need to go onto the front screw. See the next step.
Step 6: Add Wire Brads to Limit the Paper Position

Here you can see the spring that returns the stapler to its upward position (black heavy line near the axis). Near the spring you can see a vertical black line rising from the wooden base. This is one of two wire brads to act as a stop when inserting paper to be stapled on the crease of a booklet. Set a wire brad on both the left and right sides of the stapler.
Step 7: My Stapler in Real Life

This is a photo of my long reach stapler. You can see the two bevel head screws I used to fasten the portion of the steel base with the anvil to the wooden base. You can also see one of the wire brads that acts as a stop to position the paper for stapling. And, you can see how the rear portion of the steel base has been turned around.
If you look closely, you can see I made some further adaptations to it. There is a tiny amount of play in the axis pin, so I used a welder to permanently fix it to the stapler. I bumped the stapler a couple of times and it went out of alignment with the anvil. To enhance the holding power of the screws at the back end of the stapler where the steel base attaches to the wooden base, I welded a piece of steel between the two pieces of the steel base to make it one piece again.
Step 8: Additional Detail

Here you can see more clearly the two screws attaching the rear portion of the steel base to the wooden base. I used sheet metal screws. They are a little smaller than the holes in the steel base, so some adjustment was easy before I welded the two pieces of steel to the piece of steel that bridges the gap between them. The screw to the left holds down the flat spring that lifts the stapler. You can see the two wire brads that limit the position of the paper for stapling.
Also, I ground away a little of the rear portion of the stapler so I can lift it a little higher to load new staples into it.
Step 9: English, Please.

This is my long reach stapler from the front end. There is still just a little play in the axis pin at the back of the stapler. Sometimes it results in a badly bent staple I need to remove and do over. But, if I apply a little English or nudge toward the left side of the photo on the stapler, it works fine every time.
This stapler can be used as a long reach or deep throat stapler for 8 1/2 x 11 folded to make booklets 5 1/2 x 8 1/2, or it can be used for any job a desk stapler would normally do.


