

Introduction: Mezzanine Bed With Frame Inserted Into Posts


As a present for her 6th birthday, my younger daughter wanted a mezzanine bed like her older sister. After my first woodworking project, an outdoor table that you can check here, I decided to build this mezzanine bed myself.
I studied how my other daughter's mezzanine bed was made and how others I found on the Internet were made. The most common way to assemble the sides of the bed frame to the posts is using long metal screws, which means drilling deep holes as straight as possible. If you don't have a drill press, this is not easy. There are drilling jigs available, but for such deep holes, they're not perfect and can get you a few millimetres off.
I decided to look for alternatives and I wondered whether I could instead assemble the bed frame first and then insert it into blind dados I would cut into the posts. My main concern was whether this would be strong enough. After several people on woodworking forums told me it would be strong enough I decided to start this project.
It took me 4 days to complete this mezzanine bed and for the assembly of the bed frame with the posts, I asked somebody to help me hold the wood pieces, as it can be quite heavy.
DISCLAIMER: This bed is pretty strong for my needs. My daughter has been sleeping in it for over a month. I have climbed in it with her and it's not moving at all. However, I'm not an expert in mezzanine bed safety and I know that the safety rules for this kind of bed are different across countries. Please follow this instructable at your own risk!
Step 1: The Draft Plan


I used Fusion 360 to draw this plan. A lot of inspiration came from my older daughter's mezzanine bed, although the assembly of this mezzanine bed is completely different, as explained in the intro.
Note that in the 1st picture, I didn't model the stairs and that I zoomed into the actual assembly between the bed frame and the posts in the 2nd picture. In this picture, there's a small gap between the assembled pieces to more easily differentiate them.
Step 2: What You Need

Wood
I chose pine wood because it's not expensive, it's light and it's easy to work with. Only for the slats did I use beech because it's more flexible.
My measures are given in the metric system. They're suited for a standard mattress size of 1900 mm x 900 mm and a ceiling height of 2500 mm. Make sure you adapt them to your needs.
When you choose your wood pieces, always check for defects. Choose the straightest pieces.
- posts (60 mm side length at least):
- 4 x 2000 mm long for the legs
- 1 x 400 mm long to assemble the guard rails by the ladder
- boards (18 mm thickness at least):
- 8 x (80 mm x 900 mm) for the sides of the bed frame and the side guard rails
- 2 x (80 mm x 1950 mm) for the front and back of the bed frame
- 3 x (80 mm x 1870 mm) for the back guard rails
- 2 x (80 mm x 1470 mm) for the front guard rails
- 14 x (70 mm x 900 mm) for the slats (remember I used beech for these ones)
- 2 x (110 mm x 2250 mm) for the ladder sides
- 5 x (90 mm x 400 mm) for the ladder steps
- cleats (24 mm sides)
- 2 x 1880 mm. These are where the slats will be resting on.
Screws and miscellaneous hardware
- 60 dowels (10 mm diameter, 40 mm length)
- wood screws (I took packages of 100 pieces)
- 30 mm
- 40 mm
- 60 mm
- wood glue
- wood varnish (enough to cover 30 m^2, that's 3 layers)
- 2 x metal brackets to attach the bed to the wall
Tools
- a power saw to cut your wood. If you have a table saw or miter saw, you already have the best options for clean cuts. If you don't, use a circular saw as I did. Only if you have no other choice and really no other choice, a jigsaw.
- a power drill that you can also use to drive screws. You'll need a 10 mm drill bit for wood.
- optionally a router to make the blind dados in the bed legs. I'll explain how to make them without a router, but then you'll also need wood chisels
- a power sander. I used a random-orbit power sander.
- clamps, lots of clamps. A corner clamp can be useful as well.
- drill jigs / doweling jigs for the dowel assemblies
- pocket hole jigs if, like me, you want to secure your dowel assemblies
- metal ruler and square for measuring and marking
- a paint brush to apply the varnish
- a workbench
Step 3: Cut the Wood Pieces to the Right Size


With your circular saw (or jigsaw if you don't have a circular saw, but again this is not ideal for getting straight and clean cuts), cut all the pieces of wood to the dimensions listed in step 2.
For the 2 sides of the ladder you will also need to cut their ends at an angle of 15°, else your ladder would be completely vertical.
Step 4: Assemble the Bed Frame


Glue the 2 cleats centered at the bottom of the frame front and back boards (pictures 1 and 2). When the glue is dry, add a 4 to 5 wood screws to make this assembly stronger (picture 3). This is what is going to support the weight of the people sleeping in this bed.
Use your doweling jig to create an L-assembly for each corner of your bed frame. I used 2 dowels per assembly and I placed them 15 mm from the edges (pictures 4 to 6). Make sure you don't drill too deep when drilling into the face of the side boards. Glue each assembly and let it dry in a corner clamp (picture 7).
For extra safety, I used pocket hole assembly as well for each corner (picture 8).
Step 5: Add the Slats


Once the bed frame is done, place the slats on top of the cleats. Distribute them along the length of the bed frame and then attach them to the cleats with wood screws.
Your bed frame is done.
Step 6: Mark the Posts (bed Legs) for Placing the Bed Frame and the Guard Rails


For each leg, draw a line 400 mm away from its top (picture 1). It corresponds to where your bed frame will sit on the legs.
Place your bed frame against this line and 20 mm away from one edge of the leg (pictures 2 and 3) and draw lines all around it. Continue this drawing on the next side of the post to represent the depth of your bed frame front or back sides (picture 4). This will be the blind dado (slot) that you're going to cut out and where you're going to fit a bed frame corner.
Draw the lines for the guard rails so that they're spaced evenly. The only constraint is that you leave at least 20 mm from the top of the post untouched (picture 5).
Don't forget to draw the lines for the rails at the bottom of the legs (not shown here). You can put them at the height you'd like but preferably no higher than 80 cm. Be aware that there won't be any front bottom rail.
Draw the marks where you want to drill holes the your dowel assemblies. Back and front guard rails must be aligned with the back and front of the bed frame. The same way for the sides.
If you don't want to get lost, you can mark your legs (e.g. front-left, back-left, etc.).
Step 7: Prepare the Assembly of the Legs


Using your doweling jig, drill the holes for the dowel assemblies. You're going to drill many holes, in the posts and in the guard rails.
On each post, cut the blind dado that you drew in the previous step.
You have 2 options here:
- the easier and cleaner one is to use a router
- else with your drill, drill holes one next to each other along the lines (make sure you adjust the depth appropriately) and straighten the cuts with wood chisels
You'll obtain something like in picture 3.
From the small post that you'll place in the front, you want to remove a piece that is as deep and as wide as your bed frame front board (see picture 4). You can use a router again, or just a jigsaw as this is not a blind cut.
Step 8: Assemble the Legs, Frame and Rails


Lay the back legs on the ground.
Assemble the 3 back rails with dowels and pocket holes for more safety.
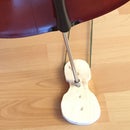
Insert the bed frame into the 2 slots you made in the previous step (picture 1). Use 2 wood screws for each side to secure the assembly (picture 2).
Assemble the side rails with dowels and again pockets holes for more safety.
Finally, assemble the front legs with the bed frame and rails the same way you did for the back (picture 3).
Now you can ask somebody to help you raise the bed (picture 4).
Assemble
Step 9: Assemble the Ladder


Draw lines at 15° spaced evenly for the 5 steps.
Using your doweling jig, drill holes along these lines (picture 2) and drill holes on the sides of steps (picture 3).
Then, as you can guess after reading the previous assembly steps, assemble the ladder steps and ladder side with dowels and make the assembly stronger with pocket holes.
Place the ladder against the front left leg. You'll notice that the upper inside corner of the ladder side has a sharp edge that should be removed. With a pencil, follow the edge of the front left leg to draw this piece of the ladder side that has to be removed. Then cut it away (picture 5).
Do the same with the right side of the ladder, using the small post as a reference (picture 6).
Step 10: Assemble the Front Rails

The front rails will be assembled to the front left leg and to the small post.
Do the same as for the other assemblies: dowels, pocket holes...
When the front rails are assembled, attach the small post to the bed frame front using wood screws.
Step 11: Sand, Varnish and Secure to the Wall


Do several passes of sanding starting with coarse grain and then using finer grain at each step, until smooth enough for you.
Apply varnish all over the bed, 3 times, sanding with super fine grain between each coat.
When this is done, you can secure the back legs to a wall using a metal bracket (picture 3).
Step 12: If I Had to Redo It...
- I would sand and varnish right after cutting the wood boards. It would be much easier than after it assembled.
- I would take more pictures of each steps to make this instructable easier to follow.

Participated in the
Homemade Gifts Contest 2016

Participated in the
Epilog Contest 8


