

Introduction: Appliqué on T-Shirts and More


Applique (sewing fabric on top of fabric) was always a mystery to me because either there was an incredible amount of work to do (thousands of little teeny stitches) or the fabric being sewed created a bulky end result, or even worse sometimes the whole project wouldn't lay flat and the T-shirt underneath stretched and looked like a mess after being sewed.
Then along came "Steam a Seam 2" and the mystery was solved - now I knew how people got great results with all kinds of projects from art quilts with sharp designs and great detail to T-shirts with bold colors and great graphics.
So here we go - I'm going to teach you how to applique a T-shirt, and then you will be able to take this skill to all sorts of fabric projects; from art quilts to decorating a pair of jeans or a purse or even pillow shams.
Step 1: Things You Need:

A T-shirt
Scissors
"Steam a Seam 2"
Sewing Machine (optional)
Iron
Fabric Scraps
Thread in lots of colors (optional also)
Step 2: The Magic of "Steam a Seam 2"

"Steam a Seam 2" (here after known as SAS2) is a reposition-able sticky fabric-like material that has a paper covering on BOTH sides because the SAS2 is really just like double sided tape. This is the most wonderful product ever invented for the sewing world besides scissors.
The following is pretty much all the reading you'll have to do. I wrote it all up for left-brainers. Being right-brained myself I need lots of pictures to understand stuff so the rest is mostly pictures to explain what I explain in words here.
For an example, let's say you want to trace a doodle you made on a piece of notebook paper. Cut a piece of SAS2 about the same size, pull off the paper covering that is hardest to pull off (one side is easy and one side is more stuck). Lay this see-through paper on top of your design and trace it. Lay that paper back on the sticky SAS2 and now pull off the easy-to-pull-off side (put it aside for later), lay it on the BACK of your fabric scrap and cut out the design and the fabric at the same time.
OK, now pull off the paper backing, turn your fabric shape right side up, position it on your T-shirt (or anything else), see if you like it, move it around, make a decision and iron it according to the directions on the box or pkg. I never looked at them - I just iron on full power, using lots of steam 'cause it's called Steam a Seam right?
Once you iron your design down to the fabric it is on top of, it is pretty permanent, the company says you can wash it, no problems (I do read some instructions). I still like to sew all around the pieces because I like the look. Sewing now becomes a breeze because there are no pins, and the T-shirt fabric doesn't bunch up because it is not being stretched as you sew.
So if you don't have a sewing machine it's OK, design away, make stuff, go for it.
Step 3: Plan Your Design


If you want to make a monster like mine go ahead and copy mine. You'll probably want to do something original though, but you'll get the idea of how to by just reading through.
I laid out the T-shirt and decided to make the body of the monster big enough for me to be able to attach arms and legs. The important thing to do here is NOT to cut out the shapes just yet. The great thing about SAS2 is that you can get really fine detail BUT to do this you must cut out the fabric and the SAS2 together. Well not always - if it's a big piece with no sharp corners then you can simply place SAS2 onto the edge in small pieces. Open the photos below to get an idea of what I mean.
Besides not wasting the SAS2 I also cut out exactly how much I need to get things stuck down because too much of the stuff creates a slightly stiff outcome. Later I will show photos of cutting away excess fabric from underneath.
Read that middle paragraph again - it's really important.
Step 4: Save Your Scraps

Don't waste this stuff because it is expensive. I save all my scraps; anything bigger than a nickel, I just lay them on top of the paper that I told you to put aside for later and roll them up for next project. Also, you don't need much of it as a little goes a long way in sticking something down.
Step 5: Assembling Parts


Try to cut out anything that you are going to have multiples of (like hands and feet and claws) with the fabric doubled. This way you have symmetry and it saves time.
Step 6: Scraps

I keep a basket on the table to put scraps into that need to be thrown out. You end up with a lot less to clean up in the end.
Step 7: Seams


You can hide a multitude of errors with more fabric like I did here when I cut out the feet to see the look and then when I liked them I didn't want to waste the fabric (I dyed it all myself) so I hid the seam with a "ring". With monsters you can get away with anything because there are no real ones to compare them to. Funny thing is that even though they don't exist you know when they don't look right. That is just weird.
Step 8: SAS2 Lets You Change Your Mind


Until you iron your SAS2-backed pieces down you can't make a mistake in placement. They are about as sticky as Scotch tape. Safe for velvet, silk or lace (though there is a lighter version especially made for silks and lace).
Step 9: Time to Iron


Here you can see the difference between the monster before he has been ironed down and after he has been ironed down and ready to sew. The ironed down one has the new and improved eye with a black pupil.
Step 10: Sewing


I like the look of stitches, zigzag or straight. They just give a project a more finished look, but it's personal preference.
The paper roll that I show in the second photo is called stabilizer paper and it's for placing under the fabric being sewn, especially if it is stretchy like a T-shirt. It is not really necessary so that is why I didn't list in "things you need". If you have it use it but don't put off being creative if you don't have it. Just sew slowly at first to make sure you don't get any bunch-up of T-shirt fabric. You shouldn't.
Step 11: Cutting Away the Bulk


I leaned about this in quilting and it applies here as well. Cut away all layers but the front one.
Applique scissors are an amazing tool that you might want to reward yourself with one day. They make applique work almost mistake proof because of the way they are shaped you can get close to the surface of the fabric but you won't poke through. I love mine. Get some. One day.
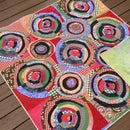
Step 12: Other Projects With SAS2


The quilt was a welcome home present I made my son last week, he's 11. We are going to lounge on the couch with it for a month and then hang it on the wall.
Here is a very old (favorite) semi-shear T-shirt which I had no problems sewing the fish silk screen on to. This was a fish my son caught and I took it's picture before we let it go. It wasn't that big - the magic of photoshop made it much larger than life.
So now that you know the wonders of SAS2 go out there and make stuff, don't be careful, take risks, experiment with the unusual, this stuff is so fantastic you can break all the rules.
The first person to make something with SAS2 and those bags that onions and shallots and baby Gouda cheeses come in, I will reward with a patch. Just post a picture in the comments section.
Don't forget! Rate my Instructable.


