

Introduction: Otto DIY+ Arduino Bluetooth Robot Easy to 3D Print


Truly open source nature of Otto allows open STEAM education, we collect feedback from different workshops and schools around the world that are already using Otto DIY in their classroom and depending of the openness of this educational places we organize the lesson material and share as well.
CC-BY-SA Creative commons license it means you can copy for free but you must give credits to the original by putting our website (https://www.ottodiy.com/)
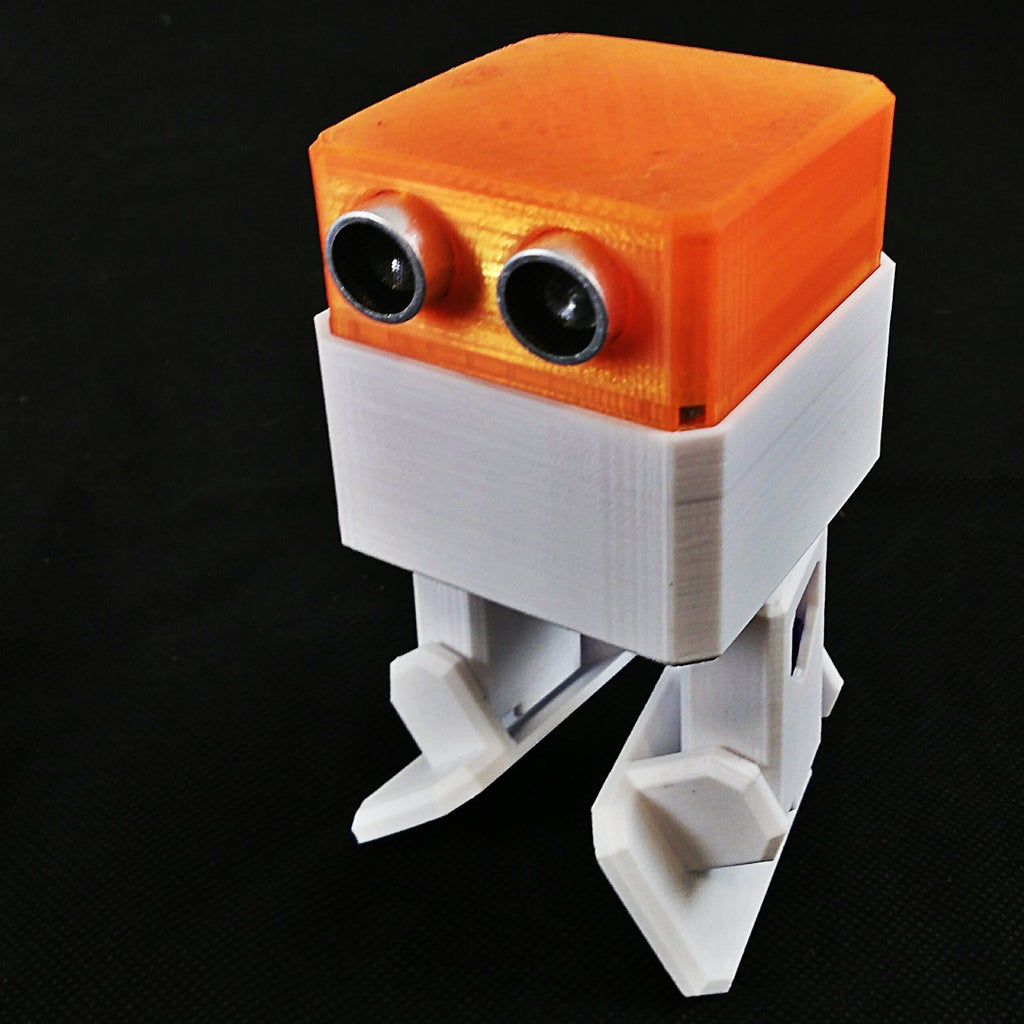
Otto DIY + is the improved and advanced version of original #OttoDIY, the idea is to have the same base features DIY robot + Bluetooth control and programming + metal gear servo motors + rechargeable + changing modes by touch sensor + sound sensor + light moves + other outputs +...?
The exciting part is that we are doing open development with makers and hackers around the world so we are open to ideas, not only from experts you can join us with , feedback, social share, testing or any other contribution that you might think of.
Supplies
1 × Arduino Nano
1 × HC-06 or HC-05 Bluetooth module
1 × Arduino Nano Shield I/O; you could use a mini breadboard but much more cable work
1 × USB-A to Mini-USB Cable
4 × Micro servo MG90s(metal)
1 × Buzzer
10 × Female/Female Jumper Wires
1 × Touch sensor
1 × sound sensor
1 × 8x8mm Micro Switch Self lock On/Off
1 × 3.7 V LiPo Battery with booster to 5V (optional) 1 × Phillips Screwdriver 1 x 3D printer (or use a service or a friend ;))
Step 1: 3D Printer Settings
It is important to read first Otto DIY previous instructable to get familiar with the basics of building a bipedal robot
Get all 3D print STL parts, codes and libraries for Bluetooth by going here https://wikifactory.com/+OttoDIY/otto-diy-plus in the files tab
- Recommend using an FDM 3D printer with PLA material.
- No need supports or rafts at all.
- Resolution: 0.15mm
- Fill density 20%
Need to adjust size some changes use the source file made in Autodesk Fusion 360
Step 2: Build Your Own Otto DIY+


in the following video and pictures you can have a reference of how to build Otto DIY+, due some new versions of the robot design.
Step 3: Code Your Own Otto


So to this point you should have an Otto 3D printed, assembled, now some programming to have libraries and Arduino installed in your PC.
The easiest to code your own Otto is by using our Blockly software, more advanced coder can try Arduino IDE directly.
Step 4: main Code for Bluetooth APP


Otto needs to be ready to receive command through Bluetooth and for that with need to put the main code inside his brain
- Copy Otto libraries into the Arduino IDE folder
- Upload APP .ino sketch to Otto
Download and Install the APP in your smartphone. Google Play Store (https://play.google.com/store/apps/details?id=com.ottodiy)
- Now you can connect the module and Enable Bluetooth in your phone.
- Find Otto and pair the Bluetooth address /name
- Now you can use the APP to control Otto!
- Play with the new features and if doesn't you might need to reconfigure your BT but do not worry is also easy ;)
Step 5: Copy, Expand, Customize,modify, Remix and Share!


Check this blog post to find ideas of how to customize your own robot
Join the Otto Builder community!
Follow us, give us a like and share your creativity, you could be featured here by sharing your robot in any social media
use the hashtag #ottodiy in your post and tag or mention @OttoDIY
Step 6: Bluetooth (BT) Setup (only If Pairing Not Successful):
This setup is ONLY needed for modules that don't come with the standard baud rate of 9600, how to know? just try first the code and the APP, if the phone doesn't pair with Otto or respond to commands, then probably means your module is in a different baud rate so need to be configured
The BT code has 115200 baud-rate so BT module must match that speed to be able to communicate with Arduino Nano via serial interface(UART).
For HC-05: 38400 or 115200
1. Upload the sketch HC05_BT_config.ino to your Nano first, then disconnect Nano from USB.
2. Now connect BT to Arduino Nano as shown in diagram but do not connect VCC.
TX - RX
RX - TX
VCC - 5V
GND - GND
3. Plug in the USB to Nano and then connect VCC so BT enters AT mode. LED on BT should start to blink slower, about once every 2 seconds. (If this doesn't work, try holding the button on BT module while connecting VCC).
Open serial monitor in IDE, set baud-rate to 9600 and line ending to Both NL & CR.
Type AT then press enter; (if everything is right, BT should respond with OK and then enter following commands:
AT+NAME=Zowi "setting the name"
AT+PSWD=1234 "pairing password"
AT+UART=115200,1,0 "baud rate"
AT+POLAR=1,0 "enabling STATE pin to be used as reset for programming arduino over BT"
Now go to the APP step
If any problem check this instructable of how to Modify the HC-05 Bluetooth Module Defaults Using AT Commands
https://www.instructables.com/id/Modify-The-HC-05-...
For HC-06: 9600 or 115200
For HC-06 BT module things are a little simpler because module is always in AT command mode when not connected to anything. But the downside is that HC-06 module cannot be used to upload sketches to Arduino because it doesn't have reset. For configuring the module
1. upload this sketch HC06_BT_config.ino to your Nano
1. disconnect USB
2. connect BT module to Arduino Nano like this:
TX - RX
RX - TX
VCC - 5V
GND - GND
3. Power on your Nano and after about 10-15 seconds everything should be finished and your BT should be configured (LED13 should start blinking).
If any problem check this instructable https://www.instructables.com/id/Tutorial-Using-HC...
IF ANY QUESTION, i don't get notifications by instructables new comments so if anything please post in our community http://builders.ottodiy.com/


