

Introduction: Particularly Prolific Polyfoam Puppets


I have been invaded by puppets!
Currently, our theatre company, Merely Players, is producing Disney's Little Mermaid in Durango, Colorado.
I am the technical theatre designer and builder. During meetings with the director, we decided that the "Kiss the Girl" scene should be done with puppets. We also decided that many of the young actors (middle and high school) would look great if they had head pieces of various sea animals. So for the last week I have been up to my gills in polyfoam creating a batch of puppet performers.
Time is at a premium now, so I may not have time to go through all of the steps for each puppet. Instead, I will give ideas about the various puppets I am very rapidly assembling for use in this week's rehearsal.
Actually, I think it is better that you just look over what I am doing and come up with your own ideas. You may discover materials and methods that you otherwise wouldn't think of if you just use this as a cookbook.
Step 1: Materials


Here's a partial list of materials that I use. But you may come up with other ideas.
adhesives:
Super 77 by 3M - excellent spray adhesive
Hi-Strength 90 by 3M - much thicker spray which I don't like as much as the 77
hot glue
staple pliers - available from hardware stores, an indispensable tool
gaffer tape - not duct tape which turns to a gummy mess
Sculpt-or-Coat
foam core - I ask local frame shops to keep any scrap for me. I usually get enough pieces to make all the puppets.
open weave fabric- black - for inside the mouth
polyfoam - 1/2" 1/4" 1" thicknesses - I just bought large sheets from The Foam Factory
closed cell foam -
"landau" foam - used for automotive upholstery
craft paints
spray paints
brushes
styrofoam balls
plastic Christmas balls
clear craft Christmas ornament balls
large newsprint for making patterns
sharpie pens
sharp, good scissors
xacto knife
ruler
Invisible Glove
The Foam Book: an easy guide to building polyfoam puppets by Drew Allison & Donald Devet at Amazon
Step 2: Planning the Puppet


I often start with a sketch of the basic puppet form. But sometimes I just grab the foam and start drawing and cutting on it.
Step 3: The Mouth


With any "mouth" puppets, I think you should start with the mouth. Use an xacto knife to carefully cut out the foam mouth. Be careful because the knife will encounter resistance but then suddenly cut along. Never cut towards any body part. When you have it cut out, use a ruler to cut about half way through the foam along the line that the mouth will hinge. Try not to cut all the way through. The mouth will be stronger if you don't.
For the frogs I started with pretty much an ellipse, with the lower mouth being a bit smaller than the upper. I drew it out on paper because I built four frogs and wanted to speed things up.
The turtle puppet uses a mouth that has dips on the side to make it more turtle-like.
The heron puppet has a narrow mouth with a long bill.
The alligator has a very large mouth with a blunt nose. The lower mouth is smaller than the upper. I didn't make a template because I was only making one of him.
The dragonfly has a circular mouth that is 5 1/2" in diameter.
I don't have any photos of preparing the mouth. The Foam Book has a detailed description of a very strong constructed mouth. Basically, you:
1) cut a piece of black fabric larger than the foam
2) use spray glue to spray the side of the mouth without the cut (the inside of the mouth)
3) flip the mouth over and spray glue the edge - then wrap the extra fabric onto the inside
4) make finger tubes - Mine are about 4 1/2" wide strips of 1/2" polyfoam that I spray glue the edges and then roll it into a tube
5) decide how long to make the finger tubes - long fingers, long tubes - then I use gaffer tape to attach them to the mouth. I usually put two tubes on the upper mouth part, and one thumb tube on the lower. Different sizes of heads may need fewer or more on top to get good movement. The tape should go from the foam core, over one tube, then back to the foam core on the other side of the tube. Each tube gets its own piece of gaffer tape. Duct tape would work, but I hate how it gets gooey after time, and the next step won't attach as well. The Foam Book suggests just using some of the black fabric and spray gluing it down and then using Sculpt-or-Coat* to seal it in.
6) Test the mouth and see how it works. Keep the hinge free of fabric and glue so that you get easy mouth movement.
*Sculpt-or-Coat is a miracle substance. It is so non-toxic you could eat it -YUCK! It adheres to nearly everything. You can mix paint in with it. It won't eat into styrofoam. It creates a durable but flexible surface.
Step 4: Heads


I honestly have no idea how to explain how you make a head piece. I just look at a sketch I've done and think about it, and I can almost always just draw directly onto the foam and then cut it out and assemble it. I do take rough measurements of the distance around the upper and lower foam core mouth pieces. The foam will have to bend around them regardless of the upper/lower shapes.
Cutting darts (v-shaped cutouts) will allow you to alter the shape of the head. Look at the images below of patterns I made from the foam. Then look at the finished puppets and see how different shapes give different results.
Fortunately, polyfoam is pretty cheap and so if you mess up you can always cut a different piece. Or you can just use spray glue to add a piece onto what you already have.
I spray glue the edges of the darts first, then do something else for a couple of minutes while the glue starts to dry. Once it isn't really wet it is easier to stick the pieces together and they will stay. Too soon, and the wet glue isn't' sticky enough. Then I spray the edges to the upper head sections to assemble them.
Next I use the hot glue to attach the upper head to the mouth.
Do the same with the lower jaw. A lot of the puppet's character comes from the lower jaw.
Many puppet heads need pieces in the back to complete the back of the "skull." You just have to decide how rounded the back of the head is.
Look at the alligator. I used two head pieces that joined to make the snout, but separated by the eyes. A third strip with a point fit in and gave the head width while the joined pieces made the snout rounded.
*If you haven't put on Invisible Glove, you're going to stick to everything for a while. Invisible Glove seals your hands from most of the chemicals you will come in contact with. It is also a water-soluble barrier that allows you to wash your hands later in water and the adhesives and paints just peel right off.
Step 5: Eyes


A puppet's eyes are very important. The Henson puppeteers spend a lot of time working out eye placement. Look at the Muppets. There are a lot of different eye types! You might also get inspiration from books on cartooning.
I use a few different things to make eyes.
Styrofoam balls work well and are lightweight. I like to seal them with Sculpt-or-Coat to make a smooth surface. I think you could also paint on Elmer's white glue to do the same thing. Then paint the colors you want.
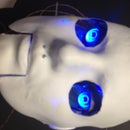
I really like the clear plastic Christmas balls you get from craft stores. They come in two pieces that snap together. If you paint on the inside you get a really nice shiny surface on the outside and the paint won't scratch off when you drop the puppet. Paint the pupil first, then the rest of they eye after the pupil dries. You can also look online for animal/people pupils and import the image into a graphics program to re-size it and maybe re-color it. If you print it on glossy photo paper you have a great looking pupil. You can use hot glue (carefully) to glue it into the inside of the plastic ball.
Look at the fish eye I made. It uses an online image printed on photo paper and then glued to the rim of the plastic ball. That makes it look like the eyeball is filled with a clear liquid and gives a great fishy look.
Plastic Easter eggs are also great eyes. For the dragonfly I glued one together and then used a Dremel tool to cut it along the long part to make asymmetrical ellipsoidal forms. I then spray painted them with metallic paint.
I also use balls from sports games as eyes. Ping pong balls work great. Keep your eye out for items in discount stores and craft stores that might make good eyes.
Step 6: Skin & Neck
For some puppets I use fabric skin. Others are just raw polyfoam skin.
Making templates from your foam pieces before assembling the head is a very good idea. That way you can lay the template onto the fabric and mark it about 1/2" larger. If you use a stretch fabric, you will be much happier. That way you can easily cover seams and adjust as you go along.
For the heron bird below, I cut long strips of fabric with a pointed series of triangles running along. Then, starting at the back, I attached the strips with spray glue. Each new strip had smaller triangles that were skinnier.
Just spray glue the polyfoam and then lay on the fabric and pull it into shape. The spray glue is very forgiving for several minutes. If you put the fabric on wrong, you can just peel it off and try again.
Did you remember the Invisible Glove?
I take a rectangle of fabric and hot glue a seam along one side. Then I pull it inside out and you have a tube for your hand and arm to go through.
I like to put the seam on the back of the neck. If the head is done, you just can use hot glue, spray glue, or even the staple pliers to attach the tube onto the head. I sometimes make the neck tube too narrow. Try a tube size out before cutting to make sure it's got enough room for your hand.
Step 7: Body


There are a wide variety of bodies in these puppets.
The frogs have basically a tube body. It is narrower at the top, wider at the bottom, but comes in a bit at the very bottom.
The dragonfly body is made of a closed-cell foam I found at the Foam Shop. The tail pieces are basically tubes. The main body is made of three parts: two side panels, a rectangular strip of foam running between the sides. The main body has a piece of foam core inside. the heavy wire that runs through the tail pieces is bent in a triangle and zip tied into the foam core. The wings are also zip tied into the foam core. For a handle, I took a rectangular piece of luan (1/4" laminated wood) and attached a wooden dowel to it with a 1 1/4" screw. Then the dowel was forced into a piece of pvc pipe, which serves as the body handle. The luan is attached to the foam core with 1" screws.
The turtle body is made of landau foam. I have not found a paint that sticks well to landau foam. However, I just found that if you spray it with Plasti Dip spray, craft paints and spray paints will adhere to it.
The heron body is also basically a tube that is narrower at the tail. Tail feathers are made of landau foam.
Your hand can go through a body, like the frog. Or, you can run your hand through the back of the body and up into the head, like the turtle. Or, you can have your hand and arm totally separate from the body and puppeteer the body with the other hand, like the dragonfly. And the alligator has no body at all!
Step 8: Finished Puppets


Here's a little gallery of the puppets I have constructed for Disney's Little Mermaid. Some of the puppets are worn on the head, but since the actor uses his/her body to give the headpiece life, I consider them all puppets. After all, Basil Twist created a popular puppet show using a 1000 gallon aquarium and manipulated pieces of cloth for puppets.
I hope that you liked learning about them.

Participated in the
Puppet Contest


