

Introduction: Portable Minecraft Torch


I have been decorating my 9 year old's bedroom in a Minecraft theme and was painting a wardrobe he had designed in Minecraft which had redstone torches on the side.
I thought it would be cool to make a real wooden torch which would light up and fix on to the side of the wardrobe. I also wanted to make it so it was removable but still work. After a bit of contemplation I came up with the idea of using a small power bank I had made previously from laptop batteries and a switched USB LED light. I knew how I could easily make the wooden torch but didn't have much of a plan about the light part! In the end it seemed to work okay so was pretty happy.
Materials
Off cuts of various woods
Fairly rigid opaque plastic
Red permanent marker
Battery/power bank
Switched USB lead
USB LED light
Brackets for mounting
Tools
Table saw
Router
Drill
Chisel and hammer
Glue gun
Soldering iron + solder
Step 1: Wooden Torch


I started off by finding various off cuts of wood I had lying about which were more than 30mm (1.25") so I could rip then down to that width square with the table saw. Once they were all the same size I arranged them in to an interesting pattern that would be akin to a Minecraft torch. I then glued and clamped them in to two strips which I then further glued and clamped once they were dried.
When it was all dry I set my table saw to cut at 45 degrees and cut the bottom end of the torch.
Step 2: Redstone End


Now I had the torch complete I need to make an opaque red part for the top of the torch. I searched round my house for ages trying to find something and I came across a broken lid in the kids toy box.
I used a craft knife to cut the lid which was harder than it sounds. Once I had cut off the lip of the lid I used it to measure how deep I needed to cut a recess in the top of the wood using a router. Now the recess was cut I knew how big to cut the plastic sides and top. Next I used a glue gun to fix the plastic bit together using the wood for reference. I then needed to make it red and tried numerous things including paint and coloured PVA but these all came off too easily. I ended up using a red permanent marker which worked really well but did use a couple of coats.
Step 3: Fixing


I wanted to use a hidden fixing so looked through some DIY catalogues and found some flush mount bracket which looked ideal. I routered a groove the width of the plate to the under side of the torch so when mounted you would be able to see any of the fixing.
Once I screwed it in place I added another to the wall and tested the fit which was perfect.
Step 4: Electronics


So the idea I had for the light was to drill a hole in the bottom of the torch for the battery, which would be connected by a smaller hole to a recess I would mount the switch in which would then be connected to a further hole in the top of the torch where the LED would be located.
I started off with the hole to the underneath for the battery which I use a spade bit on a hand drill as deep as it went. It needed to be deep enough to hold the battery and the end of a usb cable as I needed the battery to be easily removable so I can recharge it. The battery would be inserted with the USB port pointing downwards so the USB cable can be plugged in easily......the cable would then run up next to the battery up to the switch.
To fit the switch in I needed to remove the cables from it so I could run everything through hidden. I prized the switch open with a pair of pliers and used a soldering iron to remove the cables. I then cut a recess in to the back of the torch to house the switch using a forstner bit and squaring up the sides with a chisel.
I then drilled a series of holes to join everything up and re-soldered the cables back in to place.
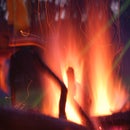
Step 5: Finished


Now it was all put together I tested the light which worked well and glued the redstone plastic part to the top of the torch. The light works really well and looks brilliant in the dark and fit perfectly in my sons Minecraft bedroom.

Participated in the
Minecraft Challenge 2018

Participated in the
Epilog Challenge 9


