

Introduction: Programming Using the TI-84 Plus


Introduction
Programming is a process that leads from an original formulation of a problem to an executable-computing program. Following these instructions shows you how to program using the Texas Instruments 84 Plus.
These instructions are intended for beginners in programming, there is no need to know any programming knowledge prior to these instructions. It is important for users new to the TI-84 Plus to carefully go through the instructions and get familiar with buttons that are used. We will be using every button that is mentioned.
Warnings
Programs help users whom execute many of the same computations clerically. While programs can help get to an answer more efficiently, it is not always the best practice to use programs in situations like: learning new material, practicing mathematical assignments, and taking exams. In many cases this can lead to an accusation of cheating, even if you created the program yourself. It is important to check with your professors before using programs on exams!
Materials and Equipment
The only required equipment that is essential to completing these instructions is the Texas Instruments 84 Plus Graphing Calculator. There are many other versions of this calculator that will work with these instructions, but we will cover the instruction using the TI-84 Plus.
- TI-84 Plus Calculator
Step 1: Important Buttons
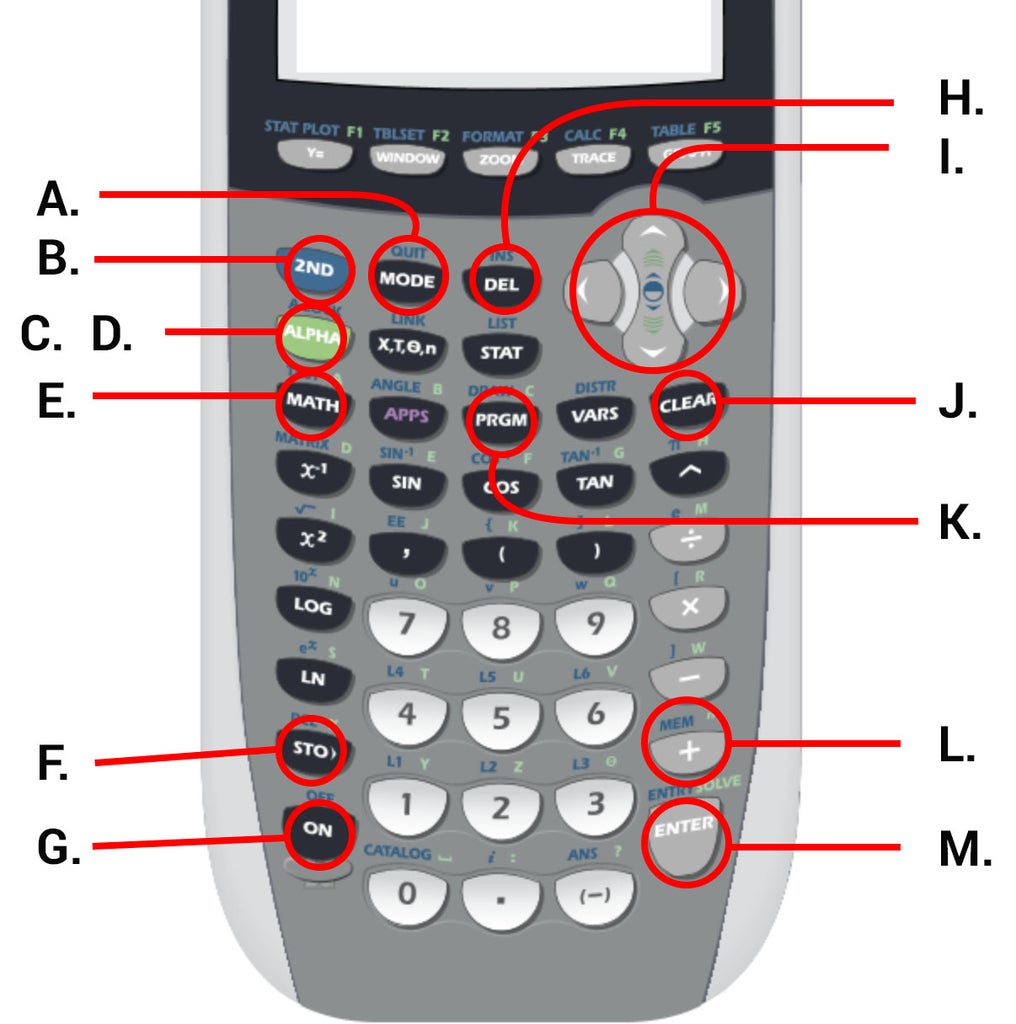
A. QUIT (2ND, MODE): The quit button is used to exit out of a current menu/screen
B. 2ND: The 2ND button is used to execute secondary buttons in blue.
C. ALPHA: The alphabet button allows you to use the other keys as alphabetical buttons. The green letters above buttons correspond to the alphabetical buttons. You can lock the ALPHA button by using A-LOCK.
D. A-LOCK (2ND, ALPHA): The A-LOCK button is used to type using the alphabetical buttons without having to press ALPHA before every character. Exit the A-LOCK mode by pressing the ALPHA button.
E. TEST (2ND, MATH): The test button brings you to a menu that holds operators (i.e. =, <, >).
F. STO>: The store button allows you to store something, often a numerical number, into a specified variable.
G. ON: The on button activates your calculator
H. DEL: The delete button deletes the existing character
I. ARROW KEYS: The UP key moves the cursor up, the DOWN key moves the cursor down, the LEFT key moves the cursor left, and the RIGHT key moves the cursor right.
J. CLEAR: The clear button clears the existing line, and also backs out of a menu.
K. PRGM: The program button brings you to the programming interface.
L. MEM (2ND, +): The memory button is used to delete programs or check storage.
M. ENTER: The enter button submits or executes a commands.
Step 2: Important Commands/Functions
While inside you program, you can find commands by pressing
PRGM. There are three menus available: CTL, I/O, and EXEC. We will only be using CTL and I/O during this step.
- INPUT [ Input ]: This command lets you create a variable under any arbitrary alphabetical character and will prompt the user to enter a value.
- DISPLAY [ Disp ]: This command lets you display text or a value of a variable.
- MENU [ Menu( ]: This command creates a menu inside of your program.
- LABEL [ Lbl ]: This command links to your menu, and executes code below its declaration.
- STOP [ Stop ]: This command stops your program.
Step 3: Creating a New Program
1. Begin creating a program by pressing the ON button.
2. Navigate to the programming screen by pressing the PRGM button. There are three menus to choose from: EXEC, EDIT, NEW. You can navigate between screens by using your RIGHT and LEFT arrow keys.
- EXEC: The EXEC screen displays all of the stored programs currently on your calculator. Click the button, ENTER, on a program and you will be able to execute it.
- EDIT: The EDIT screen displays all of the stored programs on your calculator. Click the button, ENTER, on a program and you will be able to edit it.
- NEW: The NEW screen displays only one option, Create New. Click the button, ENTER, on ‘Create New’ and you will be able to begin a new program.
3. Navigate to the NEW screen and begin a new program.
4. The next screen prompts you to enter a name. Choose a suitable name for your program (e.g. QUAD [Quadratic Formula], FTOC (Fahrenheit to Celsius Formula)). Let’s name this program ‘ASHAPE’, for your program that will calculate area of different plane shapes. Press ENTER to continue.
5. The following screen is the program editor where you can begin coding your program.
Step 4: Creating a Menu
1. You should still be inside the text editor. If you are not, navigate to the program editor by pressing PRGM and ARROW RIGHT towards EDIT, then choose your program ASHAPE.
2. Begin creating a menu by pressing PRGM once more. This will bring up the control menu where you can choose commands or functions. ARROW DOWN till you see Menu(. In this menu you can also navigate to the options using the numbers on the left of each function, in this case C (ALPHA + PRGM) will choose the Menu( option.
3. Next, we need to create options for the user to use. The first parameter we need to identify is the name is our menu. In this case it we will call it Choose a Shape. The following parameters are the options in our menu like: triangle, square, and circle. These will correspond to the labels you give them. TRIANGLE has the label T, SQUARE has the label S, and CIRCLE has the label C. You should format the menu function like so:
Menu("CHOOSE A SHAPE”, ”TRIANGLE”, T, ”SQUARE”, S, ”CIRCLE”, C)
Step 5: Create Variables Using Input Statements
1. Lets focus only on one formula for this step. Before we jump into variables, we need to link your menu to where we are writing your formula. To do this, press PRGM and ARROW DOWN until you see Lbl. You can also use the shortcut by pressing 9. Next we need to pass your TRIANGLE label, which we declared in your menu function, which is T. It should look like this:
Lbl T
2. Next, we should create input statements for your variables, in this case, base and height of a triangle. Press PGRM and ARROW RIGHT to the I/O menu. The first option is input. Press ENTER to use this function.
3. The first parameter that we need to give your input function is the name of your variable. The name must be in quotes. Following a comma, you must give it a short name or variable, we can use B for BASE and H for height.
Input “BASE=”, B
Input “HEIGHT=”, H
4. Continue steps 2 and 3 in this chapter until you have all of your variables declared. Your program should look something like this:
PROGRAM:ASHAPE
Menu("CHOOSE A SHAPE”, ”TRIANGLE”, T, ”SQUARE”, S, ”CIRCLE”, C)
Lbl T
Input “BASE=”, B
Input “HEIGHT=”, H
Step 6: Writing and Displaying Your Formula
1. When you have successfully declared your input statements that will save your variables, we need to write your formula to calculate the area the current shape. Write the formula, but keep in mind what variables you declared.
2. After the formula is written we need to store it into another variable. Press STO> and then choose any variable to use, but keep in mind that these need to be unique throughout the program.
3. Next, we need to display your answer. Press PRGM and ARROW RIGHT to the I/O menu. Choose the third option, Disp. Then type the variable you stored your formula in.
4. The final thing we need to do is stop the program from continuing, otherwise the program will continue onto the next shapes formula. Press PRGM and ARROW UP until you find Stop. You can also use the shortcut F (ALPHA, COS). Your program should look like:
PROGRAM:ASHAPE
Menu("CHOOSE A SHAPE”, ”TRIANGLE”, T, ”SQUARE”, S, ”CIRCLE”, C)
Lbl T
Input “BASE=”, B
Input “HEIGHT=”, H
.5*B*H->A
Disp A
Stop
Step 7: Repeat Steps 3 and 4 for All Other Formulas
1. Repeat the steps for square and circle (e.g. Base*Height = Area of square, 2πr = Area of circle). Remember to use the appropriate labels corresponding to each formula. It is also important to name each variable uniquely otherwise your program will not work. Your program should look like this:
PROGRAM:ASHAPE
Menu("CHOOSE A SHAPE”, ”TRIANGLE”, T, ”SQUARE”, S, ”CIRCLE”, C)
Lbl T
Input “BASE=”, B
Input “HEIGHT=”, H
.5*B*H->A
Disp A
Stop
Lbl S
Input “BASE=”, E
Input “HEIGHT=”, K
E*K->N
Disp N
Stop
Lbl C
Input “RADIUS=”, R
2πR->Q
Disp Q
Stop
Step 8: Testing Your Program


1. Execute your program and test the first option, triangle. Use easy numerals so you know the answer is correct (e.g. Base = 2, Height = 1, (.5*2*1) = 1).
2. Do this for all options in the menu in our program.

![Tim's Mechanical Spider Leg [LU9685-20CU]](https://content.instructables.com/FFB/5R4I/LVKZ6G6R/FFB5R4ILVKZ6G6R.png?auto=webp&crop=1.2%3A1&frame=1&width=306)


