

Introduction: Pyrography Jewellery From Skateboard Veneer Scraps


It is pretty standard in the skateboard industry to have scrap veneer offcuts, and many times they are just thrown away. These offcuts are the waste material from a laminated deck blank being cut to it's final shape... but they don't necessarily need to be wasted! There are lots of cool projects that can be done with laminated skateboard veneers - check out this awesome project at the Museum of Modern Art in New York, that makes use skateboard offcuts called Party Wall.
While I wouldn't consider the jewellery I have made to be on the same level as the incredible Party Wall, being lucky enough to work around some talented independent board builders has given me the opportunity to get creative with the same kind of materials. I find that the laminated (and sometimes wickedly bent) skateboard veneers make a great canvas for my woodburning hobby. Also known as pyrography.
In this DIY Instructable, I will show you how I salvage the offcuts from our board building workshop, and turn them into a product I call #CHAMPCHAINS.
Materials:
Laminated Skateboard Offcut (or scrap piece of wood)
Graphite Paper
Tape
Pen or Pencil
Needle
String
Beads
Protective Clear Coating (Krylon Triple Thick)
Super Glue
Tools:
Pencil Compass
Scissors
Scroll Saw
Strip or Edge Sander
Sheet Sander
Step 1: Preparing the Pendent


The first step in making my custom burned and beaded necklaces is to prepare the wooden pendent that hangs from the beads. As stated, I will be using the offcut veneers from a laminated skateboard deck for the pendent itself, but you can use any offcut of wood you may have around.
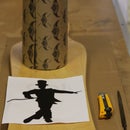
This #CHAMPCHAIN was commissioned by a customer that wanted his 'Handmade' logo burned into a round pendent, and beaded with matching colours. Because the outside shape of his logo was a perfect circle, I used a pencil compass to draw the outline before cutting it out.
Step 2: Cutting the Pendent


Cutting wood into a perfect circle can be done a few different ways and takes some practice to get accurate. If you have a band saw, check out this great Instructable on how to Cut a Perfect Circle. I find it harder to use jigs like this for smaller circles, and prefer to do them by hand on the scroll saw.
Using a scroll saw is easy, but hard to master. It is a good idea to make the cut on the outside of your line and use a sander to bring it to its final shape.
* The closer you get to the line, the less sanding and honing the shape will be required afterwards.
Step 3: Sanding the Pendent


There are many different types of sanding machines that can assist with this step of the process. I use this small strip sander because it allows me to sand in tight spaces (some of the pendents I make are very detailed) and is an economical solution - about $120.
Once I have the outside of the wood pendent cut roughly to shape, I fine tune the edges by lightly touching them to the strip sander. Not only does the help with the final shape of the pendent, but it also gets rid of any rough edges caused from the cutting process.
After I am satisfied with the edge profile, I use my handheld sheet sander to sand the faces of the pendent smooth and break the sharp edges.
Step 4: Layout the Design


When a project requires me to burn someones logo, I use graphite transfer paper to make sure it is laid out as accurately as possible on the pendent. To do this, I print the logo to scale on a standard piece of printer paper and lay it on top of the transfer paper.
Place the printed logo on the transfer paper, make sure you have the grey (or black depending on the paper) side of the paper facing down onto your wood canvas. I usually put a few pieces of tape on the image to help secure it and the transfer paper to the pendent.
Once it is taped down where you want it, you can trace the outlines of your image and transfer it to your wood. I usually only do this for the outline of the image I am transferring, and do the smaller details by hand. This helps make sure that every important line is in the proper spot.
Remove the printed image and transfer paper to reveal the freshly transferred design!
Step 5: Burn the Design


Pyrography (writing with fire) is the art of scorching designs into wood using a hot, metal tipped tool. You can get woodburning starter kits which are fairly inexpensive at your local craft or hobby store. They are very similar to soldering pens and often come with numerous screw on tips for different applications.
I use a professional woodburning system by a company in Saskatchewan called Razertip. They make two different models of woodburners and have hundreds of tips for various different strokes and effects. I mainly stick with two different tips, one for doing the outlines and the other for shading.
Whenever I do a woodburning, I start with the outlines and then shade in between the lines to give it texture. The process is slow and in many ways similar to tattooing...only wood doesn't cry when it's in pain!
To burn a pendent this size it took me approximately 30 minutes.
Step 6: Prepare Pendent for Beading


Once the pendent has been burned, you can apply any colours, paints or stains to it that you would like. This customer wanted the outside and back of the pendent stained black with a high gloss protective coating.
To apply the black stain I wrapped my finger in a cloth rag, dipped it into the stain and rubbed it into the wood. You only need a very small amount of stain to cover a pendent this size, and I find that rubbing it in (as opposed to brushing) gives me full control to apply the stain evenly.
Once the pendent is burned, and any additional stains are applied, you are ready to drill the hole for the bead string. I usually do this step with a cordless drill and my eagle-like vision to make sure it drills straight. If possible, I would suggest using a drill press if you are uncomfortable with doing this step by hand.
* the hole can be drilled at any point in the process before beading
Step 7: BEAD THE CHAIN!


I never pictured myself up in the middle of the night, beading wood necklaces for money. I'm not really a fan of this part of the process to be honest... But after a few years of fumbling beads and cursing them as they roll under the couch, I've found the best way to do it is with a good ol' fashioned needle and thread.
I asked my local bead store what the strongest, and thinnest beading string around was. They recommended a spool of nylon thread that is strong, but thin enough to allow it through the eye of the needle.
Use the needle to help guide your string through the drilled hole on the pendent and the beads themselves. When you are satisfied with the length of your beads, tie the two loose ends together tightly in a knot. I usually add a small dab of super glue to the knot, tie it one more time and then cut off the excess string with scissors.
BOOM! #CHAMPCHAIN
Step 8: #CHAMPCHAIN

I have made over 200 of these custom burned and beaded bad boys, almost all of them with offcut or scrap material. It is a labour intensive process that I know an Epilog laser etch machine (preferably the Zing 16 model ;) would help a lot doing! If your interested, check out some of my other #CHAMPCHAINS on my business website.
Whether I would simply use the laser to cut out my pendent shape, or to add the small text that is incredibly difficult to do by hand, the Epilog laser machine would be a tremendous asset to pair with my hand done pyrography work.
Hope everyone enjoyed this Instructable and learned a little about pyrography and how to make use of those tiny scraps of wood in your workshop!

Participated in the
Epilog Challenge V


