

Introduction: Remote Home Automation Example - Arduino + Ethernet Shield


Welcome again!
In this Instructable, I will detail how to use various sensors and items with an internet connected Arduino. In my opinion, this was a very fun project to put together and tinker with! Plus, I got to brush up on my HTML and Java (albeit, it was pretty basic stuff while making this project, there's nothing more refreshing than getting back to basics!). Unfortunately, as much as I'd like to, I will not be covering the SD portion of the Ethernet Shield. That's for next time :)
This project assumes that one has some working knowledge of basic HTML/Java, programming an Arduino, and working with various sensors. I will cover and detail as much as I can, as well as provide the sketch at the end of this tutorial.
--Objective--
We will program the Arduino to serve up a webpage that displays information about two sensors (LM35 Temperature Sensor, PIR Motion Sensor) and allows one to toggle an LED on and off, as well as adjust the angle of a Servo Motor.
Step 1: Bill of Materials

For this project you will need -
-Arduino Uno
-Arduino Ethernet Shield
-PIR Motion Sensor
-LM35 Analog Temperature Sensor
-LED
-Servo Motor
-Jumper Wires
-Ethernet Cable
As far as software goes, the Arduino IDE should be the only one you should use. Now, to build a webpage to serve up, you will need to have a basic to intermediate knowledge of HTML. If there is one place I know to gain a good understanding of HTML (and Java, consequently) it's http://www.pageresource.com. That was and is my go to resource for making webpages. I was introduced to that page back in high school, and have referred to it since. A vast wealth of information there!
If you already have a good understanding of HTML and Java, you can move on :)
Step 2: The Ethernet Shield

So...the Arduino Ethernet Shield. It's a very handy shield for the Arduino which, obviously, allows you to put your Arduino on the internet, and, consequently, gives you the ability to serve up a custom web page.
The IDE comes bundled with a library for the shield, as well some example sketches to get your feet wet, but before you can start remotely controlling your Arduino, there are a few steps to take to get all of your hardware talking to eachother.
First up, you'll want to enable port forwarding on your internet router (if applicable). Doing so is mostly device specific, but a quick Google search on your own router and port forwarding should get you going.
You'll need also to identify the MAC address to your ethernet shield. This is unique to newer models, and should be labeled on the box it came in, but for older models, you should be able to create one. More information at http://arduino.cc/en/Guide/ArduinoEthernetShield.
Your IP address for your shield is also needed. If you're running windows, this will be easy to find. Usually, windows will automatically assign one to it (or so it seems). Open up your command prompt and enter ipconfig. It should be labeled there, and you can use that address to identify the IP address in the Arduino sketch.
The Arduino IDE has several example sketches to get you started with the Ethernet Shield. I began with the WebServer Sketch and basically built off of that. I'll try to point the way in the next step...
Step 3: "Sketching" the Ethernet Shield

It's a pretty basic setup. The sketch provides you with most everything you'll need. You can discern from it where you should put your HTML and Java code, and how it should integrate with the sketch code. Serving the webpage is easy. Interacting with it is, well...still easy.
Basically what we are doing is, HTML wise, clicking on a link. The Arduino reads the link, and acts accordingly. What I did, however, was instead of using a link, I opted for a little Java and used a button. It just makes things look a little nicer :)
Step 4: Notepad Is Our Friend :)

One good thing to do is to use Notepad to build up your webpage before uploading to the Arduino, that way you can tweak and change your code without having to upload every time you make a change. It is important to note that when using Notepad, you will want to save the document as an HTML document (just add .html or .htm to the end of the name), that way you can double-click and it will open up in your web browser. You don't even need to close your browser when you make changes. Just make the changes, save, and refresh. Go ahead and play around at pageresource.com and the WebServer sketch to familiarize yourself with HTML. No special software needed!
NOTE - I've grown apart from Notepad recently, and decided to use Notepad++. Think of it like Notepad, but instead of just text, you can use it to write C++, HTML, Java...almost whatever programming language you wish! Although it doesn't compile or program anything, it's got some special features, such as syntax highlighting, that is not available in Notepad. You can get a free download at http://www.notepad-plus-plus.org should you like to check it out!
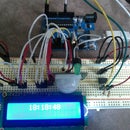
Step 5: Alright...let's Hook It All Up!

I'll cover all the gadgets in this one step. Let's bust out the PIR Motion Sensor, the LM35 Analog Temperature Sensor, your trusty Servo Motor, and an LED. Don't forget the Arduino and the shield...otherwise you've just got a bunch of stuff laying out...
At any rate, we will connect all our respective 5V pins and ground pins to 5V and ground. If you're unfamiliar with the LM35, do continue...
Step 6: LM35 Analog Temperature Sensor

The LM35 is an Analog Temperature Sensor, meaning instead of a digital signal (1 or 0) it outputs a certain voltage depending on the temperature. I have a digital temperature sensor, but I chose to use the LM35 for simplicity. You can read right from it on any one of the Analog Pins on the Arduino. We will be using A5 for this project.
In the sketch, we will use "temp" as the variable, and make it equal to analogRead(A5) - int temp = analogRead(A5).
But wait! That won't really give us a temperature reading. Looks like we are gonna have to do some math and convert the output voltage to something more...usable.
When you're reading from an Analog Pin, you will see numbers anywhere from 0-1023 (the Arduino uses a 10-bit ADC, which is why we get these numbers). Let's convert this to a temperature.
We will use the formula temp = (5*val*100/1024) where "val" is the analog reading from the LM35. This will give us a centigrade temperature. If you'd like, you can use this formula, F = (temp*1.8)+32, to convert centigrade to a fahrenheight temperature.
In my sketch, to save a little room, I combined both formulas into (((5*analogRead(A5)*100/1024)*1.8)+32) to get straight to the fahrenheight temperature :)
So, with that out of the way, we will connect the LM35 to it's power, ground, and we will hook up the output to Analog Pin 5 of the Arduino.
Step 7: The Rest of It...


If you haven't followed my previous instructable including the PIR Motion Sensor, I'll give a quick lesson.
The PIR has three pins - 5V, Ground, and Output. When it senses motion, it's output pin goes high. We will connect it's output pin to Digital Pin 3 of the Arduino. It's very simple to use and doesn't require much setup. Just don't forget to set Digital Pin 3 to INPUT.
The LED we will put on Pin 2. Set that pin to OUTPUT and you're good to go!
**NOTE - Disregard where the PIR is connected in the picture. I put it there for illustration purposes.**
Step 8: Building the Page

https://gist.github.com/gtrstitch/5992603
The link above will take you to the HTML file for the webpage. It's not the Arduino Sketch, but merely the HTML side of what will be going into the sketch. It will save as an HTML file, and when you want to edit it, just right click and open with Notepad.
Feel free to tweak and change what you please to fit it to your needs!
As I said, this is not the Arduino Sketch, and that being so, you may notice the temperature and motion sections. They don't really show temperature and motion indications. I set those there just to get an idea of what the end result would look like. All part of the design process!
Let's move on and take a look at the Arduino portion...
Step 9: Building the Sketch

https://gist.github.com/gtrstitch/5992646
The link above is the Arduino Sketch. You'll notice there is a lot of client.print(). That's where we put all the HTML code. Anything in the <> is the actual part of the code. The parts we don't see. Everything else is what we do see.
Be sure you keep track of your quotation marks! One untamed quotation mark can put a wrench in things. If there is an area of HTML that absolutely needs quotations, just use an apostrophe, ' , in place of quotations. You can get away without using quotations, most of the time.
You may also notice that I left off the page refresh part in the HTML file. This is because I preferred not to have the page refresh every few seconds, as I didn't need it to.
Step 10: Conclusion...

All in all, it's a fairly simple project, but the potential is left to the imagination.
One may use this to remotely monitor the temperature in their home, and with the use of a servo or stepper motor, you could switch on or off your A/C, or even adjust the thermostat.
You could also use it in conjunction with the Arduino Home Security project and keep tabs on what's happening at home while you're away.
I hope you enjoyed this Instructable and along the way, gained some valuable information to pave the way to your next awesome project! If you have any questions/comments/suggestions, as always, feel free to drop a line!
~~Credits~~
Big thanks to http://www.pageresource.com for being a most invaluable tool throughout the years, and I sincerely hope it helps you as much as it's been a help for me!
Singing off,
~GtrStitch

Participated in the
Arduino Contest


