

Introduction: Simple Mobile Data Logging Using PfodApp, Android and Arduino


Moblie Data Logging made Simple
using pfodApp, your Andriod mobile and Arduino.
NO Android Programming required.
For Plotting Data on your Android see this later Instuctable
Simple Remote Data Plotting using Android / Arduino / pfodApp
For Plotting Data against Date/Time using only Arduino's millis() see this Instructable
Arduino Date/Time Plotting/Logging Using Millis() and PfodApp
Introduction
This instructable shows you how to capture Arduino sensor data on your Android mobile for later downloading to your computer.
No Android programming is required and very little the Arduino programming is needed.
See www.pfod.com.au for more easy projects
Quick Start
a) Get an Arduino board and a Bluetooth Module (such as Uno and Bluetooth Shield or FioV3+Bluetooth/Wifi)
b) Install Arduino IDE
c) Connect the Arduino board (no bluetooth module attached) with a USB cable. (for Uno)
d) Copy this sketch into the Arduino IDE and compile and load it into the Arduino board)
e) Attach the Bluetooth Shield module to the Uno (The Bluetooth Shield is pre-configured for 9600baud BUT set the 3V/5V switch to 5V and set the To Board/To FT232 switch to the To Board position.
f) Load your Android Mobile with pfodApp .
g) Set up a connection between your mobile and the Bluetooth module as described in pfodAppForAndroidGettingStarted.pdf
h) Start the pfodApp and connect to your Arduino board via the Bluetooth module.
i) Finished.
Some dummy Sample Data is displayed on your mobile and save to the SD card. (as shown)
pfodAppForAndroidGettingStarted.pdf describes how to transfer the data file from your mobile to your computer.
The rest of this instructable goes into the details and shows you how to modify the sketch to send your own data.
The pfodApp can do much more, see these examples at www.pfod.com.au
Step 1: Background - Simple Data Logging


The latest version of pfodApp available from the Android Market enables raw data sent by a pfodDevice to be saved to a file for later use. See the pfodAppForAndroidGettingStarted.pdf for how to download the file from your Android mobile to your computer.
The pfodApp has a 'raw data' screen on which is displayed all data received that were not pfod messages enclosed by { }. This screen can be accessed from pfodApp using your mobile's menu
or it can be opened by the pfodDevice sending a streamingRawData message,
{=Title Of the Screen Goes Here}
(See the Arduino sketch later in this instructable).
Either way the pfodApp raw data screen is opened and will display the data that has been sent from the pfodDevice. When the screen is opened, pfodApp will start to save the data to a file. The name of the file is displayed each time the screen is opened.
To prevent your mobile filling up with data you did not want, pfodApp does not start writing data to the mobile's SD card until the first time the Raw Data screen is opened after a each new connection. The first time the Raw Data screen is opened after a new connection, up to 4K bytes of previously received data (since the connection was made) is written to file when it is opened. In most cases this means all the raw data sent since the connection was made will be saved. When the connection is closed, the last of the data is written and the file is closed.
If the file already exists, from a previous connection, it is appended to by each subsequent connection. You can delete the file from your computer. See the pfodAppForAndroidGettingStarted.pdf for how to access the file from your computer.
So in summary to save data from your Arduino to your Android mobile you need to connect to your Arduino (as a pfodDevice) using pfodApp, either by bluetooth or wifi, have your Arduino send data and open the raw data screen to start saving it. That's all.
The rest of this instructable will detail a simple sketch that implements a pfodDevice and sends some (dummy) data.
Step 2: A Simple Data Logger

This sketch (download) is a simple Data Logger. It does not do much, when pfodApp connects and asks for the main menu, the sketch just sends back a raw data screen msg which asks the pfodApp to open the raw data screen. This starts saving the data. In this case the data is sent once a second and consists of just a count of the number of seconds since the Arduino was powered up. For your real data logger you would send some real data instead.
The connection here is via bluetooth using the inexpensive ITEAD BT SHIELD (SLAVE) on a Uno Arduino board (All see this page for FioV3 boards + bluetooth or Wifi modules)
You need to set the switches on the ITEAD Bluetooth board. Set the 3V/5V switch to 5V and set the To Board/To FT232 switch to the To Board position. The default bluetooth module board rate is 9600, so no need to do any other configuration.
You will also need a USB cable and download and install the Arduino IDE. Finally a pfod parser is needed. For this sketch the simplest parser can be used and it is so small I have just included it at the bottom of the sketch. However you can also download and install it, and other pfod parsers, as a library from here.
This is the part of the sketch that sends the data. It counts down a timer and when the timer reaches 0 it sends the next data which is just a counter in this example.
// now send data if 1sec has passed
if ((thisMillis - dataSampleTimer) > SAMPLE_INTERVAL) {
dataSampleTimer += SAMPLE_INTERVAL; // update for next time
counter++; // increment sample
// send it
parser.println(counter);
}
To send your own data just change the
parser.println(counter);
to print your data to the Serial connection instead. (See this page on Arduino timers).
Step 3: Testing With the SerialMonitor


Before connecting via bluetooth, you can test out the sketch using the Arduino IDE SerialMonitor. First remove the bluetooth board, because it uses the same TX/RX connections as the USB programming and serial monitor connection, and copy and paste the sketch into the Arduino IDE and program the Arduino board. Then open the Arduino IDE SerialMonitor
You can see the data being sent by the Uno board.
Then send the getMainMenu command, {.} This is what the pfodApp will send first when it connects. The sketch responds with the StreamingRawData screen message.
{=Sample Data Logging Data}
which will ask the pfodApp to open the RawData screen. That starts saving the data to a file. See the pfodSpecification for details on all the messages and screens that pfod (Protocol for Operation Discovery) supports.
Step 4: Connecting With an Android Mobile


All is good so you can now close the Arduino IDE and SerialMonitor and attach the Bluetooth shield, as shown in Step 2.
To connect with your Android Mobile, first install pfodApp from Android Market then follow the pfodAppForAndroidGettingStarted.pdf guide to pair your Bluetooth shield with your mobile and setup a Bluetooth pfodApp connection. I called my connection “Data Logger”.
Then select the “Data Logger” connection to connect to the simple data logger. As soon as pfodApp connects it sends the
{.}
message to which the sketch responds with the
{=Sample Data Logging Data}
message which tells the pfodApp to open the raw data screen and titles it Simple Data Logging Data and also start saving the data.
Step 5: Transferring the Data to Your Computer and Extensions to the Simple Data Logger
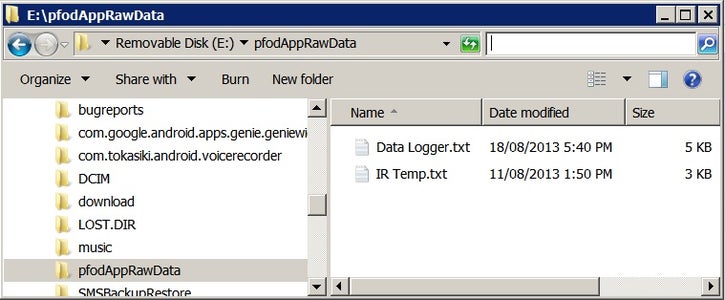
The pfodAppForAndroidGettingStarted.pdf details how to connect your mobile to your computer via USB and the turn on the USB mass storage so you can browse it from your computer. You will find all the raw data files in the pfodAppRawData folder. As shown above, the Simple Data Logger saved the data to /pfodAppRawData/Data Logger.txt
pfodApp uses the name of the connection as the file name for saving the data.
Extensions to the Simple Data Logger
Now that you have a simple data logger you can modify the sketch to send back your own data. Just write your data to the same Serial connection that is connected to your Bluetooth module. It is useful to format the data into csv format in the Arduino before sending it.
For example
time, value
This make it easier to load into a spreadsheet for subsequent processing/plotting.

![Tim's Mechanical Spider Leg [LU9685-20CU]](https://content.instructables.com/FFB/5R4I/LVKZ6G6R/FFB5R4ILVKZ6G6R.png?auto=webp&crop=1.2%3A1&frame=1&width=306)


