

Introduction: Spooky Tesla Spirit Radio


News Flash!!!
"Spooky" continues to live!
Many thanks to Mike of Mikes Electronic Parts, who as of October 2015, has a new website that features a Spooky Tesla Spirit Radio Kit with most of the essential parts for this cool project.
The Spooky Tesla Spirit Radio and Mrfixitrick are featured in a PC game called "Tesla". The theme is monsters and bats are battled while helping Mrfixitrick find the seven missing parts of the Spooky Tesla Spirit Radio. Intriguing background music. From GODD Games at: www.goddgames.com/tesla.html
Have a look at the Crystal Quantum Radio devices of EJ Gold that helped inspire this instructable: http://www.yoyodyneindustries.com/
"My first observations positively terrified me as there was present in them something mysterious, not to say supernatural, and I was alone in my laboratory at night"
- Nikola Tesla, 1901 article "Talking With The Planets"
The Spooky Tesla Spirit Radio is more than just a crystal radio circuit in a jam-jar. It's a sound maker that plugs in to a computer, and makes awesome spooky sounds by responding to electromagnetic fields or light sources in real time.
Athough Tesla used different parts, this radio's basic L-C (Inductor-Capacitor) circuit uses a similar schematic to what Tesla experimented with in his early days. The versatile 1N34A crystal germanium diode used here, substitutes for the tricky rotating nickel detectors and sensitive relays, used by Tesla in the late 1800's.
You can listen to AM broadcasts with this radio, but it was made to have fun with in other ways. (Besides, AM radio wasn't exactly what Nikola Tesla was interested in...in fact, he believed it was a waste of energy to transmit and receive Hertzian waves!)
By using a program like Audio Hyjack Pro (Mac), the radio's output is tweaked at the computer to give some great real-time sound effects...and you can record them at the same time.
In the following accompanying movies, I show how the Spooky Tesla Spirit Radio reacts to lightning, radio frequencies, the light spectrum, the computer screen, RF pulses, electromagnetic fields and more!
In the following video, the Spooky Tesla Spirit Radio is used to give voice to a Mac Hyperspace screensaver! The simple crystal circuit is apparently sensitive to the screen synchronization RF frequencies, and so it provides awesome background sounds...check it out:
The next movie shows "Spooky", the radio, beside a Dancing Ghost homopolar motor. The motor emits electromagnetic waves that are picked up by Spooky's antenna coils, and we hear the results translated through computer software in real time...spooky!!
Here's a movie of the action in the new PC game "Tesla", featuring the Spooky Tesla Spirit Radio;
Step 1: Parts List and Schematic Diagram


List of Materials
1- Small Jam Jar, (Mason Jar) with large mouth
1- 3 1/4 inch dia Plexiglas (or polycarbonate) cover lid, 1/8 inch thick
1- C1 - 60/141 pf Variable Capacitor (Mike's Electronic Parts # VARCAP141) $1.97 ea.
1- Extension Shaft and Knob for above (Mike's Electronic Parts # ExtKnob-1) $1.87 ea.
1- L1 - 680 uh Ferrite Loopstick Antenna (Mike's Electronic Parts # LSA680-470) $2.97 ea.
1- D1 - Germanium 1N34A Diode (Mikes's Electronic Parts # 1N34A) $0.49 ea
1- C2 - .001uf Capacitor (marked 102) (Mikes's Electronic Parts # CAP.001uf) $0.33 ea
1- R1 - 47k Resistor (Mikes's Electronic Parts # 47kRES) $.25 ea
1- Chassis Banana Jack Red - (*Allied Stock # 528-0158) $.53 ea
1- Chassis Banana Jack Black - (*Allied Stock # 528-0159) $.53 ea
2 - (or more for each antenna) Banana Plug (*Allied Stock # 528-0302) $1.21
2 -3.5 mm Mono Chassis Jack (*Allied Stock # 932-0260) $1.16
(above plugs and jacks also available as part of "Spooky Tesla Spirit Radio" Kit )
- a few inches of 20 gauge hook-up wire
- solder
1- Audio Patch Cord, 1/8 inch plug ends (also part of "Spooky Tesla Spirit Radio" Kit )
(Total Parts Cost less than $30.)
Note1: Most of the above parts are available in the "Spooky Tesla Spirit Radio" Kit
Note2: Complete crystal spirit radios that can also be adapted are available from
EJ Gold's Crystal Quantum Radios at YoyodyneIndustries.
Note3: For Each Spiral Pancake Antenna,
6 feet of #14 gauge solid copper wire
Banana Plug
Note4: For the Football Style Antenna,
4 feet #10 gauge solid copper wire.
40 feet of #30 gauge coated magnet wire.
Heavy Paper
Scotch Tape
Hot Glue
SuperGlue
Banana Plug
Tools
Needlenose pliers
Wire Cutter
Soldering iron
Computer w/ Audio Hijack audio software (Mac), or equivalent (older iMacs may work best! )
Please Note!
As of Oct 2015, above Crystal radio parts and Spooky Tesla Spirit Radio kits are now available at Mike's Electronic Parts
Step 2: Make a Clear Cover and Drill It


The first step is to create a clear lid so we can see the simple but effective radio components. I chose polycarbonate just because that is what I had on hand. Acrylic can be used, but it won't machine as easily.
Use a circle cutting attachment on a drill press to cut out a 3.25 inch disc cover lid out of 1/8 inch Lexan polycarbonate.
Next, 1/4 inch holes are drilled in the cover lid for the two banana jacks and for the two audio jacks.
The two banana jacks will receive banana plugs with pre-mounted antennas.
Two audio jacks will also be used. One is for for audio out to the computer, and one is for an optional auxiliary input modulation from a hand gripper or other source.
Drill holes as seen in the photos, or lay out your own hole design. I drilled a total of nine holes;
Two 1/4 inch holes for antenna banana jacks,
Two 1/4 inch holes for audio jacks,
One hole for the variable capacitor shaft, and two small 1/16th inch holes for its screws
and two 1/16th inch holes to feed the diode wires to mount the diode on top of the jar lid (This is for better light-to-sound effects; as the 1N34A diode is light-sensitive)
Step 3: Mount the Components on the Cover


Mount the Adjustable Capacitor and Banana Jacks in the clear jam jar cover.
For the variable capacitor, I had to find two screws long enough to feed through the 3/16 inch thick cover. A thinner cover will work with standard screws. The variable cap has an optional shaft extension and knob kit found at http://comtrolauto.com/
Mount the 1/8 phono jacks as well. I had to countersink the holes to get the threads to start because of the rather thick plastic cover I used.
Step 4: Prepare the Induction Coil

There is an option with the Induction coil to run it direct with an antenna connection, or to wrap the Induction Coil with about 10 wraps of 22 gauge wire that runs from the antenna to ground. The first method gives a better chance of a station signal being loud enough with a short antenna. The second wrapped inductor method is best for using a long (20 foot plus) antenna. See schematic for clarification.
I like the inductive method even with a short antenna, because it gives a clearer signal with less 60 cycle hum. The amplitude of sound will be less in AM tuning unless a long antenna is used however. The amplitude can be partially made up by using the human body as an antenna by touching the jam jar ring, which has a connecting wire that goes to the antenna + wire when the lid is twisted on.
The other advantage of wrapping the inductor is that it gets supported inside the jar by the heavier wires.
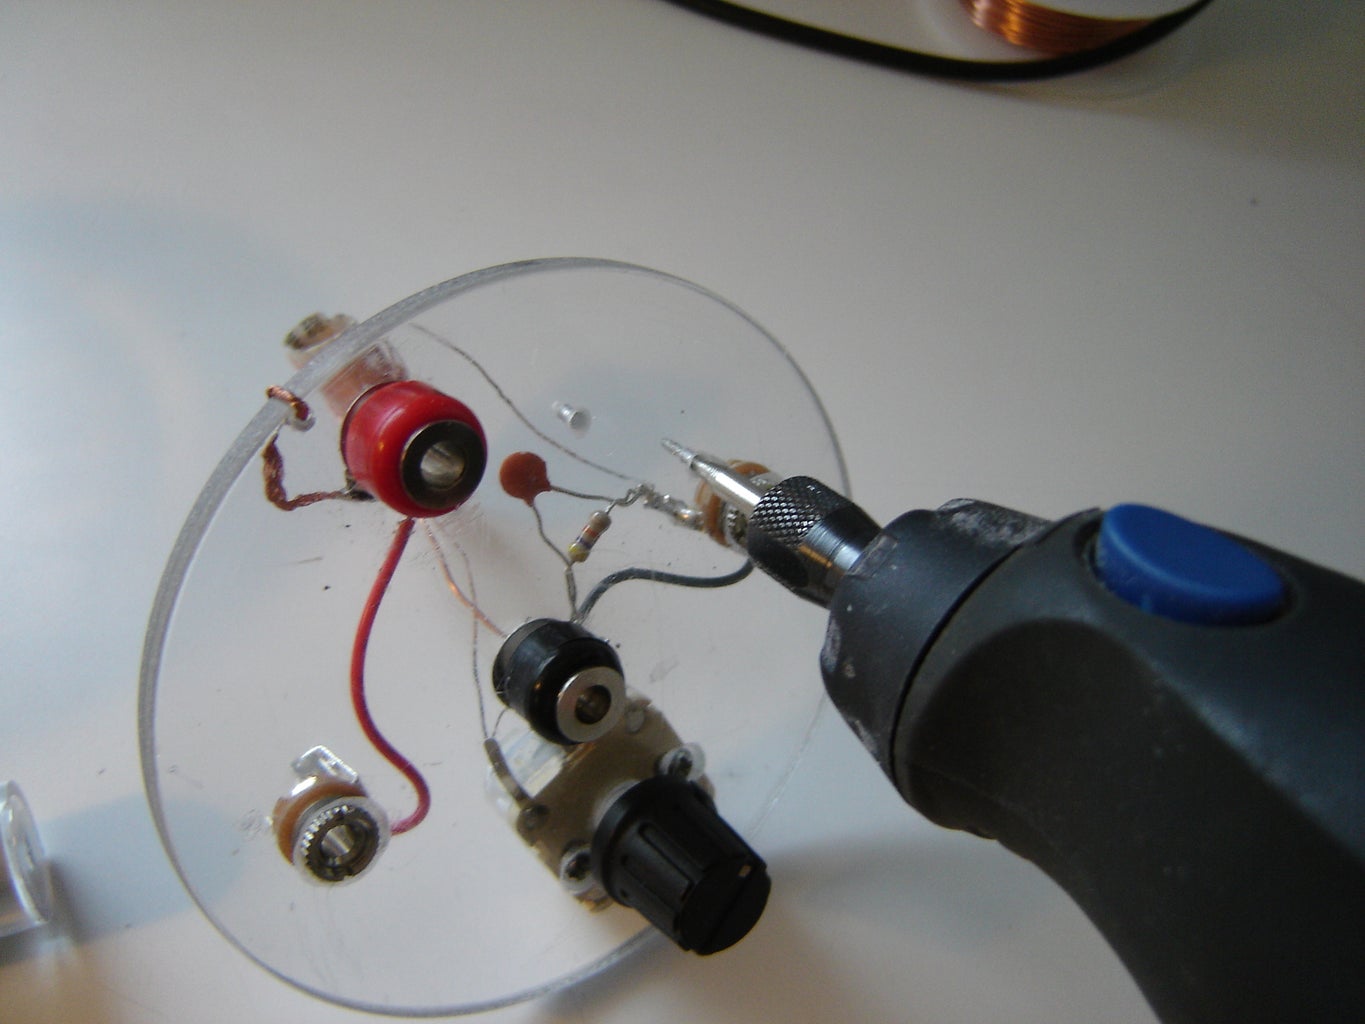
Step 5: Wiring and Soldering


Ok, once most components are in place, it's time to wire and solder things up. Direct point-to-point wiring can be used with so few components. Follow the pictures and the schematic for the basic connections.
Only a couple of wires need to be soldered in. Run one ground wire from the middle ground post of C1 to the ground connection on the phone jack. Another wire will go from the antenna to the other C1 post.
Note that the centre connection of the C1 variable capacitor is connected to the ground connection of the phone jack. The 160 pf connection is on the right facing C1 from the top looking down, connecting tabs facing away from you. The 41 pf connection is on the other side of the middle ground connection, and was not used.
The D1 diode is heat sensitive and may fail if over-soldered. Use an alligator clip as a heat sink when soldering its leads. I mounted it on top of the cover to make it more sensitive to light.
The L1 Induction Coil thin wire with black paint goes to ground. The other thin inductor wire goes to the non-ground C1 capacitor connection. L2 is simply 10 wraps of wire around the inductor coil.
Step 6: Make the Tesla Spiral Antennas


"The Tesla antenna is a form of wireless antenna or wave launching structure developed by Nikola Tesla in which the transmitted energy propagates or is carried to the receiver by a combination of electrical current flowing through the earth, electrostatic induction and electrical conduction through plasma with an embedded magnetic field."
- Gary L Peterson in "Rediscovering The Zenneck Surface Wave"
This is an area for scientific and artistic license. There is still much debate as to what exactly Tesla was up to with his transmission and reception of power systems. ( See Joel Young's blog comments in Design News Magazine on July 8th, 16th and 28th...
http://www.designnews.com/blog/The_Weird_and_Wonderful_World_of_Wireless/index.php?text=tesla+antenna+
I experimented with two types of Tesla antenna design. The first is similar to the flat spiral "Pancake" coil that is seen in several of Tesla's patents. The second is a peculiar "Football" coil made of two cones.
For the basic spiral antenna, I used a 6 foot length of 14 gauge solid copper wire, and bent the wires by hand, coil by coil. I used a needle nose pliers to begin the core spiral, and after a turn or two, gently but firmly worked the wire around with bare hands. I soldered on a short vertical antenna to the centre loop. In retrospect, It would have been better to make the vertical end part with a one piece construction.
Keep working the wire to eliminate kinks and bends, then make sure the coils are evenly spaced. I soldered on the vertical antenna last.
Step 7: Make a Peculiar Tesla Football Antenna


This coil was one of Tesla's later designs, and is said to have spooky anti-gravity effects when pumped with the correct frequencies and voltages. I won't be working in that high-power range with this un-powered crystal radio !
The core of the Tesla Football Antenna is made with four 2 inch paper cones glued and taped together. The paper cones were doubled up, two on each side, for strength and smoothness.
The 30 gauge wire conical coils are wound laboriously by hand. The thick 10 gage copper wire was carefully bent to conform to the football coil without disturbing the coils of the coil. (Note to self...don't try this again without coating the wires with a resin or glue first, because the coils will start unravelling...)
After this small coil-winding feat, two snazzy Banana Plug ends are put on. These ones were found at an electronics store.
Here's a link to a similar coil that puts out sparks!
[http://www.tesla-coil-builder.com/double_cone_bipolar_tesla_coil.htm]
Step 8: Testing the AM Radio Circuit
This step is a circuit test of the Tesla Spirit Radio, to see if it works as an ordinary AM radio. Once the wiring and solder connections are double checked, we can test the AM radio part of the device.
Plug in the Audio Patch Cord into the 1/8 inch jack of the radio, and then into the computer "Sound In" port. Launch Audio Hijack (or equivalent PC software). Set up with a basic 10-Band EQ and two or three AU Pitch controls. AU Bandpass and Reverb won't be used for this test...use their "Bypass" buttons. Gain may need to be turned up high. Au Pitch controls at the neutral 0 pitch setting. (See screenshot below.)
Turn the variable capacitor knob and the sounds of a local AM station should come through; if not, a long antenna may be required in your area. Try touching the jar ring or antenna to see if that makes a difference.
If you have no sound at all, then something is likely wrong. Check for a dry solder connection. Also, if too much soldering heat was used close to or on the diode connection, the diode may be burned out. Substitute to check, or use the diode checker function of your multi-meter to test it if necessary.
Attachments

Step 9: Spooky Effect # 1 - Detect Lightning and Predict Storms

"No doubt whatever remained: I was observing stationary waves."
Nikola Tesla, commenting on reception of lightning in his receivers.
The Spooky Tesla Spirit Radio can detect lightning! Check out the main intro movie.
You can listen to AM radio if you really need to, but Nikola Tesla spent most of his radio listening time tuning into natural Earth (and beyond Earth) pulses, and the high and low frequency vibrations that were around him. He was a storm-chaser from the comfort of his own laboratory.
During Tesla's Colorado Springs experiments, he would listen in on approaching and receding lightning storms, which he could detect up to hundreds of miles away. He noticed standing waves produced by the lightning that inspired him to develop his wireless power apparatus.
It helps to have a long antenna (be sure it is safely grounded with a spark-gap arrester!), but even with the short antenna, this crystal radio can be made very sensitive with the computer software adjustments. When a storm is near, you can really hear it! (It's a loud crashing sound in the audio ;)
Requirements: Mac computer and Audio Hijack software. "Super-Sensitive Lightning" software setting adjustment, as seen in the screenshot below...and a nearby storm! PC owners will need to use an audio software solution that is able to alter pitch, gain and reverb in real time. And preferably record it.
Here's a fun site devoted to "Nature Radio Signals and strange emissions at very low frequency." http://www.vlf.it/
Step 10: Spooky Effect # 2 - Disembodied Spirit Voices
""The sounds I am listening to every night at first appear to be human voices conversing back and forth in a language I cannot understand. I find it difficult to imagine that I am actually hearing real voices from people not of this planet. There must be a more simple explanation that has so far eluded me."
-Nikola Tesla 1918
Nikola Tesla, and many others of the early radio pioneers, often thought they heard voices in their radio receptions. Both Edison and Tesla claimed to be working towards communicating with disembodied spirits.
Dale Afrey, in the book "The Lost Journals Of Nikola Tesla", says . "At one point Tesla chided Edison for stealing his idea on using a form of radio to contact the dead."
You can get the impression of disembodied spirit voices by tuning close to an AM station, then use the Au Pitch Controls of an audio software such as Audio Hijack to raise the pitch to a squeaky high, ghostly sound. Add Reverb for the final touch. Au Bandpass is also used in this effect. Check the settings in the screenshot below.
Alternately, the AU Pitch can be used to lower the pitch instead of raising it, for a moaning type effect.
Attachments
Step 11: Spooky Effect # 3 - Make Sound With Light

The 1N34A germanium diode in this crystal radio circuit is sensitive to light of all kinds. It responds to sunlight, light-bulbs, laser, flashlights, and even candlelight! The laser will work to activate sound from the radio from many feet away, but only when the laser light is actually moving across the light-sensitive diode.
Light-bulbs affect the radio diode from a couple of feet away, and the 60-cycle hum can be heard from them. The radio or light does not have to move to make sound in this case of AC power.
Candlelight must be close and moving to affect the diode, and then it is a very low frequency that is hard to catch. The AU Pitch control must be raised high to hear the low bass sound from the flame. See CandleSetup screenshot, below.
The use of various light sources to make sound is shown in the main movie.
Step 12: Spooky Effect # 4 - Create Freaky Music

The computer monitor, speakers and the computer itself are all sources of cool and spooky sounds for the Spooky Tesla Spirit Radio. You can go for extreme feedback and resonance effects, or you can keep it simple and just hear what's going on inside your computer box.
By altering the AuPitch, Reverb, and BandPass module controls, the normal static, clicks or hums become rich soundscapes. The cool thing is, once the controls are set, the radio does the rest!
All of the sound effects on the main video are generated in the above way. In the following video, the AuPitch controls were set before the main Hyperspace voyage.
Here's another example of making sounds and music live in real time, with another crystal radio I have that's made by EJ. Gold:
Step 13: Spooky Effect #5 - Van Eck Phreaking

What is Van Eck Phreaking?
Wikipedia:
"Van Eck Phreaking is the process of eavesdropping on the contents of a CRT and LCD display by detecting its electromagnetic emissions."
Can a simple crystal radio circuit really sense the colours and movements of windows on a computer screen??
Yes it can! Check out the above video... and also the main video that shows colors being discerned electromagnetically by the radio.
Attachments
Step 14: Spooky Effect #6 - Make Fright With a Mike

Who would have thought it was possible, but the addition of a magnet on the side of the jam jar can turn the radio into a temporary microphone! Experiment with holding a neodymium magnet close to the ferrite coil inside the jam jar. Then talk at or into the jam jar. Hit the record button in Audio Hijack to see if it records the sound. It will be faint in the background...perfect for recording alien or scary voices!
Use the Super-Sensitive audio set-up for this experiment.
Attachments
Step 15: Spooky Effect # 7 - There's a Woodpecker in Your Modem!

Wireless modems put out a strong EM (ElectroMagnetic) pulse when operating...even if you are not using the wireless part of the modem.
I discovered that a modem pulses at about 10 Hz, and sounds very similar to the controversial Russian Woodpecker radar transmissions. (http://en.wikipedia.org/wiki/Russian_Woodpecker).
Other electronic and electric items such as calculators, cellphones, and computers can be investigated to hear what fields they emit. Motors like a Dremel tool are also fun to listen to...but not for very long!
Attachments
Step 16: Spooky Effect #8 - Bring a Screensaver to Life

In this example, the Spooky Tesla Spirit Radio is placed in front of an iMac computer screen. The radio is able to read the moving RF contents of the screen and make them audible. If it seems impossible that a simple crystal radio could do that, then watch the following...
The "Hyperspace" screensaver is available at download.cnet.com/Hyperspace/3000-2257_4-90475.html
Step 17: Links to Tesla and Spirit Radio

Tesla's article "Talking With The Planets" in Colliers Weekly, Feb19,1901 earlyradiohistory.us/1901talk.htm
Here's Tesla's Colorado Springs Notes that show much of his early experiments with radio LC circuits:
www.scribd.com/doc/335469/Nikola-Teslas-Colorado-Springs-Notes
Here's a detailed investigation into Tesla's Colorado Springs receiver experiments:
www.teslasociety.com/teslarec.pdf
Tesla on Mars:
www.borderlands.com/archives/arch/marscom.htm
Two Tesla radio related patents:
Patent # 645576 "System Of Transmission Of Electrical Energy"
www.pat2pdf.org/patents/pat645576.pdf
Patent #649621 "Apparatus For Transmission Of Electrical Energy"
www.pat2pdf.org/patents/pat649621.pdf
Michio Kaku's site: mkaku.org/
"Renowned physicist Michio Kaku explores how mind reading, the routine use of force fields, and other feats that are currently science fiction may become commonplace tomorrow."
Link to EJ Gold's line of BetaBlocker Crystal Radios:
www.yoyodyneindustries.com
The above controversial video from EJ Gold shows an alternate use for crystal radio circuits... to partially suppress Beta brain waves to allow the Alpha-Theta waves to predominate for better meditation and psychic work.
Decide for yourself if it could be true!
Second Prize in the
Halloween Contest


