

Introduction: Make Your Own Stuffed Hobbes (Free Pattern!)


The comic strip Calvin and Hobbes was wildly popular through its run in the papers. Like most people, I've always been a fan, and now my kids are as well. For Christmas a few years ago, I thought a stuffed Hobbes doll would make a great gift for one of my sons.
The artist of the strip, Bill Watterson, famously refused to allow his characters to be licensed and capitalize on their popularity, feeling that doing so would undermine the integrity of the strip. So despite obvious interest Calvin and Hobbes merchandise was never available. Thankfully you can buy all the comics in book form. I recommend picking up the box set if you don't already have it.
Since you can't buy a Hobbes doll, I figured I'd make my own!
For anyone interested in duplicating this Hobbes doll, I'm sharing the pattern I came up with for free. The pattern produces a Hobbes that is about 16 inches tall.
The pattern shared here is for personal, non-commercial use only.
My son loves his Hobbes and has been happily dragging him around for years. If you make one, please post a photo in the comments!
Attachments

Step 1: Pattern

I spent a while digging through my Calvin and Hobbes books studying the Hobbes character when he was in the stuffed-toy form.
Early versions of Hobbes were very cartoony, and things like the shape of the nose and the number and placement of stripes were not always consistent. His proportions also appear to have changed slightly over the years. Later versions were crisp, clean and very consistent in the features. I based my Hobbes doll off of pictures that appear in the later strips.
To create the pattern, I broke the doll down into separate basic shapes. After some trial and error, I had a pattern that yielded all the needed body parts that fit together to my liking.
This pattern requires creating and stuffing all of the different body parts separately, hand stitching them all in place, and then hand stitching all of the stripes in place individually.
If that wasn't completely clear, this project requires a ton of hand stitching. You've been warned!
Begin by printing out my Hobbes pattern (pdf is at the end of the previous step), preferably on stiff paper like card stock.
You will need about 1/3 yard of orange fleece, some little bits of black, and a couple small pieces of white. You will also need some polyester stuffing, poly stuffing beads if you want, two black 3/4" plastic buttons, and some thin black cording or yarn.
Step 2: Body


Print and cut out all the pattern pieces, and tape the two pieces together that form the pattern piece for the body.
Use the pattern to cut out all the various shapes from fleece, according to the colors and number of pieces needed as indicated on the pattern.
Sew the white belly piece to one of the orange body pieces. I did mine on the machine with a zig-zag stitch, although now that the doll is finished I wish I had sewn it on by hand so it matched all the other exterior stitching on the doll.
With the white belly facing in, sew the two body pieces together along the longer sides only.
Sew the round orange bottom piece into the bigger end of the body section.
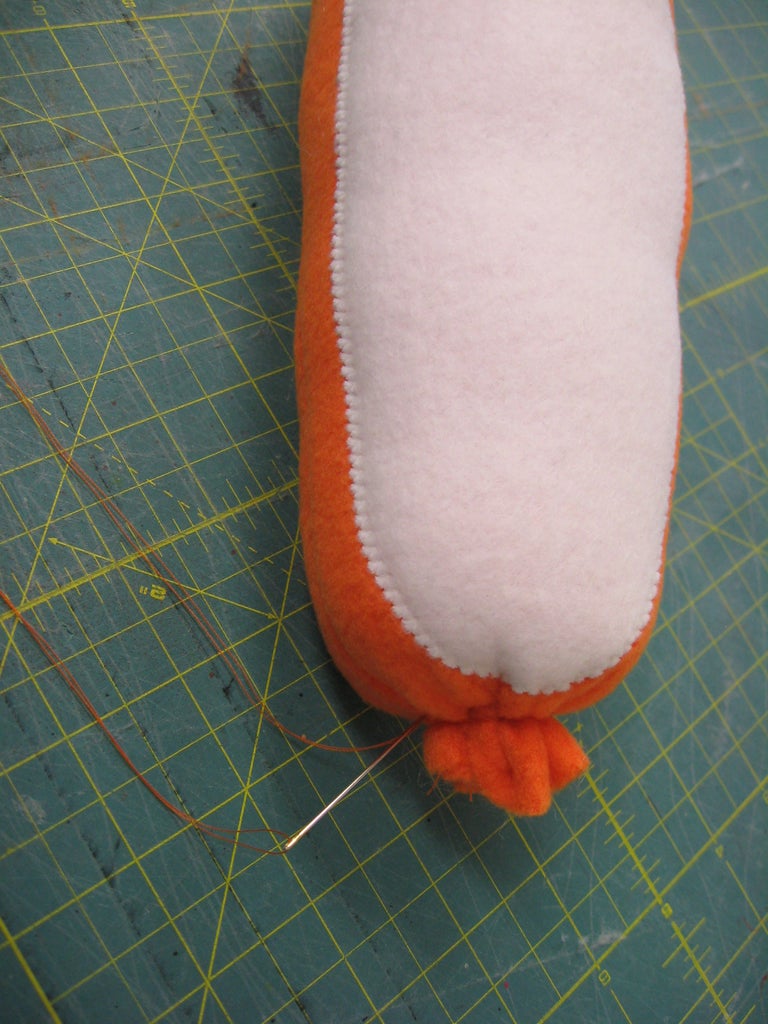
Turn the completed body right-side-out, and fill it with polyester stuffing, leaving the stuffing about 1/2" from the top. Hand stitch the top of the body closed as shown in the last photo.
I filled my Hobbes doll pretty firmly with stuffing, figuring it would break down and become more floppy over time. However firmly you choose to fill your doll, just make sure you do it consistently in all the different body parts. I didn't do it on anything but the tail, but you could add stuffing beads to the ends of various body parts to add weight if desired.
As far as seam allowances, I usually just line my material up with the right edge of the presser foot on my machine, which is about 1/4".
Step 3: Arms and Legs


Sew the white ends onto each arm and leg piece as shown in the photos.
I tested out sewing some stripes onto a practice arm (at the point shown in the third photo), but I didn't like the way the machine-stitched stripes looked on the completed arm. I decided to complete the entire Hobbes doll without stripes and sew them all on by hand at the end. This proved incredibly tedious, but allowed for very precise sizing and placement of stripes, which I appreciated.
Please examine the last three photos carefully if you have any questions on how the rounded ends of the arms and legs are accomplished.
Turn the arms and legs right side out, and fill with stuffing. Do not sew them shut at this point.
Step 4: Ears


Sew both pairs of ear pieces together, and turn them right-side-out.
To get a nice curve to the ears, fold the bottom half of each ear in half and place a few hand stitches to hold them in place, as shown in the photos.
Step 5: Head


Sew all the pleats on both pieces of the head as shown in the photos and indicated on the pattern.
Before sewing the two head pieces together, sew the ears in place onto one of the head pieces, right side to right side, just outside of the top two pleats, as shown in the fifth photo. (The ears appear different because this was an earlier test piece, but the method is the same.)
Note that the pattern for the ear pieces is not round, but they will appear so once they are sewn into the head. I sewed the bottom 1/2-inch or so of each ear into the head . . . just a bit more than a typical seam allowance.
With the ears in place where you want them, sew the two halves of the head together, and turn right-side-out. Fill the head with stuffing, but do not sew it shut.
Step 6: Tail


Sew the tail pieces together in the same manner as the arms and legs, according to the pattern, and fill with stuffing. I added some stuffing beads to the end of the tail to add some weight so it would flop around.
Step 7: Attach Head to Body


To attach the head to the body, begin by folding in about 1/2" of the fabric at the bottom of the head, like in the second photo.
Use orange thread to hand stitch the head in place. Nice, tight slipstitches work best for this, as well as for attaching the arms, legs and tail to the body. Learn how to do the slipstitch right here. (Thank you jessyratfink.)
I didn't like the way the head looked after my first attempt (shown in the first photo), so I took it off and added more stuffing and then re-sewed it in place. The extra stuffing helped create a more defined transition from head to body, which I thought more closely matched the Hobbes doll as he appeared in the strip.
Step 8: Prep Arms for Attaching to Body


Use a needle and thread to nip and tuck the arms as shown to create a shape similar to what is shown here in the first three photos.
Examine photos 4 - 7 carefully to see the steps I took to achieve this shape. The completed arm should be about 5 inches long.
Step 9: Prep Legs for Attaching to Body


Sew the tops of the legs shut as shown in the photos.
I guess it's not completely necessary to do it this way, but I thought it was nice and tidy.
Step 10: Attach Arms and Legs to Body


Use a needle and thread to attach the arms and legs to the body as shown. A curved upholstery needle may make things a bit easier when you're working in the tight crevices where the arms and legs meet the body.
When the arms are attached, they should be positioned about 3/4" down from the head, and about 1/4" away from the white belly.
Disregard the muzzle showing in these photos. It was a first attempt which I wasn't happy with, so it was removed and replaced with a new one which is shown in the next step.
Step 11: Muzzle


Begin the muzzle by sewing all the pleats as indicated on the pattern piece.
I recommend hand stitching the nose and mouth in place before attaching the muzzle to the head. I used a simple whipstitch (thanks again jessy) to attach the nose to muzzle, and muzzle to head, as well as for attaching all the stripes later on.
The mouth was made with some thin black cording and was stitched in place with a heavier needle.
Stitch the muzzle in place, but leave the bottom inch or so open. Fill it with stuffing and then stitch it all the way closed.
Step 12: Eyes


I wanted to use buttons for the eyes, but I couldn't find any in the shape was looking for.
I ended up buying some simple black plastic buttons that were 3/4" in diameter, and used a sanding attachment on my Dremel to carefully sand them down to the oval shape seen in the photos.
You could sand them down by hand, but it's much quicker with a Dremel. Just be careful, work slowly, and don't sand off your finger tips.
Stitch the eyes in place, positioning them as shown in the photos.
Step 13: Stripes


The two bottom-most stripes on the both the arms and legs, and the five stripes on the tail are all made from 3/4" strips of fleece.
The upper-most stripes on the legs were made from strips that were about 1/2" wide.
All other stripes were custom made as I went along, but I've included them in the PDF pattern. (You're welcome!)
Hand stitching on all of the stripes is a tedious process, but it's rewarding each time you see a newly completed stripe and you're one step closer to a completed Hobbes.
In the pattern, I've numbered and labled all the stripes to help you know where to put them. Note that the first stripe below the neck stripe is number 1 in the pattern, and so on down his back. Note that depending on the placement of your arms and legs, you may need to make adjustments to the size and shape of the back stripes, mainly numbers 1, 2, and 6.
The tail is the one piece of the body I left off until the very end. It was easier to sew the stripes onto it first, and then attach it to the body after.
Take a close look at all of the photos for placement of the stripes.
Step 14: Accessories


No homemade Hobbes would be complete without at least a few accessories.
Through the strip, Hobbes is seen wearing a variety of different things. I made him a tie, a Calvinball mask with flag, and his classic red scarf. Maybe I'll get around to making him some other items as well when I get a chance. (A cool sombrero, perhaps?)
For anyone that decides to make this, I'd love to get some feedback on how it goes. Please let me know if there are any parts that need more clarification or detail.
My kids love it. I'm kind of nervous that they're going to destroy it, but I guess I could always fix it, or at least make a new one . . .
Let me know what you think, and if you make yourself a Hobbes doll please post a photo in the comments below!

Participated in the
Sew Warm Challenge

Participated in the
Holiday Gifts Challenge


