

Introduction: Table Saw Sled for Precise Angled Cuts


There are plenty of table saw sled designs, here and elsewhere, on the Internet. A sled is an excellent addition to your table saw, and is usually intended to make precise 90 degree cuts. But occasionally you need to make a precise angled cut, as is required if you are doing segmented wood turning on a lathe. This Instructable shows you how to make a sled to make specific angled cuts on your table saw, more precise than anything you can buy for US$300.
Layout drawings in Imperial units are provided in the steps; layout drawings in Metric units included in step 7.
Step 1: What Do You Need?

The sled will be made from 3/4" MDF.
You will need a precise measuring rule, a good framing square, a drafting triangle and a sharp pencil. A magnifying glass will be a big help also.
Step 2: Make the MDF Rectangle


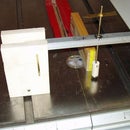
Start with a rectangle of 19" wide by 16" deep MDF. As in the photo, align the top edge square with the left miter slot. Use a framing square held tight against a 3/4" board fit tight into the left miter slot. Position the MDF so it extends an inch left of the saw blade. Place a strip of 3/4" wide x 3/8" thick x 17" long hardwood into the right miter slot, under the MDF. The width of the hardwood strip must be trimmed precisely to fit into the miter slot without slop. Place some shims under the hardwood strip to hold it just above the saw table.
Now that you have everything positioned, carefully lift the MDF, apply a line of glue on top the hardwood strip, and replace the MDF, making sure it is still square. Weight the MDF above the hardwood strip and wait for the glue to dry.
After the glue dries, trim off the excess on the left of the saw blade. You will now have the basics of an 18" wide x 16" sled.
Step 3: Layout the Base Lines


Use a SHARP fine point pencil for these steps. The critical dimensions will be shown precise to two decimal points; I used a rule graduated in hundredths of an inch, it will be OK to convert my decimal measurements to closest 1/64". So if a measurement is shown as 2.00" for example, lay it out precisely.
Draw a vertical line 1" from the left side, top to bottom, parallel to the left edge of the MDF. This will be your vertical base line. On this line, measure down 1" and make a fine pencil mark. Then measure down another 9.00" and make another pencil mark (see the drawing). From the 9.00" mark, use a framing square clamped to the left side to draw a fine horizontal line all the way across the MDF. It's important that this horizontal line be perpendicular to the left edge of the MDF (and so perpendicular to the vertical base line also). To check that it is, use the 3:4:5 triangle principle shown in the drawing below. When you have confirmed the horizontal line is perpendicular to the vertical line, measure over 16.00" and make another mark, as shown in the drawing. From that point, use a drafting triangle to draw a vertical line to the top of the MDF.
You should now have three baselines, two vertical and one horizontal.
Step 4: Layout the Angle(s)

The angled line(s) will be laid out mathematically. Best is to make one sled dedicated to one angle, the dimensions for three common angles used in segmented turning are shown on the drawing below, based upon the equation h = 16 * tan (angle). So for the angle 15 degrees, h= 16 * tan (15) = 16 * 0.268 = 4.29". You mark the height h on the right hand vertical line, draw a line from that point to the intersection of the two lines on the left, and you have a line that makes a precise 15 degree angle with the saw cut line.
Step 5: Make and Attach a Fence on the Sled

Now cut a 18" long strip of MDF 3" wide for the fence. Be sure the top edge is straight, I use the factory cut edge. You can glue this strip in place, aligned exactly under the angle line you marked, or if you want to re-use the sled for other angles, use screws. I used both glue and screws!
Be sure the strip extends past the left edge, then trim off the overhang.
Add a 2x3 to the bottom of the sled as a handle.
Step 6: Make a Stop for Measuring Your Cut Pieces

You will likely want some way to measure and duplicate cut length, especially for segmented turning.
This photo shows one way to make an adjustable stop; it has a miter bar strip underneath like the large sled,
Step 7: SI Units for Layout


These drawings provide metric units for layouts.

Participated in the
Woodworking Contest


