

Introduction: The $74 PVC Mega Awesome Super PVC Table


As the title states, this Instructable will show you how to build an VERY large table out of a hollow core door and PVC pipe and fittings. They can be used for anything, such as craft tables, train tables, light desks or for garage sales or even family dinners as a ‘kids table’. It is entirely up to you. We needed ten of them and we use them as desks. This was our first one we built.
We built each one for $74.
We could have gone to Costco and purchased a bunch of folding tables for $39.99 each, but this one actually looks pretty nice and classy, has a stainable/paintable top and is perfectly smooth. Best of all its BIG, coming in at 36”D x 80”L. Hence the ‘Mega Awesome Super’ moniker.
A couple of notes on this Ible:
- Hollow-Core vs. Solid-Core: I chose a hollow core down to keep costs down, and since our tables weren’t going to be abused, they didn’t need to be as ‘tough’. If you want your table to take more of a beating or is more of a workbench, I recommend a solid core door, however, the price is about $25 more and they are substantially heavier (which is not all bad and the structure will still hold). You could also substitute an Ikea tabletop if you have an Ikea store near by.
- Fittings: The PVC fittings we used are all from Formufit (formufit.com), which I have used in the past on my other PVC projects. I chose these because they have the Table Caps, 4-Ways and the flat End Caps that are needed to make this with the fewest parts. Their total on this project was $30, but that is because I used their crosses and tees. You could cut the cost down if you used plumbing grade on those two items, but it wont look as pretty and I am not sure if the pipe inserts into the fittings at the same depth.
- Pipe: I used plumbing grade PVC pipe from Home Depot to keep costs down. Had I had a larger budget, I would have used Furniture Grade PVC pipe, which is prettier, stronger and last longer, but I didn’t. If we build more in the future, we will probably do Furniture Grade pipe.
Step 1: Tools

- You need something to cut pipe with, which can be any of the typical variants found in my PVC 101 Ible I posted a few years back, such as a hacksaw, ratcheting plastic pipe cutter, or a power miter saw. Your choice!
- A power drill or electric screwdriver to attach the table caps to the underside of the table.
- You will need at least fifteen (15) 1-1/4" to 1-1/2” long threaded screws and drywall screw inserts. The inserts may not always be needed, but will sometimes be used to make sure that the table caps are secure to the tabletop.
- PVC Cement to secure all of the pipe and fittings together. These parts will never come apart again. Or you can use small 1/2" screws between the pipe and fittings if PVC cement is not your bag.
Step 2: Parts


I once again ordered all my parts from Formufit (www.formufit.com) as they are have a big selection of parts for a PVC build. You can also get their stuff on Amazon.
Here are the parts I ordered:
- 5 x 1-1/4” PVC External Caps (F114EEC)
- 5 x 1-1/4” PVC Table Caps (F114ECT)
- 4 x 1-1/4” PVC 4-Way Tees (F1144WT)
- 4 x 1-1/4” PVC Regular Tees (F114TEE)
- 2 x 1-1/4” PVC Crosses (F114CRX)
- A quantity of five (5) 3” lengths.
- A quantity of ten (10) 12” lengths.
- A quantity of four (4) 20” lengths.
- A quantity of four (4) 30” lengths.
Step 3: Assembly: SIDE 1

With that….let’s get started:
SIDE 1 Assembly
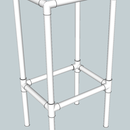
The first thing you want to do is assemble to the first of the two sides of the PVC frame using the Tees, 4-Way Tees, the End Caps and the Table Caps, as shown in the attached photo. Fitting placement is in BLACK, and the pipe size to use is shown in RED. This will be ‘SIDE 1’, or the left side of the table.
I recommend a dry fit first, THEN pull everything apart and reassemble using PVC Cement. As many of you know, once you apply PVC cement, it will not come apart again.
Apply the PVC cement to the inside of the fitting at the ‘stop’ point of the fitting only. Make sure things are being inserted the way they should, then press the pipe into the fitting and hold for 30 seconds to secure the weld.
NOTE: Most people (including Formufit) will tell you to apply it to both the end of the PVC pipe and inside the fitting, but I have found that this is not necessary.
NOTE: THE SEQUEL: If you don’t want to use PVC cement (as it is noxious indoors), use a screw between where the the pipe and fitting meet to secure them both in place. You can see more of this in my previous PVC 101 Ible.
GOOD HEAVENS, ANOTHER NOTE: I tried to line up the plumbing pipe markings so that they face the rear of the table (the rear is where the 4-Way Tees are). This way they don't show up as much and you don't have to Acetone them off, if you want to keep a cleaner look. I did a poor job on the one shown in this Ible. Learn from me.
Step 4: Assembly: SIDE 2

The next step is exactly the same as the previous, however, you want to build your ‘SIDE 2’ or the right side of the table as a mirror image to the SIDE 1, so that the ports on the 4-Way Tees face the other direction, when in the rear.
Another diagram is attached which shows pipe and fitting placement, with pipe in RED and fittings in BLACK.
Step 5: Assembly: BACK

Now its time to build the ‘BACK’ of the table, which is a fairly simple. For this step, you will need a Table Cap, an External Cap and two Crosses, both which should not have not yet been used. Assemble them, along with the long pieces of 30” pipe to make something that looks like it belongs on the top of a telephone pole.
When assembling the 'center stack' with PVC cement, lay this flat on the floor so that everything is flat and your pipe is all parallel.
Step 6: Assembly: the Merging.


Now its time to bring everything (PVC-related) together.
Insert the ends of the pipes from the BACK into each of the SIDE 1 and SIDE 2 elements to end up with something shown in the diagram. Again, I recommend a dry fit to make sure everything lines up before applying PVC cement.
Once you a comfy with the dry fit, pull them apart and apply PVC cement into the fittings on SIDE 1, and insert the BACK pipes into the 4-Way Tees on SIDE 1. Quickly make sure everything is sitting a right angles. Press together and wait 30 seconds.
Next, apply PVC cement into the fittings on SIDE 2, and insert the BACK pipes into the 4-Way Tees on SIDE 2. Quickly make sure everything is sitting a right angles. Again, press together and wait 30 seconds.
You should now have a completed frame! Almost Done!
Step 7: Assembly: Table Top


Hollow-core doors are constructed of an outer frame and various slats that run (when stood upright) along the horizontal plane of the door. The remainder of the area between these slats is either filled with cardboard (seriously), foam or just plain nothing.
Since we can’t see where those slats are, I found that it is a hit-or-miss scenario as to where our table caps will end up attaching to the door, be it a slat or a fluffy piece of cardboard. Where it is cardboard we want to use a drywall insert, to attach the cap to the wood or wall of the door instead. Here is how we do it:
- Lay the hollow-core door on the floor, with the side you want to be the top, facing the floor, then flip the PVC structure over and place it, upside down onto the door, with the table caps against the door.
- Center the whole structure by eyeballing the placement of the PVC pipe segments and their relation to the edges of the door, then using a pencil or Sharpie marker, mark where the holes in the Table Caps meet the door.
- Remove the PVC structure and place it to the side. With a drill or electric screwdriver, insert a screw into each of the marked points you just made on the door.
- If it goes in easily, you have hit a hollow point in the door. Remove the screw and insert a drywall screw insert into these holes (if you need to, make the hole bigger with a drill bit).
- If it goes in and catches the threads, you have hit a slat, and the hole is good as it is. No drywall screw insert is needed. Remove the screw.
NOTE: All of this can be avoided if you use a solid-core door. I am $25 under budget on each table for not doing so, but alas, I am a cheap, cheap man.
Finally, insert the screws into the table caps and into the door/screw inserts. You now have a fully-completed, upside down table.
Step 8: Completed: Flip It and Finish It.


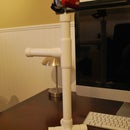
Finally, flip the table over and you should have (if I have explained myself correctly) a fully functional, huge, sturdy table.
You can finish the table with paint, or a nice stain if so desired. We chose to keep ours 'natural', however water stains show up like mad on the thin wood, so we recommend a light waterproofing stain or paint.
Customizing
As with any project involving PVC and found parts, you can make any adjustments to suit your particular needs. Doors come in shorter lengths, so you can easily change the length of the 30" pipe segments to 24" or 28" to accommodate shorter doors. You can also increase the height of the table by increasing the 3" lengths of pipe under the table caps, to make a table that is more suited for standing or counter height.
I hope you enjoyed this Ible! Let me know your thoughts in the comments and I'll make corrections/edits/adjustments as necessary!

Participated in the
Workshop Contest


