

Introduction: The RRRRRRRRRRBBA, a $3 Arduino


Hey, we all LOVE the Arduino, and for my projects I make extra sure that I used the Arduino platform, so that everyone in the artist and hacker community could springboard off it for their own projects, and so that I can springboard off them. Its so universal and easy to learn! But, there are a few things THEY don't want you to know about the Arduino:
Starting with the SHOCKING REVELATION THAT....
Step 1: For a Microcontroller, the Arduino Is NOT CHEAP!


1. the Arduino is NOT a cheap microcontroller!
When Arduino-lovers like me say "Wow, the Arduino is such a cheap microcontroller!" this is not strictly true -- it is very cheap for what it is, but type "microcontroller" into Mouser's search box and you will find microcontrollers that cost 30 cents, not 30 dollars.
thats because....
(go to next page)
Step 2: The Arduino Is NOT a Microcontroller!
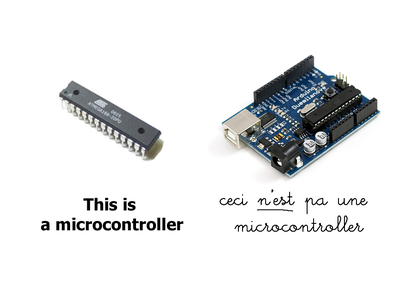
2. The Arduino is NOT a microcontroller!
Of course, the Arduino is not a microcontroller, but rather a development environment for microcontrollers -- including a programmer board, a software program for the computer, and a programming language, in addition to the microcontroller chip itself. A programming/debugging solution the Arduino is extremely easy and friendly to use, and the level of support you get with it is well worth the money. But really, the term "microcontroller" refers specifically to the ATMEGA chip that is on the Arduino debug board. All the other stuff on the board (the fancy power supply, the LEDs, the reset button, the programming circuitry, the USB-to-Serial converter) is totally optional.
Could that possibly mean that....
(read on)
Step 3: The ATMEGA Chip Works Fine Without the Arduino Board!
3. The ATMEGA chip works great WITHOUT the Arduino board!
Arduinos that have been pre-loaded with the "Lilypad" bootloader firmware, instead of the standard Diecimila or Uno firmware, have a very special property: after you program such an Arduino with your own code, you can then take the $3 ATMEGA168 chip out of the programmer board, supply 5V power to it (such as the power from a USB bus or cell phone charger), and it will still work the same and do the same amazing things that your $30 Arduino does, all by its lonesome! You only need the Arduino board to program the chip -- after that, the chip can fly solo!
Before you upload your code to the Arduino, you need to pre-load the Lilypad bootloader fimware. Buy an AVRISP mkII and follow the instructions here: http://arduino.cc/en/Main/Bootloader . Make sure you have "Lillypad" selected as the board you are using in the "Tools" dropdown menu of the Arduino IDE window on your computer.
UPDATE: I am not sure if the Lilypad bootloader is compatible with newer boards like the UNO, which have an auto-reset feature the Lillypad doesnt have. If you have a newer board you may or may not have to disable your board's auto-reset feature by following these instructions -- http://www.arduino.cc/playground/Main/DisablingAutoResetOnSerialConnection . Please comment if you have tried this method with an UNO -- my own board is a bit of an antique!
Step 4: The ATMEGA Chip IS a Cheap Microcontroller!

4. The ATMEGA chip IS a cheap microcontroller!
The ATMEGA168 chip, which does everything the Arduino can do, costs about $3.00. (You can also use the equally cheap ATMEGA328 or ATMEGA328p -- but DONT use an ATMEGA168p -- the Arduino gods decided not to support it for some reason.)
Step 5: Some Caveats:


** Caveat #1 : The reason this trick works is that, unlike most Arduinos, the Lilypad Arduino is clocked by the ATMEGA's built-in oscillator instead of by an additional crystal oscillator circuit. This lack of additional oscillator circuitry makes wiring up the circuitry a lot simpler, but as a result the chip runs slower (8MHz instead of 16MHz) and its timing is not as accurate. The lilypad bootloader knows how to compensate for this speed difference to make sure all of your delays and baud-rates and other time-sensitive functions work correctly, but the fact remains that the chip will perform slower. This is not a big deal unless your application needs very accurate timing or needs to perform tasks very quickly.
If you do need your Arduino to run at the proper 16MHz speed, use two 22pf cermamic capacitors and an Abracon ABL-16.000MHZ-B2 crystal oscillator, and connect them as shown in the figure above. If you do decide to use this 16MHz crystal oscillator setup, don't use the Lilypad bootloader -- just use the correct bootloader for the board you have (eg diecimila, duemilanove, uno etc).
** Caveat #2: The ATMEGA chip has weird names for its pins -- ie ATMEGA pin 1 is not necessarily Arduino pin 1. So you need the chart above to translate (courtesy of http://arduino.cc/en/Hacking/PinMapping168 )
**Caveat #3: Whatever power supply you use (cell phone charger, usb jack, or AAA batteries are quick and easy methods) it may not be a perfectly solid 5V. So if you have problems with the chip hanging or resetting unexpectedly, add a .01 uF capacitor between 5V and Ground, as close to the chip as reasonably possible. This filters out noise on the power supply. You can also add an additional 10uF electrolytic cap in the same place (noting the polarity markings on the capacitor) --this protects against disruptions in the power supply.
**Caveat #4: The most expensive and complicated part of an Arduino is the serial-to-usb circuitry. By omitting it, we save a lot of cost and effort, but If you still want to use your ultra-bare-bones arduino to communicate using the normal Serial.print() commands, you will need to purchase a 5V TTL USB-to-rs232 adapter cable, and connect it like so:
Cable TX wire ---> ATMEGA Pin 2 (RXD)
Cable RX wire ---> ATMEGA Pin 3 (TXD)
Cable Gnd wire ---> ATMEGA Pin 8 (Gnd)
Step 6: There You Have It!
Thats it! That's all there is to it. 5 Volts+ATMEGA168 = cheapest Arduino ever. Be sure tell all your hacker friends about the cheapest Arduino of all time and space: The Really Really Really Really Really REALLY Really Really Bare Bones Arduino!


