

Introduction: Transform an Image Into a Dowel Rod Sculpture


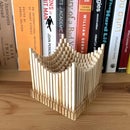
In this project, I converted an image of a hot air balloon into a dowel rod sculpture. The final structure is a transformation of digital information stored in a photo into a physical 3D object. I constructed the sculpture to help visualize how images are stored on computers, as well as demonstrate the enormous scale of information in just a single picture that you see on a computer. It looks cool too! This instructable will go through how to construct an image based dowel rod sculpture of your own.
Here’s the basic idea. Every digital image is made up of many tiny squares (pixels) with each square assigned some intensity value. Very dark regions in the photo have pixels with low intensity values, while regions that are bright (e.g. the balloon) have high intensity values. In the sculpture, the intensity values at each pixel in the image are converted to a dowel rod height. The bright regions have a high height, and the dark regions have a low height.
The sculpture I constructed had dimensions of 82.5 x 123 x 60 cm, and 4230 dowel rods (53 rows by 80 columns) were cut. In the end, I used almost 1/2 mile worth of dowel rods, but you can scale your sculpture to whatever size you’d like. This project will require some image processing and carpentry skills. A description of it is also listed on my website: jrbums.com. Thanks for checking it out!
Step 1: Supply List


Materials:
1. 5/16" x 48" Birch Dowels – determining the number you will need is explained in step 3, it will probably be more dowel rods than you have ordered in your entire life (I ordered here: http://www.cincinnatidowel.com/)
2. ¾” thick plywood (I think I used birch: http://www.homedepot.com/p/Columbia-Forest-Products-3-4-in-x-4-ft-x-8-ft-PureBond-Birch-Plywood-165921/100077837)
3. Painter’s tape
4. Elmer’s wood glue
5. Wood putty
6. Metal tubing with 5/16” diameter (For 90 degree drill guide).
7. Zip ties (For 90 degree drill guide).
8. Cheap plywood (For circular saw guide)
9. 2 in. x 4in. x 96 in. Prime Kiln-Dried Whitewood Stud (For circular saw guide)
10. Fine sand paper (around 200 - 300 grit)
11. Paint (optional)
Tools:
1. Power drill and 5/16” drill bit for wood
2. Circular saw
3. Power sander
4. Adjustable T-Square (http://www.homedepot.com/p/Empire-48-in-Adjustable-T-Square-419-48/100653520)
5. MATLAB, or another image processing software
Please use safe woodworking practice during this project! There are a ton of dowel rods to be cut, so you must be very focused and take lots of breaks.
Step 2: Transforming a 2D Image Into a 3D Model


In order to determine the lengths of the dowel rods in the sculpture, you will have to do some image processing. I used Matlab, and posted the code in step 3 of this instructable. You can use another image processing software program too.
To visualize the transformation from RGB to intensity, I have a video shown above. A false colormap is used to display the intensity of the image (red is high intensity and blue is low intensity). The other video posted above shows the transformation from a 2D intensity image to a 3D object.
Loading the image
The image of the hot air balloon was loaded into Matlab and converted to a grayscale image. Here is the code to do this in Matlab:
A = imread('ball.jpg'); % load image into matlab
A = rgb2gray(A); % convert RGB to grayscale
A = double(A)/max(double(A(:))); % normalize the grayscale image and convert to double
Downsampling the image
The original dimension of the image was 2572 x 3873, way to many dowels to cut by hand (unless you want to go nuts!). Therefore, the image is downsampled so there are much fewer pixels, and therefore much fewer dowel rod to cut. I also used a spatial filter to smooth the image so that the structure would appear more continuous. Finally, the image is normalized so that the maximum intensity is 1.
A = imresize(A, 0.0205); % resample image to 2.05% of the size of the original image
A = medfilt2(A); % smooth image
A = double(A)/max(double(A(:))); % normalize the grayscale image and convert to double
Converting to dowel rod length
At this point, the image is stored as a 53 x 80 matrix with values ranging from 0 to 1. To convert this matrix to one consisting of dowel rod lengths, you multiple it by the maximum height you want your dowel sculpture to be. I chose 60 cm for mine. You then need to add some extra length to the dowel for pushing the dowel rod into the board. This also ensures that that the dowel rod cuts weren’t too small. I set this to 2.5 cm (1 inch).
AmaxH=60; % Max height of sculpture (in cm)
drillDepth=2.54; % Additional length added to dowel rods so that it can be pushed into board (1 inch)
Alength=A.*AmaxH; % Multiple image matrix by max height to convert image matrix to dowel rod length
Alength=Alength+drillDepth; % Add drill depth
In this part of the project, you will decide how big you want the sculpture to be. You can adjust the scale of the downsample (adjust scale in imresize), and the maximum dowel height. Cost and how long you want to take on the project should be considered when selecting the scaling. Even the 53 x 80 pixel sculpture I constructed required cutting 4240 dowel rods! This project took way longer than I thought it would, and I wished that I had taken more time considering how much to downsample the image.
Step 3: Determining the Number of Dowel Rods Needed
In this project, there are many dowel rod cuts of variable length. Therefore, I came up with an algorithm that minimizes the number of dowel rods that you need to order. After processing the image, you will know the lengths of cuts that you need to make. You also know the length of dowel rod that can be ordered (in my case, they were 4 foot dowel rods). I used a numerical method for solving this problem.
My algorithm cycles through columns in the image and adds up the heights. If the next height in the image exceeds the length of the dowels that can be ordered (a little less than 4 feet to account for cutting), then it is skipped. This process is continued until 4 feet is reached or when you cycle through the entire image. A data structure is then created that specifies the length of the cuts that are made for each dowel rod you order, as well as the location of that piece in the image. This approach helps to keep the cuts of one dowel rod close to each other so as not to mix them up. It is not the most efficient and not an exact solution, but it works.
The video shown above explains how the minimization algorithm works and how the data is stored and displayed. Code for processing the image, minimizing the dowel rods cut, and displaying the output is attached.
Here is a summary for my dowel rod sculpture:
Image dimensions: 53 x 80
Number of cuts: 4240
Total length of dowel rod used: 76847 cm
You need to buy 646 dowel rods with unit length 119.92 cm
Attachments

Step 4: Creating the Pegboard for the Sculpture


Cut the plywood with a circular saw or table saw. The dimensions need to match the number of pixels you have and the spacing you desire. For example, I had 53 x 80 pixels and wanted spacing of around 1.5cm so the plywood was cut to 82.5 by 123 cm.
53*1.5 + 1.5*2 = 82.5 cm (the 1.5*2 is for the border)
80*1.5 + 1.5*2 = 123 cm
Using the adjustable T-square, I drew lines for all the row and columns that would be in the sculpture. I then constructed the device designed by Izzy Swan to drill 90 degree hole into the plywood. Here is a link to the video he posted.This device worked very well for drilled straight holes of the same depth over the entire board. Any bad marks left on the board were then cleaned up using wood putty.
An optional step is to paint the board. I did this to cover up some of the putty and bad spots. The painting is of the contour lines of this image. In the final sculpture it is difficult to see this painting due to the density of dowel rods.
Step 5: Cutting Many Dowel Rods


In the next part of the project, you will have to cut a lot of dowel rods and keep track of their position. I decided to cut five dowel rods at a time (I’ll refer to this as a bundle of dowel rods). The cutting algorithm that I created displays the length that each dowel in the bundle needs to be cut (see the picture). I measured this distance with a ruler and marked it with a piece of painter’s tape that completely wrapped around the dowel. This is important because it prevents the dowel rod from splintering when being cut with the circular saw. The bundle of dowel rods is then aligned for being cut with the saw.
I designed a wooden holder out of cheap plywood and 2x4's that enabled the bundle of dowel rods to rest in a slit. Perpendicular to this slit was a guide for the circular saw. With the dowels secured in place with tape, the circle saw is dropped along the guide to cut all dowels in the bundle at once. The dowels are then labeled so you know where the dowel rods will be placed in the pegboard. The cut number was all that was required because the actual position is stored in the program that I created. This procedure is repeated until all cuts are completed in the bundle, and then five new dowel rods are cut. Because there are so many cuts, it is very important to stay focused and to take lots of breaks. The video above describes the entire process as well.
In the end, there are a ton of dowel rods to place in the board, so it is crucial to use an easy to remember labeling system. The image above shows only half of the dowels cut in this project!
Step 6: Placing the Dowel Rods Into the Board


You officially have a TON of dowel rods cut. In order to efficiently place them into the board, it may be useful to create a few temporary holding boards out of the cheap plywood. In one of the pictures, you can see a temporary holding board that corresponded to around five or so columns in the pegboard.
The cut dowel rods were unpacked and the end was sanded with fine sand paper. This job is great to share with a willing friend. It is a true test of friendship. After your friend helps, you are required to cook them a dinner or help them with another DIY project.
After sanding, the dowel rods are moved to the temporary holding board. The labeling convention and the output of the Matlab program is used to place each dowel in the correct position. A dab of wood glue is added along the edges of around five holes along a column in the pegboard. The corresponding five dowels are then placed in the board. You can use a hammer for driving the dowel rods into the board completely.
The reason for aligning several dowel rods at a time is to make sure that the dowels "made sense" in the position they were being placed. If a dowel looks too small or too short, you can double check the program for the length that is supposed to be at that position. You may have to recut dowels or you can adjust how far you drive the dowel rod into the board.
I repeated this placement and alignment of dowel rods for around three columns at a time. I also designed and 3D printed an alignment tool that went at the end of the dowel rods so it was easier to ensure that the dowel rods were straight when the wood glue dried. You can see this adapter being used in one of the photos. An STL file for this adapter is attached. You may have to redesign depending on the dowel rod diameter and spacing.
Attachments

Step 7: Finished Structure and Some Advice


Once you finished placing and aligning all the dowel rods into the pegboard, your sculpture is complete! Shown above are a few more photos of the dowel rod sculpture that I constructed. For the most part, I am happy with the end results. However, there are a few pieces of advice I have for anyone thinking about doing a similar project:
1. Consider doing smaller dimensions than this structure (53 x 80). This project was a blast in the planning stages, and was pretty meditative after all the kinks were worked out. However, the manual labor sometimes became monotonous. It also took me a looong time to complete, around two years after the day I conceived the idea!
2. Use thicker dowel rods and/or make the maximum height of the dowel rod sculpture shorter. Even with the alignment tool, I had difficulty keeping the dowel rods well aligned. Larger diameter dowel rods or shorter heights would have helped.
3. Use a higher quality piece of wood than plywood for the pegboard base of the sculpture. Underneath the sculpture there are cracks from hammering the dowel rods too far into the board.
4. Don’t take a lot of time painting the pegboard; the dowel rods cover up most of it anyway.
5. Ask friends for help! Sanding 4000 dowel rods is an odd task to complete, so why not share it with a few good friends.
Good luck!


