

Introduction: Electric Vise (UPDATE ON OFF ON SWITCH)


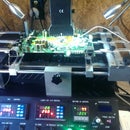


i love my little pan vise i use it for a lot of my repair work and for holding circuit boards for soldering the only problem is that the vise only moves a little with each rotation so going from a small circuit board to a large circuit board seems to take forever. so i decided to look around the shop and see what i had laying around and between a old ps1 a rc car and my arduino starter kit i had everything i needed to make my electric vise.
Attachments

Step 1: Parts Needed


- pan vise i got mine from radioshak for around $20
- soldering iron and solder
- small electric motor/ i pulled mine from a broken ps1 disc drive
- push button
- double pull double throw switch
- rc car strut bar
- super glue
- power supply/ im using a 8v power supply from a ps2 slim
Step 2: Fitting the Motor to the Vise


at this stage i was just going for proof of concept and making sure my motor would be able to spin the vise.
- the first thing your going to want to do is find a drill bit the same size or a little smaller then the spinning part of your motor
- now do the best you can to get center on the vise handle and drill your hole and make sure your motor will fit in the hole
- before making anything permanent hold onto the motor and apply power and see if its strong enough to spin the vise handle
- if you were able to spin the handle with your motor go ahead and add some super glue to the hole and put your motor back in the hole and give it a few minutes to dry
Step 3: Securing Your Motor to the Vise


now you want to make sure your motor dosent spin freely and not rotate the vise handle.
i had a old rc car laying around and i was able to use the strut bar to secure the motor to the vice i aligned everything up then super glued it in place and gave it time to set.
i know everyone dosent have a rc car laying around so you can use anything that you can find to secure the motor to the vise.
i did find the rc strut bar worked really well my hole wasn't perfectly aligned and this caused a lot of vibration but the strut bar has ball joints on both ends that allow everything to stay secure but still allows play in the motor to wobble a little bit since its not perfectly aligned.
after everything dries go ahead and add power to your motor to make sure everything is set right and its working you just need to switch the positive and negative wires to make the motor spin forward or backwards.
Step 4: Wiring


for the wiring you want to use a double pull double throw switch so that you can switch between forward and reverse and a pushbutton to actually start the motor.
- the 2 center pins are for your power if you look at the diagram i have them labeled 2 and 5 go ahead and attach positive to pin 2 and your negative to pin 5
- now your going to add wire to pin 1 and pin 6 you want to wire these to the same side of the motor so if your motor has red and black wiring attach pin 1 and pin 6 to red on the motor
- now add wire to pin 3 and pin 4 these 2 wires are going to be connected together to one side of the pushbutton then take the other side of the push button and wire it to black on the motor
now to test and make sure everything works
push your switch up then press the push button your vise should start to close.
push the switch down and press the push button and the vise should start to open
if your open and close are backwards on your switch simply switch the wires around on your motor so pin 1 and 6 will now be black and the wire from your push button will now be red
Step 5: Finishing
this was put together in less then a hour with parts i had laying around. radioshak and other stores sell nicer larger switches and push buttons in a few days i will pick some up and build a nice housing for the buttons to attach to my work bench i would highly recommend starting out with the bigger push button and switch there a lot easier to work with and they look a lot nicer.
thank you for reading my instructable i hope you enjoyed it.
Step 6: UPDATE WITH ON OFF ON SWITCH


i got rid of the small circuit board setup when my new switches came in there dpdt on off on switches you wire the same as the other switch butt you dont need the pushbutton anymore doing this cleaned the project up and made it much simpler to use.

Participated in the
Green Electronics Challenge

Participated in the
Full Spectrum Laser Contest

Participated in the
Gadget Hacking and Accessories Contest


