

Introduction: ISteadii 2.0 - Image Stabilizing Unit


I would like to introduce to you, the iSteadii .
Its task is to act as an adequate stabilisation unit, for a Compact point and shoot or a DSLR camera.
The principal is based on a floating buoy. The mass of the camera is equalised by the
counter-weight, which is self locating. Therefore deadening fluctuations of movement.
Camera lenses today, come with options such as image stabilisation. Not only are these lens expensive, compared to their counters, they are not always the best bang for your buck.
This little unit should only set you back a few dollars, that's if you don't have the parts already laying around your house.
There is an iSteadii 1.0, yet this is a vaste improvement on that design. It deserves its own I'ble, which it may get at a later date.
By no means will this perform as well as a normal stabilising lens, but then again it does not cost as much.
On that note I give you iSteadii 2.0
Step 1: What You Will Need

Before you start you will need the following-
~ Utility Knife
~ Tennis ball
~ Sharpie
~ Pliers
~ Spanner to suit nuts
~ Tape
~ Threaded bolt 1 - 1 1/2 inches long or 25mm - 37.5mm with 1/4-20 thread type (Head type irrelevant)
~ Nut to suit x 2
~ Washers x 2 (approx 3/4 - 1 inch)
~ Lead sinker (sphere type, atleast 8oz)
Step 2: Getting Started


Take your tennis ball and choose a position, where the seam of the ball does not run underneath it. This is because the seams cause some degredation, to the fluid movement of the sinker, at the bottom of the ball.
Mark with your sharpie a line slightly wider than your sinker.
WARNING- The next proceedure can be dangerous, if done in a rush or carelessly. Please take your time. If you are under 18 I strongly suggest you get Mum or Dad to assist. Removing the dags from the lead is easy with a sharp utility knife, yet some pressure is required.
I assume no responsibility for you injuring yourself, from following these instructions. This is a guide only and it is your responsibility, to not attempt this, if you are not capable.
Use your utility knife to cut open the ball along the line.
Before we insert the sinker we need to take the dags from the lead mold off, so it resembles an almost perfect sphere.
Once you have done this insert the lead sinker.
Step 3: Creating the Pinch Bolt

Take your bolt and place the two washers on it, then the nut.
Thread the nut down far enough to expose a short length of thread.
The first washer will be inserted inside the ball, the other remains outside the wall.
When we tighten the nut it will "pinch" the tennis ball wall.
Step 4: Inserting and Tightening Up

We now need to insert the bolt and tighten it.
This can be a little tricky.
Insert the first washer leaving the other outside the wall.
We now need to tighten the bolt.
This is where the pliers, spanner and tape come in.
Take your tape and wrap it firmly around the exposed thread. Put enough on it, so the pliers will not damage it when gripped.
Grip the taped thread with some force and use the spanner to tighten the nut.
Not much pressure is required to sandwich the wall, so you should not damage the thread.
We're almost there!!
Step 5: Attach to Camera


Attach the unit to your camera tripod mount and away you go.
You will note there is now, a strong center of gravity located below the camera. It is a strange feeling to get use to at first, yet so is an image stabilising lens to begin with.
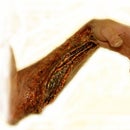
I took this out and shot 20 frames, both with and without the unit.
These are the best of each.
First is with the unit on, the second is without.
You be the judge.
Please note~ These are taken zoomed in, not widefield.


