

Introduction: Radioactive Chair


so i was tasked with producing a chair for 7-8 year old children for my coursework, but me being me i wanted to be able to use it too so i decided to make it truly versatile and make a chair that could be used by almost anyone from about the age of 7 upwards.
After much research and tedious design, here is what i came up with.
Step 1: The Design and Materials


i wanted a design that would appeal to as many different age groups as possible but still keep it stylish enough to keep in the house.
but with all this in mind i also needed to produce the whole thing within a budget of £100 and also within a time frame of a month.
after weeks of deliberation i decided on the barrel design because barrels are cheap if not free, they are made of steel so are strong and durable and also easy to finish.
Materials
- the obvious choice for the body of the chair was an 88 gallon oil drum, they are easy enough to get hold of, i went down to a local fuel supplier, not like a fuel station but one of the depots that the oil companies distribute fuel from.
- some rubber edging, i got mine from a local hard wear store that sells rubber seals.
- 12mm marine ply, i managed to get hold of some scrap wood that was perfect for this project but otherwise you can just buy some.
- i decided to add a wheel base that can be removed and replaced when wanted.
- for the internals i used two pieces of 25mm mild steel box section for the supports.
- green and yellow acrylic paint for the detailing
- wood and metal primers
- super matt black paint
- areldite glue, small nails, frog tape, rollers, angle grinder, etc.
Step 2: Cut and Clean

the first step was to open up the oil drum and clean it out
to do this i first cut off the top using an angle grinder and began to pour out the oil, nasty messy job with oil everywhere.
i then used a strong detergent to get the grease/oil off the surface of the drum, this will bereally important later once you start welding.
Step 3: Mark Up and Cut Up


once clean, i marked the shape that i wanted the barrel to be in first using a marker pen then some frog tape (bright green painters tape)
1) then using an angle grinder i cut up the barrel, VERY noisy so make sure to wear ear defenders... my first mistake.
2) then i used another grinding wheel to remove the burs and smooth the sharp edges.
this step is much easier if the barrel is really clean and dry as you can then just use a vacuum cleaner to remove all the metal filings from inside the barrel, yet another mistake i made.
Step 4: Welding


in this step i cut and attached the 25mm box section mild steel to the inside of the barrel.
1) using a hack saw, or in my case a mechanical one, cut the 25mm box section to 400mm lengths.
2)using a 572mm diameter circle, i made section of it out of card, mark the edges of the box section so that they will fit flush inside the barrel. then cut this shape out with an angle grinder or hack saw and ensure that they fit nicely inside the barrel.this is really important in order to get a strong and clean weld!!
3)secure the box section on either side of the barrel 12mm from the hole for you to sit in (refer to diagram below). for this i used a mixture of scrap wood to prop the pieces up and some strong welding magnets to hold the metal in place. ensure that they are level otherwise the seat wont sit level!
4) then carefully weld the box section onto the barrel. be careful as the barrel is very thin and, as i soon found out, it is easy to bun through the metal. please excuse my poor welding skills.
5) then grind down the excess metal from the welds on top of the bars. again this is important for the seat to sit level.
if you don't have access to welding equipment i would suggest making supports from the bottom of the barrel rather than attaching it to the sides.
Step 5: Back, Seat, and Base


I then made the back and seat part of the chair. the seat part is pretty simple, just a 572mm diameter circle of 12mm marine ply wood. the back consisted of two right angel triangle pieces with a 15º to the vertical hypotenuse. then one 300-550-12mm piece of marine ply to make up the back.
the base was made of another 572mm diameter circle of 12mm marine ply except i then added 4 sets of caster wheels to the bottom.
once all this is done, sand it all down, fill any gaps, prime everything with wood primer, then paint with whatever colour you like (i used some super matt black paint for the design i was going for)
1) cut out the triangular side sections with a base of 141mm and a height of 530mm. then sand all the faces and edges
2) cut the 300-550-12mm section
3) tack and glue the sections together to give you the back section. as shown below.
4) cut out the circles for the base and the seat.
5) finishing
once all this is done, sand it all down, fill any gaps, prime everything with wood primer, then paint with whatever colour you like (i used some super matt black paint for the design i was going for)
make sure
6) i then added the 4 sets of caster wheels to the base. i just marked two perpendicular lines across the diameter of the base then inset the caster sets by 50mm so that they would be less visible.
Step 6: Finishing Up the Barrel


finally after cutting everything up, i primed the metal using hammerite oxide red primer (its excellent at preventing corrosion).
i then took the barrel to a local car repair workshop to have it professionally sprayed as i don't have access to any spraying equipment, they can give it a much more even finish than hand painting it, and it worked out to be a lot cheaper than buying the same quantity of spray paint.
I then made some stencils to use to put the radio active design onto the sides to give the chair its finishing touches. i first drew out the design 1:1 scale and cut it out of thick card.
i then used this as a template to cut sections of frog tape to mask off the arias that i wanted to stay black around the design and leaving the areas exposed that i wanted yellow.
i bought some small pots of yellow acrylic based paint and rolled the paint onto the barrel. this method was much quicker and gave much better results that trying to paint it on by hand!
then as a finishing touch, using some bright green acrylic paint, i painted on some 'drips' from the top. i did this by hand as it didn't need to be precise and making a stencil would have taken far longer than a bit of steady hand.
Step 7: Upholstery and Covering the Edges


because of my complete lack of textile skills, i had the back and seat part professionally upholstered. he did a far better job than i could have ever hoped to do!
i managed to scavenge some off cuts of the green fabric from a local firm. i manged to get some high quality, course, and heavy duty fabric so that it wouldn't get damaged my me or my viscous cats!
i then fitted the back piece to the seat part using some areldite glue and tacks, it didn't need to be strong as it wasn't going to be supporting any weight.
once i had wresled the seat into the barrel and made sure that it all fitted, i used some rubber edging (i dont know the technical words) to cover up the sharp edges left from the cutting and it added a better look to the seat.
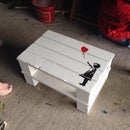
Step 8: Finally Finished!!


well that about it, i did have some ideas about adding lighting to the insides of the storage compartment but that will have to wait
thanks for taking a look and good luck to anyone who takes inspiration from this id love to see any developments on my design!

Second Prize in the
Instructables Green Design Contest

Participated in the
Epilog Challenge V


