Introduction: Scrap Ends Table
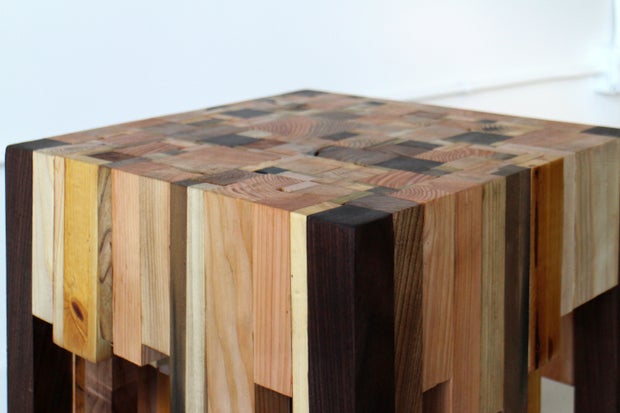
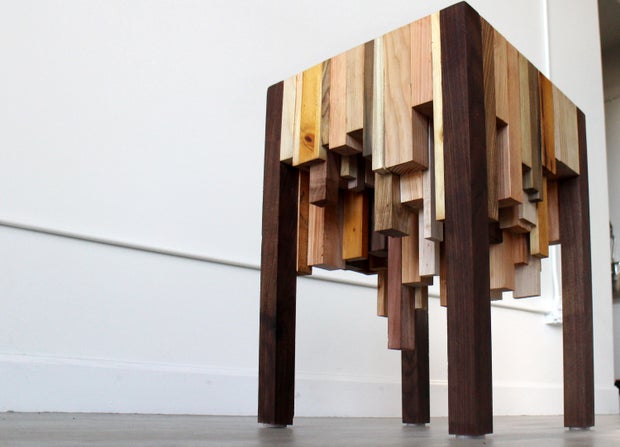
It might be hard to believe, but this attractive end grain table was made almost entirely with scrap wood. It looks amazing and is easy to make as it doesn't matter the size or of the scrap wood you use, or that you aren't precise with your cuts.
The only parts of this project I bought were a 3' section of walnut post and felt pads for the bottom of the feet, the rest was all leftover wood. Making an end grain table from your own scrap wood pile is not only a great reuse, but gives any nice wood scraps you have a new life.
Here's how I made it.


Step 1: Scrap Wood
We have a full wood shop at my work, with loads of people making all kinds of things. We have a "leftovers" bin where larger pieces of wood can be stored and are free for anyone to use. Some of the wood in there are really nice, but usually too small to do anything useful with.
With the exception of the walnut corner/leg pieces, this end table was made from salvaged wood from the leftover bin or the garbage. I used a combination of softwood and hardwood, and think I lucked upon some exotic wood, too!
There were bits from old furniture, weird edge bits, and off-cuts from projects that didn't work out. Some wood looked brand new and some looked like it had seen better days - all was fair game to be included in this table.
Step 2: Square and Cut to Size
This table used a lot of wood. Before we can get started we'll need to prepare each piece to make the assembly much easier.
Each piece of scrap wood was squared up using the planer and table saw, and the larger scraps were cut in to multiple pieces and down to more manageable dimensions. Knowing I wanted an irregular height bottom to my table I deliberately chopped any similar length pieces to have different lengths. Those cut offs were also saved and used.
Since most of the wood doesn't have a common dimension we're going to have lots of gaps, you're going to need thin pieces of scrap wood, too. Save all your cut-offs, chances are you can use them to fill in gaps later.
Step 3: Corner Legs
I had a really nice piece of walnut that I bought and thought it would be perfect in this project.
Marking the center on the end I bisected the piece on the table saw, then ripped the two halves in half again creating 4 equally square legs. Using a table saw sled I squared the ends.
Step 4: Planning Arrangement
Once I had my wood squared I roughly arranged them by length. This table is built upside down, so you'll need a flat work surface to assemble the pieces. Before any gluing I arranged the cut wood vertically to get get an idea of placement.
It was here I realized that I could cut most of the pieces and create more surface area from the cut-offs. I went for a design that had longer pieces in the center and shorter pieces closer to the edges.
Step 5: Edge Glue Up
Before starting any gluing, my work surface was covered with paper. Since this table is constructed upside down I knew that a lot of glue would drip from between the pieces, and I didn't want to glue my table to the table.
I planned my table surface to be 16" square, so I made a template from a straight piece of wood that was marked at 16". The walnut legs were clamped (not glued) to the template at the 16" mark to make the boundary, then scrap wood was glued to fill the space between the clamped legs using the template as a guide to keep the edge straight. Allow glue to dry completely. Repeat this process for each side of the table to create the table perimeter.
Step 6: Interior Assembly
After the perimeter of the table is constructed and the glue has dried we can focus on building up the interior. Starting with shorter pieces closer to the edges, wood scraps were glued to the the perimeter working inwards. I paid attention to wood height and tried to space out similar types of wood.
Fill entire interior of table with scrap wood, you may have to reconfigure some of the pieces as you go along to create the best arrangement based on your scraps. I used clamps to keep the perimeter stable while I built the interior.
When I couldn't get any more wood into the interior I let the glue dry overnight.
Step 7: Flip Over
Once the glue has dried completely the table was flipped over and the protective paper was peeled off. Despite my best efforts to fill the table with wood there are plenty of gaps, we'll fill these in with thin scrap wood, this time with the table right side up.
Step 8: Fill Gaps
With the table standing upright, fill in the gaps with more scrap wood. An easy way I found was to give small scraps a slight taper, allowing the tapered end to be inserted into the gap with a bit of glue to act as a plug.
Once all gaps were filled the glue was allowed to dry completely. The plug ends were then trimmed with a coping saw.
Step 9: Router Top - Make Level Edging
Though the table was constructed on a flat surface, and it looks flat, there's a lot of variation on the surface. We'll router the top to make a flat and level top, this is easier and produces better results than just trying to sand the top down.
To router the top we'll need to set up a level edge for the router to float on. I started by measuring from the ground 24" inches, then nailed a straight board level to one side. I repeated this on the opposite side to create level and parallel rails for the router to ride along.
Next I needed to make an extended table for the router to sit on in order to reach the parallel rails. My rails were 16" apart so my router table needed to be at least double that in order to reach both sides. Using a long and thick piece of flat plywood I drilled an opening in the center for the router bit, then drilled more holes for the router collar to be screwed into. I also made a spine on my router table to keep it from bowing during operation. All screws were countersunk to hide the screw heads inside the piece and keep a level base for the router to glide on.
Step 10: Router Top - Leveling
With the router table and level parallel rails on the table the surface can be leveled.
The router depth was set to take off about 1/2", then the router was carefully placed on the rails and worked around the entire surface of the table top. This table took about 30 minutes to router.
This also make a huge mess. Which is fun!
Step 11: Sanding
After leveling the table surface we can start sanding. I started at 100 grit, then worked my way to 220 grit and got a very nice and smooth finish.
Because there's a mix of hard and soft woods in this project it sands unevenly, and care was taken not to sand too aggressively and create low spots where the softer wood sanded faster.
Step 12: Sand Edges + Sides
I sanded the edges and sides with 180 grit to get rid of any sharp parts and smooth any rough spots. I wanted to leave the sides mostly rough, as I think it adds to the character of the table.
Step 13: Finish
To seal and protect the table, and to really make the end grain pop, I used a few coats of Danish Oil. Wearing protective gear and working in a well ventilated area, Danish Oil was added to a rag and rubbed into the table. After application, excess Danish Oil was wiped clean. A second coat was applied after about an hour.
Step 14: Felt Feet
To protect the floor wherever this table ends up, and to make it easy to slide around, felt pads were added to the feet of my table.
Step 15: Place
Your scrap wood table is now ready to be placed. My table is about 24" high and works perfectly as a couch end table, and having it close to my front door of my apartment means it's sure to get plenty of adoring looks when people enter.
Calling all woodworkers! Have you made your own project using scrap wood? I want to see it!
Happy making :)


