

Introduction: Switches


In your lifetime you have used many thousands of switches. Every time you enter a room and turn on the light, you are using a switch. When you get into an elevator and press the button, you are using a switch. When someone cuts you off in your car and you lean on the horn, you are using a switch. When you are programming the time on the microwave to reheat leftovers, you are using switches. The list goes on and on.
Almost all electrical devices have at least one switch and they play a vital role in all electronics. Fortunately, they are extremely simple to understand.
Step 1: How a Switch Works

A switch is the simplest device you can imagine. It is basically a mechanical device which makes or breaks a circuit. In other words, a switch consists of two (or more) conductive terminals that can be connected or disconnected with a mechanism (such as a lever or button).
In this example, you can see that I have replaced the push button of the auto-waving novelty flag with a knife switch. When the metal bar closes between the terminals, the two wires are connected and the flag waves. When the bar is lifted, the switch is disengaged and the flag stops.
Step 2: Poles and Throws

Of course it gets a bit more complicated than that. Switches can make or break more than one connection at a time. Switches consist of poles and throws. You can think of a pole as the point a switch enters a circuit and the throw as the potential exit points.
The most basic switch has a single throw and a single pole, since electricity only has a single point of entry and exit. This is often referred to in shorthand as SPST.
If we were to add another throw or exit point, we have created a single pole, double throw - or SPDT - switch. This allows you to toggle between two different electrical pathways.
We can also add additional poles. If we were to add another pole to the SPDT switch, we would get a double-pole double-throw (DPDT) switch. This is basically the same as having two separate SPDT switches that get toggled by the same lever.

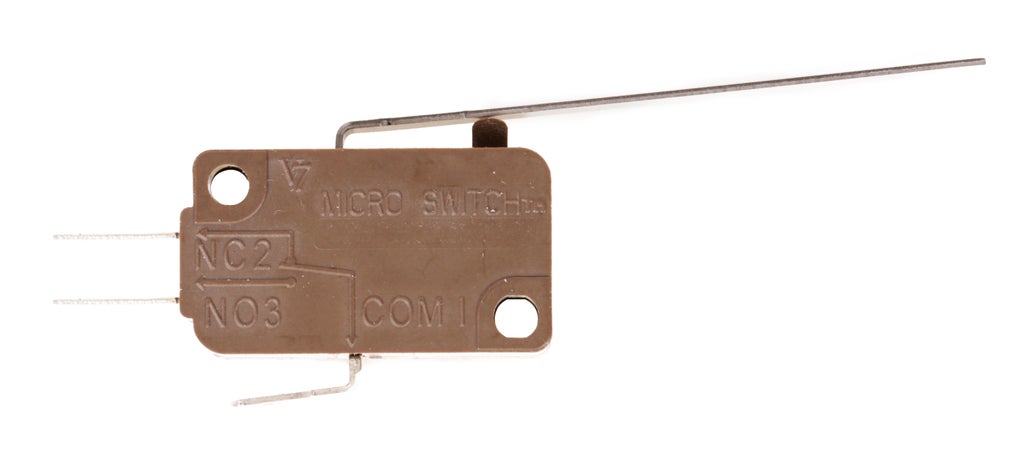
The easiest way of determining poles and throws on a switch is with the continuity setting on a multimeter. Touch the probes to the different terminals until you get a connection. Once you have determined which pins are connected, flip the switch to its other position(s) and check again to be entirely certain.

There are all kind of different pole and throw arrangements you will find. For instance, this pushbutton switch has three input poles, and two output throws. This is what is called a 3PDT switch (three poles, double throw). On the other hand, this rotary switch has two input pole and six throws. This is a DP6T (double-pole, six-throw) switch. This type of switch gives you a lot of different output choices.
Which brings us to our next point...
Step 3: Types of Switches
Switches come in a bonanza of different form factors! This means that they come in all shapes, and sizes. They also have a host of mechanisms; some of which will be familiar to you and some which you may find surprising. Here is an extensive, but by no means exhaustive list of common switches you may encounter.

A knife switch is one of the oldest forms of switch, and likely familiar to you if you are a fan of old monster movies. It's about as simple as switches come, consisting of a metal bar with an insulated handle that bridges two (or more electrical contacts). In the switch pictures, when you lower the lever onto the terminal, it makes a connection and completes the circuit. Otherwise, no circuit is made.

Getting a bit more advanced, we have a toggle switch. This type of switch has a little lever that is toggled back and forth to activate the switch. By flicking the lever back and forth, you can make or break one or more connections.The nice thing about these is that they are typically mounted to an enclosure using a round hole, which make installing them a breeze.

The standard light switch is basically little more than just a specialized toggle switch meant to handle a fair bit of electricity.

Very similarly to the toggle switch, the rocker switch moves back and forth. Instead of being pushed back and forth, it "rocks" or pivots along its center axis. They are commonly used as power switches and are sometimes illuminated (i.e. internally light up). These are typically mounting using rectangular holes, which makes installing them into an enclosure very annoying.

Just like toggle and rocker switches, the slider switch toggles back and forth. Unlike a toggle switch, the lever switch can have multiple positions to toggle between. However, most of the ones you might encounter are typically just two positions. These are commonly found as power switches in consumer devices.

A pushbutton switch is activated when you push down on it. These are found everywhere from elevators, to arcade machines, to game shows, to consumer products. They share the ease of mounting that we have come to know and love from the toggle switch.

The tactile switch is basically just a small pushbutton switch that gets soldered directly to a circuit board. Most small electronics devices with a pushbutton interface are actually using one of these with a custom molded plastic cab on top of it. These are actually everywhere, but you likely have not seen them anywhere unless you have a penchant for taking things apart.
The lever switch is like a pushbutton switch, but has a lever which adds a mechanical advantage. The benefit to this is that it can be activated with very little force.

On the contrary, rotary switches typically require a fair bit of force to operate. However, what they lack in ease of activation, the more than make up for in number of inputs and outputs. By turning the knob you can toggle between a massive amount of different configurations of inputs and outputs. These switches are great when you need to toggle between lots and lots of different circuit combinations.

The DIP switch is another switch with lots of different inputs and outputs. However, instead of toggling between inputs and outputs, this switch is really just a whole ton of SPST switches jammed together in a single package and mounted to a circuit board. You normally see these used when you need to configure a circuit to perform in a different way and leave it. For instance, each tiny switch could represent a different setting within a circuit. This are commonly used for things such as setting custom security codes for garage door openers.


Speaking of switches and home access, the reed switch is commonly found as part of many home alarm systems. While it may seem complicated, it is actually just a switch that is activated by a magnet. In your home, the way it works is that when people open the window and slide the magnet away, the switch gets triggered. It's actually a really simple device consisting of two metal plates that are either pulled together or pushed apart depending on whether a magnet is present. In fact, if you listen very carefully, you can often hear the switch click when a magnet activates it.

Moving on to other esoteric switches sometimes encased in glass, we have the tilt switch. What is cool about the tilt switch is that the connection is made depending on what direction it is tilted. Historically these switches used a mercury bead to make electrical contact between two wires (like the one pictured). However, in modern times, this has been replaced by a much safer metal ball. You can get switches which make or break connections at a number of different tilt angles.
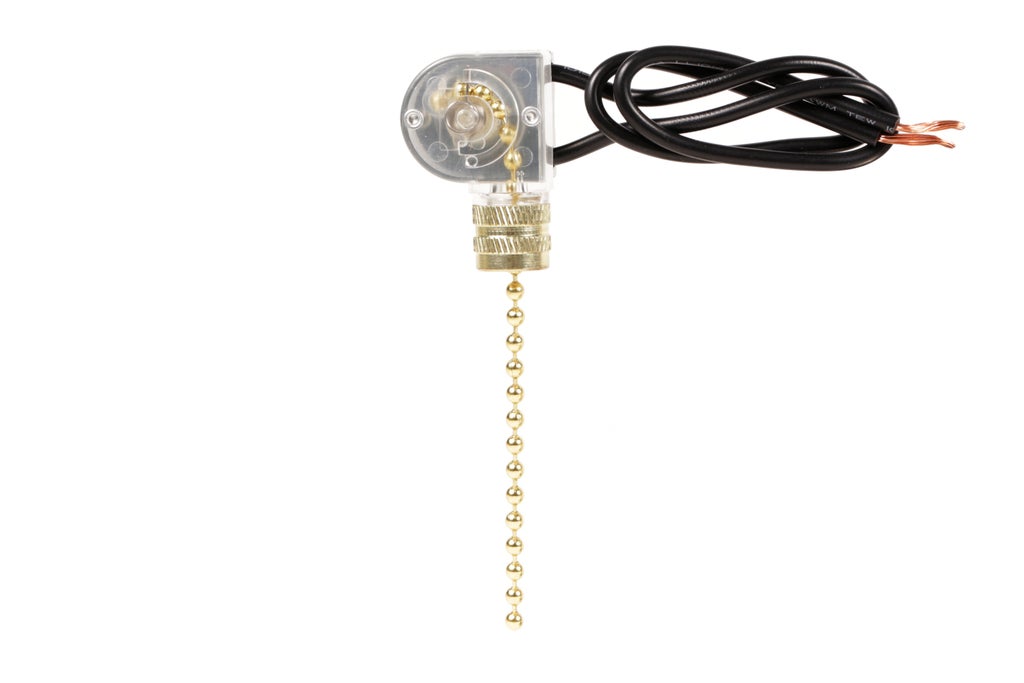
We're nearing the end, but before we get there I would be remiss not to mention the pull cord switch. This type of switch is activated when the cord is pulled and most often used in lamps and ceiling fans. While not used very often in other projects, it could be a fun switch to add to a project for a zany retro feel.

Now we finally reach the end of our switch-a-palooza with the key switch. This switch is activated when a key is turned. These are obviously found in cars, alarm systems, and anywhere where you want to control access. These are always a fun finishing touch to add to hobbyist projects. They make everything seem important.
Step 4: Momentary Vs. Latching
There is another distinct aspect of switches worth pointing out and that is the difference between momentary and latching switches.

A momentary switch is only connected while you are activating it. That means the moment you stop applying force upon it, it toggles.

A latching switch on the other hand is activated with a force once to toggle one way, and then needs to be activated again to be toggled back to its initial state.
While there are a few types of switches which can only ever be one type or the other, most switches can be produced to be either momentary or latching. It is important to pay attention to what type of switch you get.
Step 5: Power!

The size of a switch is typically a good indication of how much voltage and current a switch can handle before it malfunctions. However, to be sure, just look at the switch itself. They typically have their power rating printed on them.


![Tim's Mechanical Spider Leg [LU9685-20CU]](https://content.instructables.com/FFB/5R4I/LVKZ6G6R/FFB5R4ILVKZ6G6R.png?auto=webp&crop=1.2%3A1&frame=1&width=306)


