

Introduction: Arduino Temperature Sensor Using LM35


Introduction
The LM35 series are precision integrated-circuit temperature devices with an output voltage linearly proportional to the Centigrade temperature. LM35 is three terminal linear temperature sensor from National semiconductors. It can measure temperature from -55 degree Celsius to +150 degree Celsius. The voltage output of the LM35 increases 10mV per degree Celsius rise in temperature. LM35 can be operated from a 5V supply and the stand by current is less than 60uA. The pin out of LM35 is shown in the figure below.
Features
• Calibrated Directly in Celsius (Centigrade)
• Linear + 10-mV/°C Scale Factor
• 0.5°C Ensured Accuracy (at 25°C)
• Rated for Full −55°C to 150°C Range
• Suitable for Remote Applications
• Low-Cost Due to Wafer-Level Trimming
• Operates from 4 V to 30 V
• Less than 60-μA Current Drain
• Low Self-Heating, 0.08°C in Still Air
• Non-Linearity Only ±¼°C Typical
• Low-Impedance Output, 0.1 Ω for 1-mA Load
PinOuts Of LM35 is Shown in image.
You can download the datasheet from below file.

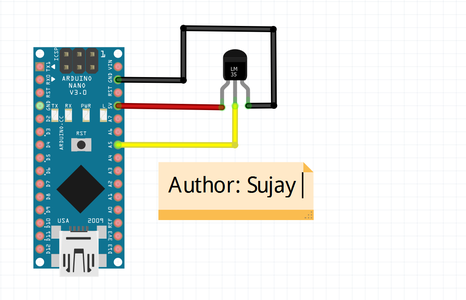
Step 1: Hardware Required and Circuit Diagram


- Arduino Board (Any) Buy it from Flipkart
- LM35 Sensor Buy it from Flipkart
- BreadBoard
Connect the Circuit as shown in image and upload the following code.
Step 2: Programming the Arduino
/*Code designed by Sujay Alaspure in SA Lab */
const int sensor=A5; // Assigning analog pin A5 to variable 'sensor'
float tempc; //variable to store temperature in degree Celsius
float tempf; //variable to store temperature in Fahreinheit
float vout; //temporary variable to hold sensor reading
void setup() {
pinMode(sensor,INPUT); // Configuring sensor pin as input
Serial.begin(9600);
}
void loop() {
vout=analogRead(sensor); //Reading the value from sensor
vout=(vout*500)/1023;
tempc=vout; // Storing value in Degree Celsius
tempf=(vout*1.8)+32; // Converting to Fahrenheit
Serial.print("in DegreeC=");
Serial.print("\t");
Serial.print(tempc);
Serial.print(" ");
Serial.print("in Fahrenheit=");
Serial.print("\t");
Serial.print(tempf);
Serial.println();
delay(500); //Delay of 1 second for ease of viewing }
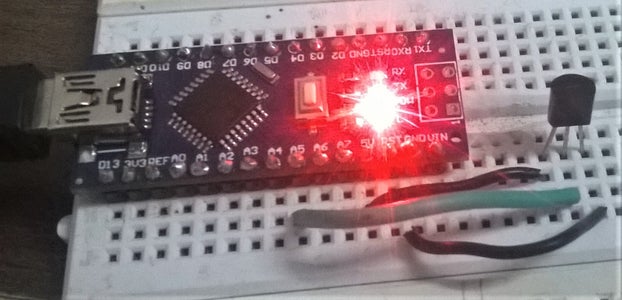
Step 3: Output Result

See the result on Serial Moniter....
First of all, I would like to thank you for reading this guide ! I hope it helps you.
If You have any queries I am happy to help you.....
Drop a Comment. Your feedback is valuable for me.
