Concrete Coffee Table
Intro: Concrete Coffee Table
We were moving into a new house and the girlfriend hated our old Ikea coffee table, so we decided to make ourselves a new one. It's not made of pallet wood, so we're ok there, but we did use threaded pipe... Don't shoot us.
Parts:
- Melamine board for form making
- Dap/Silicone/crack sealer (DAP)
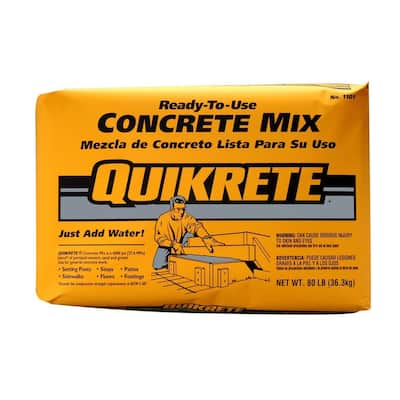
- 2 bags of concrete (Concrete)
- Poly fibres for concrete reinforcement
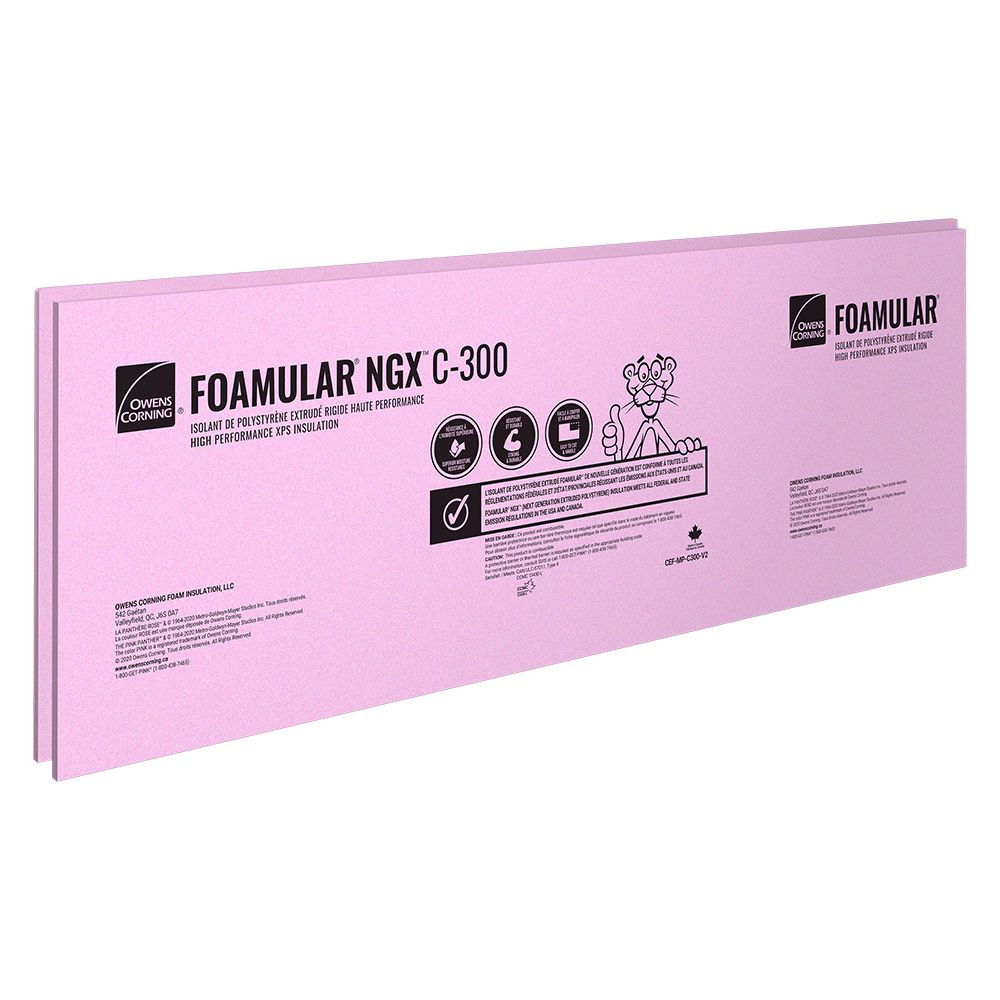
- 1" thick rigid styrofoam insulation (Rigid insulation)
- Threaded pipe fittings, 3/4" and 1/2" (Pipe Fittings)
- Threaded rod and nuts (Threaded Rod)
- Concrete sealer
- Sand paper
- Dust Masks
- Bucket for concrete mixing
Cost: The majority of the cost was in the threaded pipe fittings. They run close to $2 CAD each. We were fortunate enough to get a few things for free as well - Concrete sealer and poly fibres. Our total build cost was $160ish CAD but if we had to buy the sealer and fibres, we would have been about $200 CAD all in.
Dog: Gus had just been neutered when this picture was taken so he has his anti-licking shirt/onesie on. It is almost more ridiculous than a cone.
STEP 1: Build a Form
We used Melamine for the form. The thin sheet on the bottom seemed like a better bet than a 3/4" piece simply due to the cost. We had a heavy board underneath it so it wouldn't be able to flex. The edges are 3/4" melamine.
You use melamine for it's smoothness. Any scratches, dents, blemishes on the form will show up on your finished concrete. If that's the look you're going for, good on ya. If you want smooth: go melamine.
After screwing the whole thing together, we sealed all the edges with Dap to ensure the corners would not leak.
If you look closely at the left "wall" of the form, you can see a pencil line. That line is at the 1/2" mark. In order to reduce the overall weight of the table, we decided to add rigid insulation to the core of the table. Remember how your parents used to have an empty jar or something similar in the toilet tank to take up space so you didn't use so much water? Well, this is the same idea. The insulation takes up the space that would normally be solid concrete, thus reducing the concrete volume used and reducing the overall weight.
Our total table thickness is 2": 1/2" Concrete 1" rigid insulation core 1/2" Concrete
The insulation is cut back about 2" from the long edges and 5-6" from the short edges. This gives us solidity around the whole table and a place to attach our legs directly into concrete and not into the insulation.
STEP 2: Give It Some Legs!
While the dap dried, we put the legs together. We used 3/4" pipe for the vertical supports but reduced down to 1/2" for the horizontals. This saved us a bit of cash.
If you look closely, you can see the threaded rod and nuts sticking out of the flanges on the left side. These will embed directly into the concrete. More on that later.
STEP 3: Call in the Reinforcements!
Again, in an effort to reduce weight, we opted to exclude re-bar or any other reinforcing metal. We went with poly fibres instead. A friend who works for a concrete company gave them to me. I didn't do any testing to see if it was stronger, but it hasn't crumbled yet. 3 months and counting!
STEP 4: Pour It
Sorry, a bit of a jump ahead here we mixed and poured the concrete. My mix was a bit dry but it seemed to go in nicely. We followed the instructions on the bag but could have used more water. Pour 1/2" of concrete into the form, lay in the insulation, fill in the rest. We tried our best to smooth out the concrete, but our troweling skills aren't the greatest, but we like how it came out. A little rough around the edges
STEP 5: Attaching the Legs
This is how the legs are attached to the table. I just used threaded rod and not bolts (as drawn). After we poured the concrete, we placed the legs on the wet concrete and pushed the rods in. They probably aren't gripping as well as we'd like, but they didn't really move after everything was dry, so we called it good. If they come out down the line, we'll just put glue into the holes where the rods were and then put the rods back in those holes and it shouldn't move again. But for now, the weight of the table is holding everything in place.
STEP 6: Poured and Covered!
Sealing in the moisture is important so we laid some poly on top.
STEP 7: Oooooo, Ahhhhh. Unboxed
We unwrapped it after an impatient 7 day cure. It came out of the form pretty well, but peeled a pit of the melamine paper off, which stuck to the table top. Hand sanding and a flap wheel attachment on my drill made quick work of that.
The sanding was taxing, but not terribly difficult. Especially since I just stood around taking pictures and not helping. All of the melamine remnants came off fairly easily.
STEP 8: WE LANDED ON THE MOON!
We didn't get an absolutely flawless finish on the table top, but really, we didn't want it to be perfectly smooth. The pits and air bubble holes add texture and depth. We could have smoothed it out more by vibrating the concrete and having a wetter mix.
STEP 9: Signed, Sealed, Delivered!
We were going to scratch our names into the bottom before it dried, but we waited too long. The nieces were on the driveway drawing with chalk so we decided to do the same. We signed the bottom with chalk and then sealed it in forever!
STEP 10: Sealed and in Place
We sealed the table then added 4 coats of clear on top. Most of the pits and holes filled in a bit but there is still some texture. It's tough to see but it is really smooth! It looks at home in our place and Gus approves! Thanks for looking!
92 Comments
Henryworks 6 years ago
DanL63 7 years ago
CosmicMiami 7 years ago
Looks like a decent first build. I think you will find that the slab will crack when you start moving it around. The foam addition doesn't add strength and in fact weakens the slab.
I don't see a lot of aggregate in your tabletop. Quikrete makes a countertop mix that is high strength. The fiber material you added will not provide continuous support over any length. Adding wire mesh (at minimum) or small diameter rebar would have been much better.
I made an outdoor countertop using Z Counter Forms. It's 2" thick and has a frame underneath. It was cast in place and the durarock bottom stays. Z Forms have some excellent how to videos.
Like you, I thought a wetter mix would work better. I was wrong. In fact, a drier mix is better and then use a palm sander on the forms to vibrate everything into place. Additives may help even though it may increase the cost.
In essence, you have two slabs with a foam sandwich in between. I'm not sure the minimum thickness for a table of this dimension from an engineering standpoint. I'm guessing you could have eliminated the foam, made it thinner, and used steel bar.
Either way, I like the industrial look. Hope it works out for you.
TheOnlyKd 7 years ago
Thanks for the comments. We haven't experienced any problems with it yet. We wanted to maintain that thickness while minimizing the weight. We probably could have put in some steel lathe for support but in all honesty, it's likely overkill - as are the fibres. It's never really going to be carrying a lot of weight so we're not too worried about it breaking.
We also didn't vibrate the forms so that may have helped us.
CosmicMiami 7 years ago
"For additional insurance against cracking, some countertop fabricators add tiny synthetic fibers to the countertop mix. These fibers, alone, will not provide structural reinforcement for concrete countertops, but they are effective at controlling shrinkage cracking. Contractors usually use them in combination with steel rebar or wire mesh."
TheOnlyKd 7 years ago
Well, no going back now lol. If it breaks, we'll deal with it.
mtbike2 7 years ago
If it breaks, accentuate that break. Get you some metal strapping and some sort of off color concrete caulk. Drill and bolt the strapping top and bottom and fill the void with the caulk. Will look even more industrial like in this link http://nextstar.ca/images1/wallrepair.jpg
69Ztang 7 years ago
On travertine they fill some of the voids with something, I wonder what that is because some of the tile I have it came loose and I'd like to refill it.
CosmicMiami 7 years ago
More than likely it's unsanded grout. The same they used for grouting the tile. Hopefully they left you some. If they didn't, try to find out what color they used. If you can't, it's okay. Find something that is close. Nobody will notice. Clean the voids well. Get as much debris out as you can. Using a small foam float. Mix up the grout in a pail and fill the voids. Be sure and use various angles as you float in the grout. Let it dry a little bit and wipe with a clean sponge and clear water. If you have some film leftover after it all dries, you can use an acidic tile cleaner to remove it. Go easy on the acid though. Less is more. If you have sealed travertine, you will need to reseal the portions.
Good luck.
TheOnlyKd 7 years ago
That's a neat idea! thanks!
CosmicMiami 7 years ago
Understood. Just wanted to give a little advice from somebody who has worked with concrete and also done a similar build with a counter top. Looks great.
TheOnlyKd 7 years ago
I appreciate it!
DavidM1069 7 years ago
On the contrary, the poly fiber will add structural integrity, but not protect from flexural loading. The concept of adding "fibers" to increase structural integrity has been used since "ancient times."
Great concept; I would suggest utilizing Lightweight Concrete mixtures as the aggregate is specifically engineered/mined for its lightweight properties. To avoid having to sand; if you use a concrete float (basically a metal trowel) to smooth the surfaces this will bring the liquid slurry to the top and create that smooth look you see on floor slabs.
CosmicMiami 7 years ago
Understood. I guess I should have clarified a little bit. I wouldn't pour anything like this without adding some structural component like rebar or at minimum mesh. I prefer bar although it seems like overkill but hey, why put the effort in without making it Tim Taylor proof? LOL
TheOnlyKd 7 years ago
Thanks for the tips!
coolcrafter101 7 years ago
Is there any way to round the corners? Concrete could really hurt if you hit it with your foot or something. Would you just have to make a different mold?
69Ztang 7 years ago
My tile guy used a grinder with a stone wheel to shape my travertine tile around shower door, so he didn't have to buy the edge tile with the round edges. Harbor Freight has cheap grinders.
coolcrafter101 7 years ago
Wow! Thanks! Thanks all of you guys!!
CPUDOCTHE1. 7 years ago
Probably the easiest would be to get a block of wood that is twice the width and length of the radius that you want for the corner. Then drill a hole in the center of the block that has a diameter of twice the radius of the curve. Then you get four pieces of wood with the correct radius that you can tack into each corner.
TheOnlyKd 7 years ago
The easiest way would be to make a different form. You might be able to grind it down after the fact, but it would be a lot of work and difficult to get all the corners to look the same.