

Introduction: How to Make Line Follower Robot Using Arduino


In this instructable, I will teach you how to make a line follower robot using Arduino, which is a very common microcontroller board. The robot will use two infrared proximity sensors to detect the line and on the basis of input received from the sensors, the Arduino will direct the motors to move with the help of a motor shield.
Step 1: The Working


So there will be infrared proximity sensors placed on either side at the front of the robot. There are four possible sensor outcomes:-
Case 1:-
In this case, both the sensors don't detect the line. Both the motors rotate forward. As a result, the car moves forward.
Case 2:-
In this case, only the left sensor detects the line which means that the car requires to turn in the left direction. The left motor rotates backward and the right motor rotates forward. As a result, the car turns left.
Case 3:-
In this case, only the right sensor detects the line which means that the car requires to turn in the right direction. The left motor rotates forward and the right motor rotates backward. As a result, the car turns right.
Case 4:-
In this case, both the sensors detect the line. This means that the end has come. Both the motors stop rotating. As a result, the car stops.
That is the working structure of our robot...
Step 2: Parts Required
The parts required to build the robot are as follows:
- Chassis (including motors and wheels )
- Arduino Uno r3
- L293D Motor Shield
- IR Proximity Sensors (pair)
- Jumper Wires
- Switch
- 4AA Battery Holder
Tools required:-
- Soldering Iron
- Hot Glue Gun
- Screw Driver
I always prefer Quartz Components for buying electronic components!
Gather these parts and be ready for the next step ...
Step 3: Assemble the Chassis


Now, assemble your robot body. Everyone may have a different chassis. So assemble your chassis accordingly. Most of the chassis come with an instruction manual and even mine came with it so have a look at it and build your chassis accordingly. Then, attach the components to the chassis. Arduino, with the motor shield attached to it and also the battery holder must be fixed on the chassis.
Also, attach the proximity sensors at the front on either side, facing down. Make sure that they are attached at the corners...
Attach the switch too...
Solder wires to the motors and also switch and keep ready...
Step 4: Main Connections
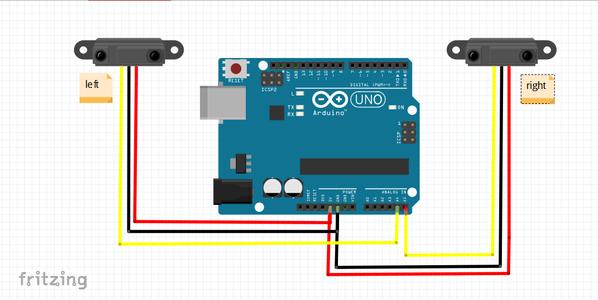
Now do the connections as per the diagram above...
Left Sensor>>Arduino:-
- Vcc>>5v
- Gnd>>Gnd
- Out>>A4
Right Sensor>>Arduino:-
- Vcc>>5v
- Gnd>>Gnd
- Out>>A5
Connect the motors to the motor shield and plug the motor shield onto the Arduino board. Connect the battery holder to the shield through a switch. That's it for the connections, let's move on to the next step...
Step 5: Arduino Code

Now its time for the main thing- coding our robot...
Download my Arduino code file or write up your own code to get done...
Code Link: https://github.com/aaravgarg/linobot
